

How to Extract Frames From a Video
To generate a consistent AI character, lock one canonical reference, reuse it in every shot, keep identity traits separate from scene changes, and choose an image-conditioned mode whenever appearance must carry over. Repeating a text description helps, but a reference image is the stronger control because it gives the model actual facial structure, hair, wardrobe, and proportions to follow.
Astorie is useful here as the working surface rather than the subject of the tutorial: the reference, model node, prompt, settings, and outputs can remain visible on one canvas. In a completed Hailuo 02 Pro image-to-video test, the reference-led result kept the woman’s face, dark outfit, workshop composition, and warm palette coherent through a short motion clip. That single result supports the workflow shown below; it is not a claim that every model or prompt will behave the same way.
How to Generate a Consistent AI Character: The Short Answer
Create one canonical reference. Use a clear portrait or full-body image that shows the features and wardrobe you need to preserve.
Write a compact identity specification. Separate fixed traits from details that may change between scenes.
Use image-to-image or image-to-video. Text-only generation is appropriate only when the model may invent a new appearance.
Change one major variable at a time. Test pose, clothing, camera, or location separately before combining them.
Compare every output with the reference. Reject drift early instead of carrying it into the next shot.
Promote only approved outputs. Reuse the canonical reference or an approved derivative, never a visibly drifted frame.
Define What Must Stay Consistent
Character consistency is not the same as making every image identical. Identity should remain recognizable while expression, action, camera angle, and environment change. Decide which details are fixed before generating.
Layer | Usually keep fixed | May change deliberately |
Identity | Face shape, eye spacing, nose, skin tone, age range, body proportions | Expression, gaze, head angle |
Hair and wardrobe | Signature silhouette, hairline, base color, key garment details | Weathering, accessories, scene-specific outerwear |
Visual world | Art direction, palette, lens language, period or brand cues | Location, time of day, shot size |
Motion | Character scale and physical rules | Action, camera move, speed |
The switch trigger is simple: move from text-only generation to a reference-first workflow as soon as a recurring character must be recognizable from one asset to the next. You gain identity control, but give up some of the model’s freedom to redesign the person on every prompt.
Choose a Reference-First Generation Mode
Mode | Best for | What you gain | Main limitation |
Text-to-image or text-to-video | Inventing the first look | Maximum freedom and fast ideation | The model can create a different person on each run |
Image-to-image | Pose, scene, or wardrobe variants | A visible identity anchor | Large edits can still change facial details or proportions |
Image-to-video | Animating an approved still | The opening composition and character are anchored | Identity can drift during strong motion, occlusion, or large camera changes |
Reference or character feature | Recurring casts and many outputs | Reusable identity conditioning where supported | Controls, limits, and availability vary by model |
A previous Kling 3.0 text-to-video test illustrates the boundary. The generated workshop scene stayed internally coherent, but the woman did not match an earlier source image because the successful run had no image reference attached. That was a mode-selection issue, not evidence that text-to-video cannot hold a character within one clip.
Step 1: Build a Canonical Reference
Choose one approved image as the identity source. A useful reference has a readable face, clean lighting, limited occlusion, and enough image area to show the wardrobe or body proportions that matter. Avoid starting with a frame dominated by motion blur, extreme perspective, heavy facial shadow, or hands covering the face.
The steampunk engineer below works as a reference because her face, hair, dark brown outfit, brass machine, and warm workshop palette are all visible. Those details create concrete anchors for the next generation.
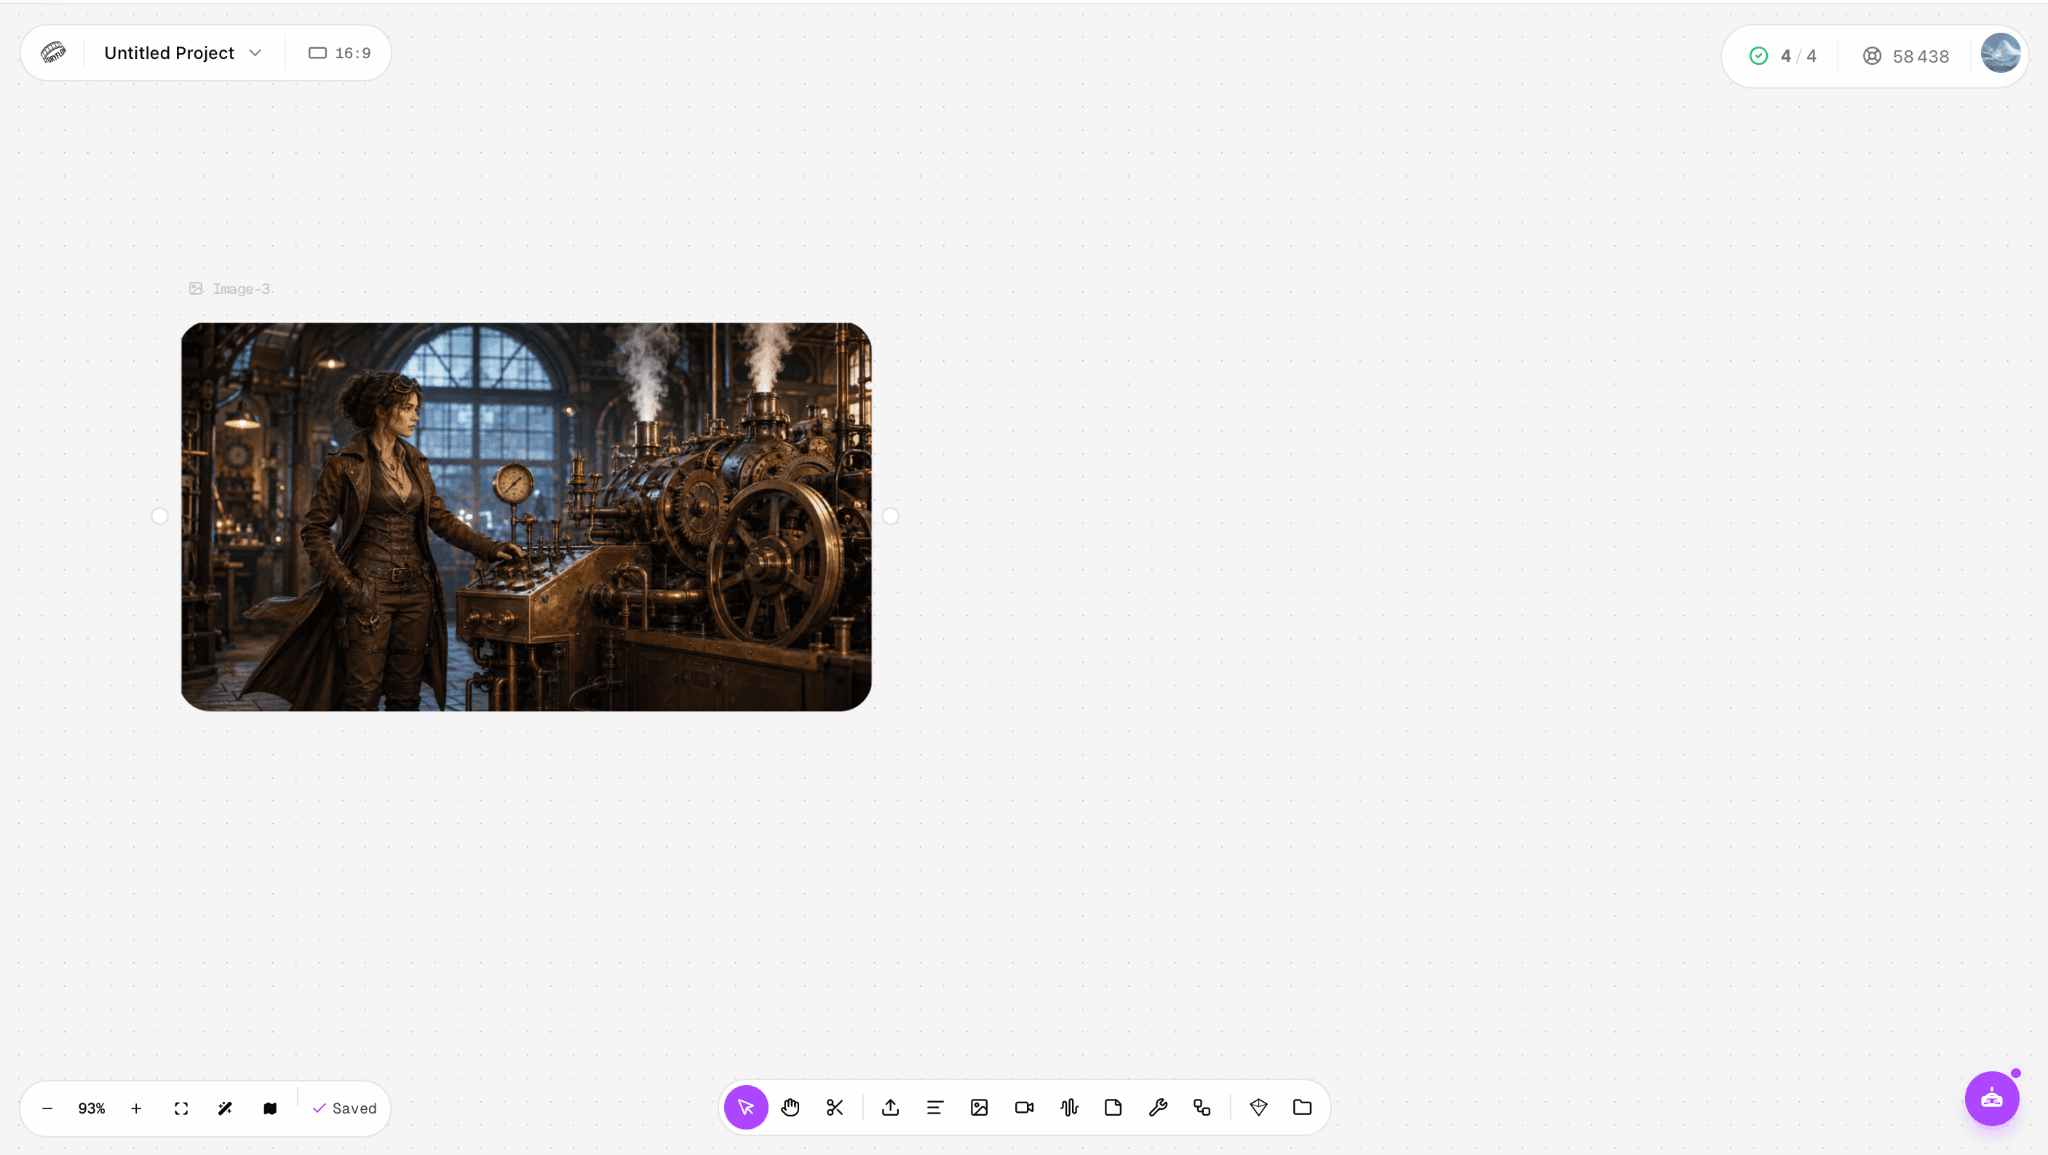
Figure 1. Canonical reference used in the existing image-to-video test: one clearly visible character, a stable outfit silhouette, and a distinctive workshop environment.
Step 2: Write an Identity Specification
Write a short, reusable specification beside the reference. Describe features that can be seen and checked. Do not rely on vague labels such as beautiful, cinematic, or distinctive.
CHARACTER LOCK |
Keep the lock compact. When every sentence repeats the same description in slightly different words, the prompt becomes harder to edit and may create conflicting instructions.
Step 3: Separate Fixed Traits From Scene Changes
Build prompts in blocks: identity, action, environment, camera, and exclusions. Reuse the identity block exactly; change the action or camera block on purpose. This makes drift easier to diagnose because you know which instruction changed.
Prompt block | Example | Editing rule |
Identity | Same face, pinned dark hair, brass goggles, dark brown workwear | Keep unchanged across the series |
Action | Reaches toward the brass controls | Change one action at a time |
Environment | Warm Victorian workshop with copper pipes | Preserve unless the scene intentionally moves |
Camera | Slow push-in, medium shot | Use modest changes before testing extreme angles |
Exclusions | No new person, no wardrobe change, no text or logo | Use only for visible failure modes |
Step 4: Connect the Reference and Check the Settings
Connect the approved image to a model mode that accepts an image input. Confirm the direction of the connection, the selected model, the duration or output count, aspect ratio, and the estimated cost before generating. A model name alone does not prove that the active mode is reference-conditioned.
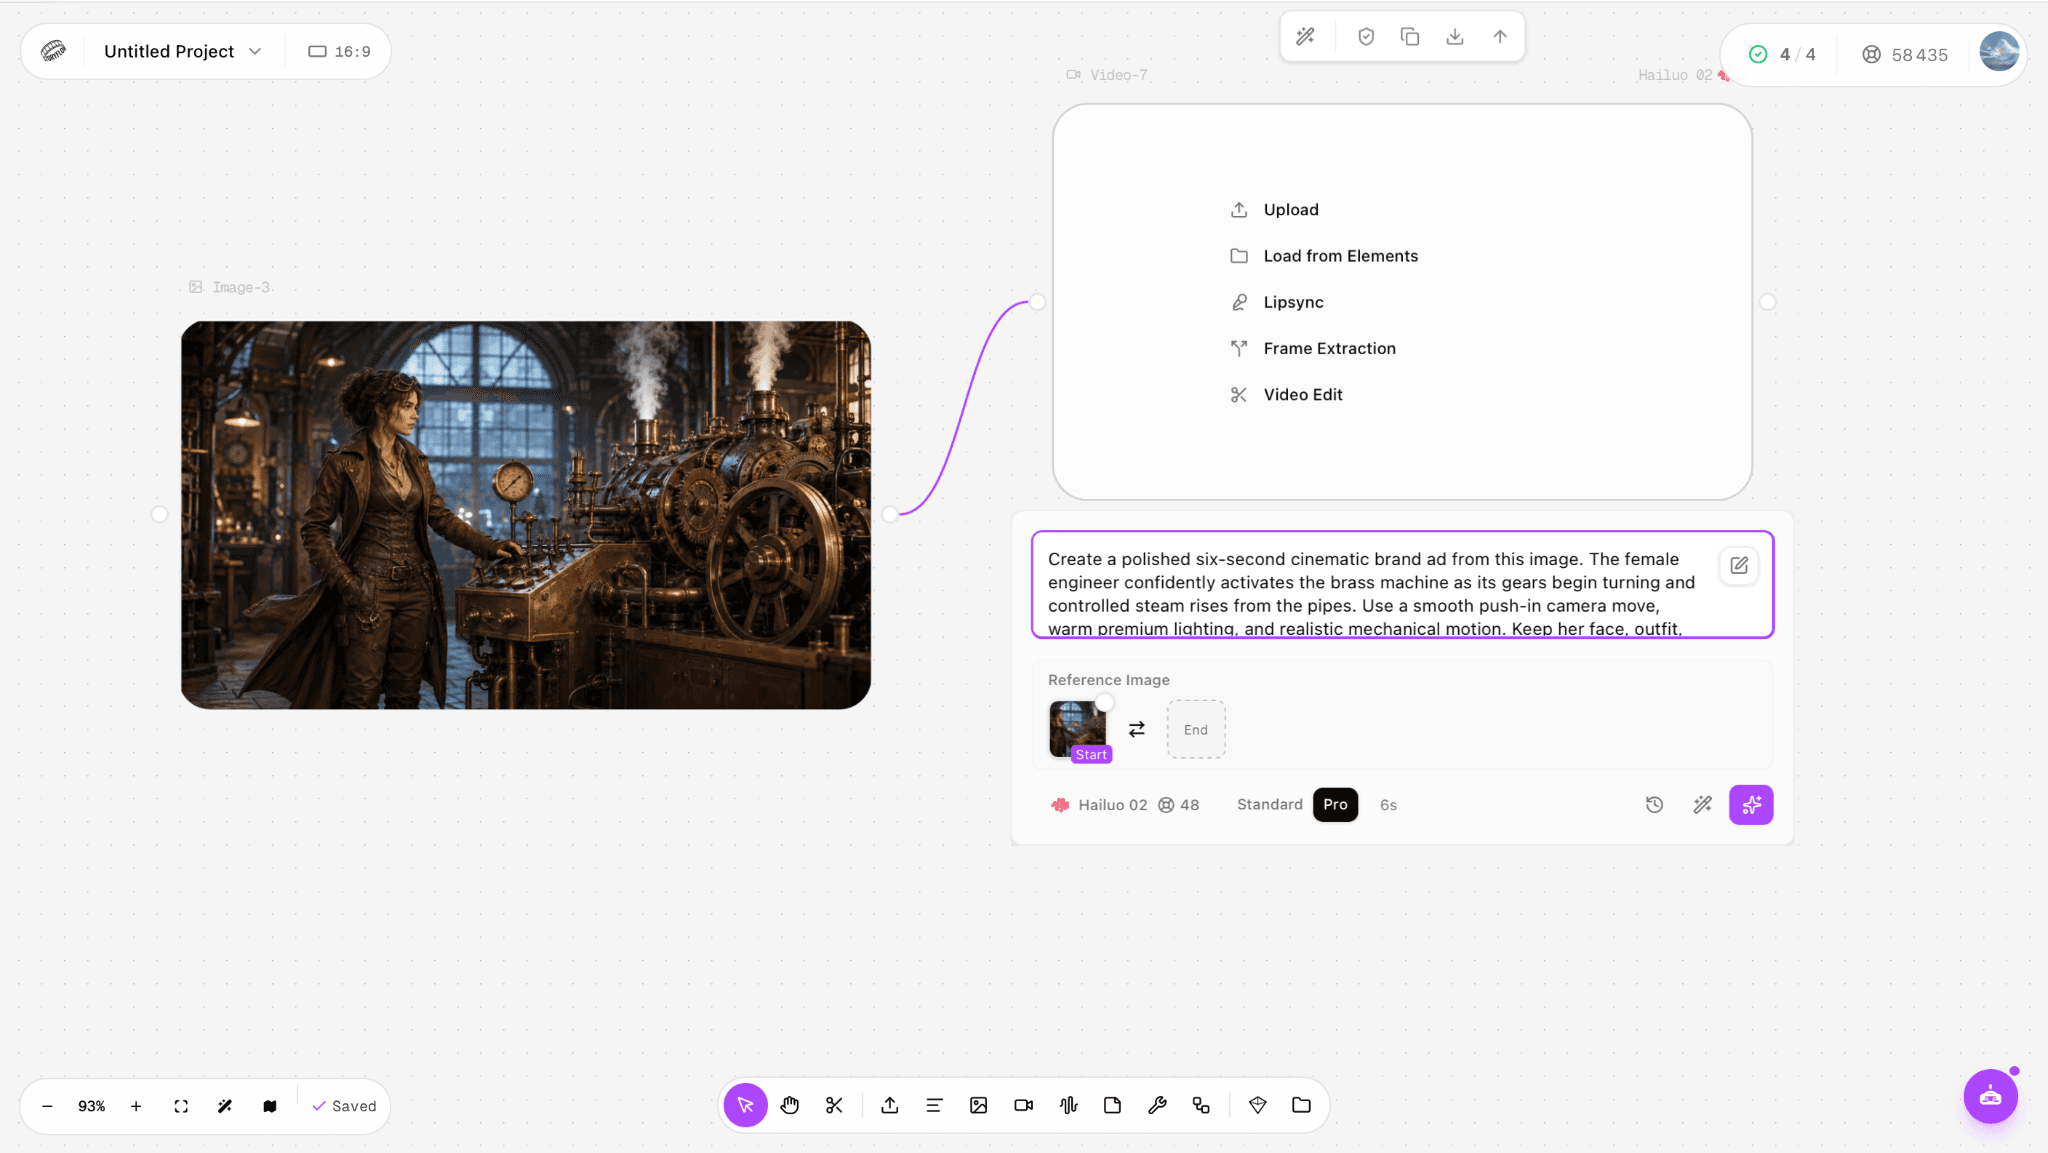
Figure 2. The reference image connected to the Hailuo 02 Pro video node in the earlier test. The interface showed a six-second duration and an estimated cost of 48 credits.
Step 5: Write a Motion Prompt That Protects Identity
Tell the model what moves, what stays fixed, and how the shot ends. Strong motion, full turns, occlusion, or a dramatic camera orbit gives the model more opportunities to redraw the face and clothing. Start with restrained movement, approve the identity, then increase complexity.
Create a polished six-second cinematic shot from this reference image. The female engineer confidently activates the brass machine as its gears begin turning and controlled steam rises from the pipes. Use a smooth push-in camera move, warm lighting, and realistic mechanical motion. Keep her face, hairstyle, dark outfit, body proportions, and the workshop consistent with the reference. No new person, wardrobe change, text, watermark, or logo. |
The prompt does not ask the model to redesign the character. It names one action, one camera move, the environment, and the identity details that should not change.
Step 6: Review the Whole Result for Drift
Watch the full clip and pause at the beginning, middle, and end. Check the face when it turns, hands when they touch objects, wardrobe edges during motion, and body proportions when the camera moves. A good opening frame is not enough if the character changes before the final second.
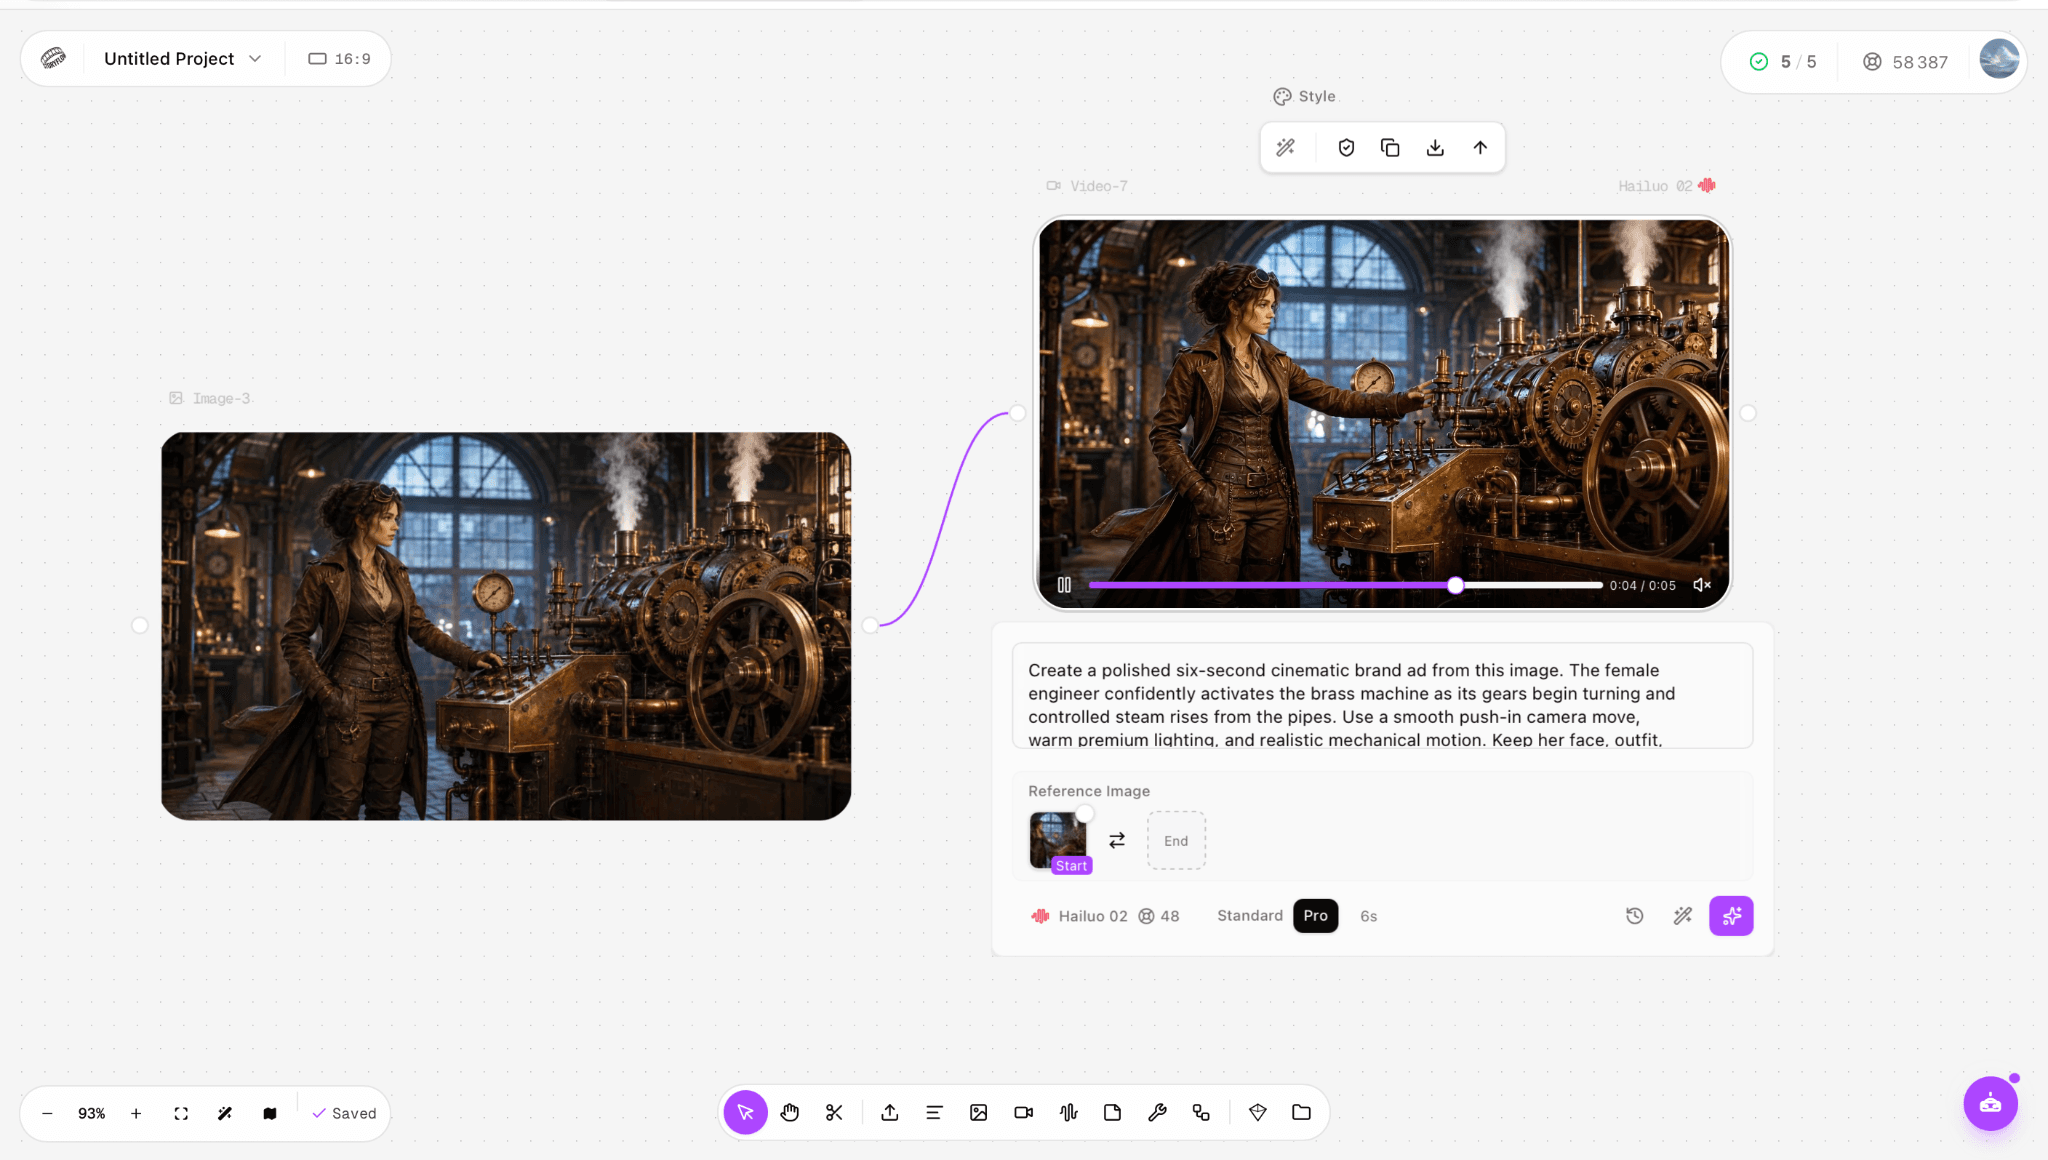
Figure 3. The completed Hailuo 02 result at about four seconds, shown beside the source image for a direct identity and environment check.
What the Existing Test Actually Shows
In this single test, the output preserved the woman’s face, dark outfit, workshop composition, and warm color palette more closely than the separate text-to-video short-film run. Her arm moved toward the controls while the machine and steam supplied background motion. The action was subtle, which reduced the number of large redraws the model had to make.
The node requested six seconds and displayed 48 credits. The downloaded file measured 1918 × 1080, 24 fps, and 5.875 seconds. Those are observations from this run, not guaranteed current defaults or universal performance claims. Model availability, controls, and credit estimates should be checked in the active node before a new generation.
Build a Multi-Shot Character Workflow
For a series, treat consistency as version control. Keep one canonical reference and a small set of approved derivatives. Every new branch should start from an approved image, not from the latest result by default. Repeatedly feeding a slightly drifted output into the next generation compounds the error.
Keep a continuity ledger. Record face, hair, wardrobe, scale, key props, palette, and the exact source image used for each shot.
Change one major variable per pass. Test a new pose before combining it with a new outfit, location, and camera angle.
Use checkpoints. Compare every approved result with the canonical reference, not only with the immediately previous frame.
Reject drift early. A visibly altered jawline, hairline, eye spacing, or signature garment should not become the next source.
Separate character from style. Identity defines the person; style defines rendering, lighting, and art direction. Keep both explicit.
Save prompts with outputs. A consistent result is difficult to reproduce when the exact model mode, prompt, ratio, and source are missing.
Prompt Template for a Consistent AI Character
Use this reference as the same recurring character. Preserve [face shape, eyes, nose, skin tone, hairline, hairstyle, body proportions, signature wardrobe]. The character [single action] in [environment]. Use [shot size] and [camera movement] with [lighting/style]. Keep [fixed props and palette] unchanged. Allow [expression or scene-specific variation]. No second person, face substitution, age change, body-shape change, or unrequested wardrobe change. |
Replace every bracketed field. Remove redundant adjectives before cutting the identity, action, camera, or fixed-detail instructions.
Common Consistency Problems and Fixes
Problem | Why it happens | What to change |
The face changes between shots | Each run starts from text or a different source | Reuse one canonical reference and an image-conditioned mode |
The outfit changes | Wardrobe is described loosely or omitted | Name the fixed garment silhouette, color, and signature details |
The character drifts during motion | Action, occlusion, or camera movement is too aggressive | Reduce motion, shorten the shot, or split it into simpler shots |
A new person appears | The scene prompt leaves subject count ambiguous | State one character and exclude additional people |
Later shots look progressively different | Each output becomes the next reference | Return to the canonical image or an approved checkpoint |
The image reference seems ignored | The active mode may be text-only or the connection is unsupported | Verify the input slot and model mode before spending credits |
Style is stable but identity is not | The prompt controls palette more strongly than facial structure | Move visible identity traits into a fixed character block and use the reference every time |
Frequently Asked Questions
Can a text prompt alone keep an AI character consistent?
A repeated prompt can keep broad traits similar, but it does not reliably lock a specific face. Use text to invent the first design, then promote one approved image to the canonical reference for later images or video.
How many reference images do I need?
Start with one clear canonical reference when the active mode accepts a single image. Add more only when the model supports them and each image clarifies identity from a useful angle. Conflicting references can reduce rather than improve control.
Should I use image-to-video or text-to-video?
Use image-to-video when the shot must start from an approved character. Use text-to-video when the model may invent the person or when internal consistency within one clip matters more than matching an existing design.
Can I change clothing and still keep the same character?
Yes, but treat wardrobe as the single major change in that pass. Keep the face, hair, proportions, camera, and environment comparatively stable, approve the result, then introduce the next variation.
Why does the character change after several generations?
Small errors accumulate when each new output becomes the next reference. Compare every branch with the canonical image and return to that source whenever the jawline, eye spacing, hairline, proportions, or signature wardrobe begins to shift.
Does one successful result prove the workflow will always work?
No. A single run shows what happened under one source, prompt, model mode, and set of controls. Keep those conditions with the output, test the next required variation, and avoid turning one result into a general performance claim.
Ready to try it on the canvas?
Open Astorie and fan your prompt across every frontier model in one workflow.