

How to Create Multi-Shot AI Videos That Actually Stay Consistent

Quick Answer
To create a multi-shot AI video, first break your story into connected shots. Create consistent character and location references, then describe the timing, framing, action, and camera movement for each shot. Generate closely connected shots together when continuity matters. Finally, review the cuts for character, location, lighting, movement, and spatial consistency.
In this guide, I use Astorie and Seedance 2.0 Omni to create a 15-second scene with three connected shots.
What Is a Multi-Shot AI Video?
A multi-shot AI video contains several camera shots within the same sequence.
A single-shot video might follow a character for 15 seconds with one continuous tracking shot. A multi-shot sequence can start with a wide shot, cut to a medium tracking shot, and end with an over-the-shoulder view.
The difficult part is not adding more cuts. Each shot still needs to feel like part of the same scene.
That means keeping several types of continuity:
- Character: The person should remain recognizable.
- Wardrobe: Clothing and accessories should not change without a reason.
- Location: The environment should remain recognizable across cuts.
- Lighting: The direction, color, and mood of the light should stay consistent.
- Spatial continuity: The character should move through the same physical space in a logical way.
- Action continuity: An action started in one shot should connect naturally to the next.
This last point is easy to miss. A character and location can look consistent while their positions inside the scene do not.
How to Create a Multi-Shot AI Video on Astorie: Step-by-Step
For this test, I created a short scene set inside a secondhand bookstore. A young woman named Lily enters after the rain, walks between the shelves, and notices an old book.
I used Seedance 2.0 Omni for the final video. For this test, I designed the story as a 15-second sequence to match Seedance 2.0's supported multi-shot output.
Step 1: Plan the Story and Shot Sequence
Start with the story before writing the video prompt.
My original idea was longer. Lily would enter the bookstore, find an old book, discover a faded photograph, and look toward a rainy window.
For this test, I reduced the story to one 15-second sequence. This made it easier to judge continuity without adding too many actions.
Shot | Time | Framing | Action |
Shot 1 | 0–5s | Wide | Lily enters the bookstore |
Shot 2 | 5–10s | Medium tracking | Lily walks between the shelves |
Shot 3 | 10–15s | Over-the-shoulder | Lily notices an old book |
The three shots form one continuous action. Lily enters the space, moves deeper into it, and stops at a bookshelf.
This matters when planning a multi-shot video. Do not choose camera angles at random. Each cut should move the story forward or reveal something new.

Step 2: Create and Save Character and Location References
Next, I created two reference images with GPT Image 2.5.
The first image defined Lily. She has the same face, hairstyle, dark green coat, and black trousers that I wanted to keep throughout the sequence.
I saved this image as an Element called Lily.

The second image established the bookstore. It showed a quiet secondhand bookshop with tall shelves, warm interior light, and soft daylight coming through the windows.
I saved this image as another Element called bookstore.
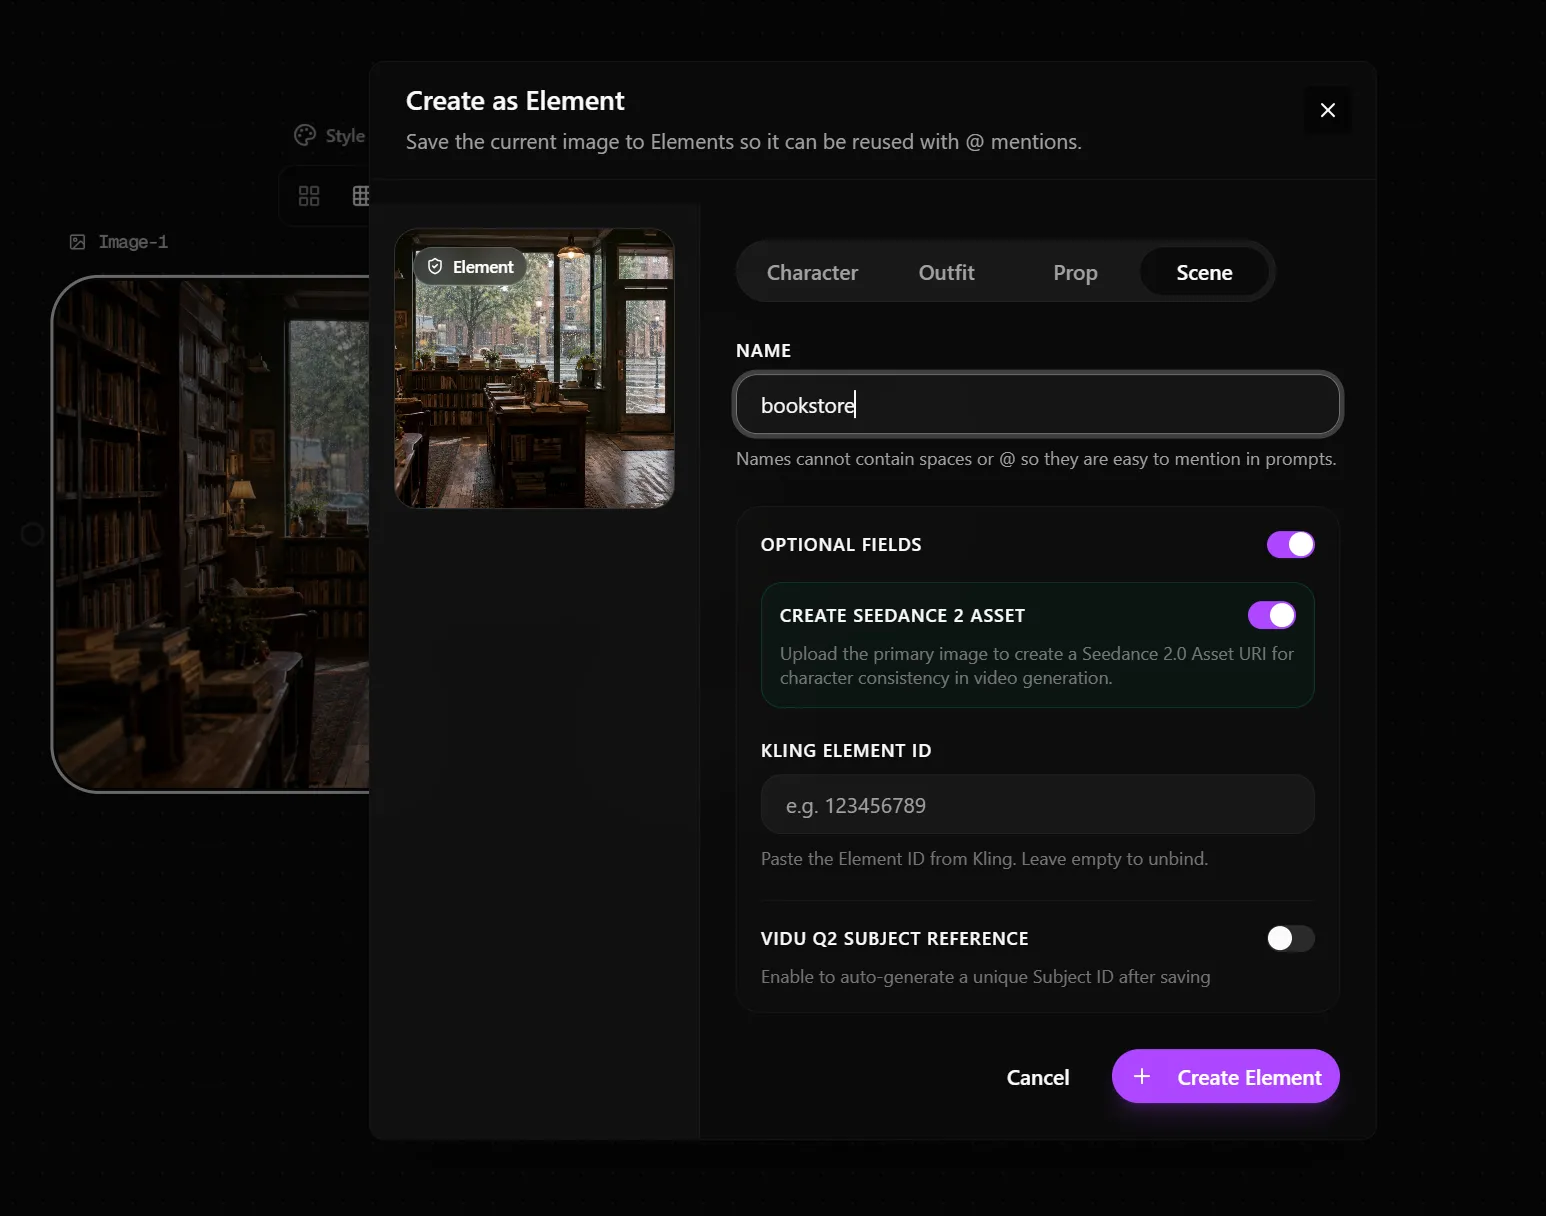
These Elements give the video model a visual reference for what should stay consistent. They are more useful than describing the same character and location from scratch in every prompt.
However, references do not solve every continuity problem. I found this out when I tested the shots separately, which I will cover later.
Step 3: Write a Structured Multi-Shot Prompt
Instead of writing one long paragraph, I divided the prompt into three timed shots.
Here is the prompt structure I used:
Create a 15-second cinematic sequence featuring Lily inside the bookstore, using the provided Lily and bookstore references. Keep Lily's face, hairstyle, dark green coat, clothing, and the bookstore environment consistent throughout all shots.
Shot 1 — 0–5s: Wide establishing shot. Lily opens the bookstore door and quietly steps inside from the rainy street. She pauses briefly as the door closes behind her. The camera makes a subtle slow push-in.
Shot 2 — 5–10s: Cut to a medium tracking shot. Lily walks slowly between the bookshelves, quietly looking at the books as she passes. The camera tracks gently alongside her at a steady pace.
Shot 3 — 10–15s: Cut to an over-the-shoulder shot from behind Lily. She slows down beside a bookshelf, notices an old worn book on the shelf, and gently reaches toward it. End before she removes the book.
Maintain the same late-afternoon lighting, rainy atmosphere, muted color palette, soft shadows, and subtle film grain across all three shots. Quiet, intimate, slightly nostalgic independent-film mood. Natural restrained movement. Use clear cinematic cuts between the three shots. No additional shots, no dialogue, no text.
This structure separates two kinds of instructions.
The individual shot blocks tell the model what should change: framing, action, timing, and camera movement.
The final instructions tell it what should stay the same: character, location, lighting, color, and mood.
Step 4: Generate the Full 15-Second Sequence
I connected the Lily and bookstore Elements to Seedance 2.0 Omni and generated the three shots as one 15-second sequence.
I chose one generation instead of creating three separate five-second clips. This gave the model the full sequence at once.
Seedance 2.0 is designed for this type of workflow. It supports text, image, audio, and video references, and it can use text-based storyboards to guide a sequence.
In my result, the video moved from the wide entrance shot into the tracking shot and then into the over-the-shoulder shot. More importantly, Lily's movement through the bookstore felt connected.

Do not judge a multi-shot result only by how good each frame looks. Watch the transitions and ask whether the shots make sense together.
Step 5: Check Continuity Across the Shots
I reviewed the finished sequence using six checks.
Check | What to look for |
Character | Does Lily remain recognizable after each cut? |
Wardrobe | Does her dark green coat stay the same? |
Location | Does the bookstore remain visually consistent? |
Lighting | Does the late-afternoon rainy look continue? |
Spatial continuity | Does Lily move logically through the bookstore? |
Action continuity | Does each action lead naturally into the next? |
Spatial continuity deserves special attention.
For example, if Shot 1 shows Lily entering with a bookshelf on her right, Shot 2 should not suddenly place her in a completely different part of the store without explaining how she got there.
A video can pass the character consistency check and still fail this spatial check.
Step 6: Extend or Export the Video
A 15-second sequence does not have to be the entire video.
If I wanted to continue the bookstore story, I could make a second sequence:
Sequence 1: Enter bookstore → walk between shelves → notice book
Sequence 2: Pull out book → open it → discover photograph
The sequences can then be arranged on a timeline and trimmed before export.
This is a useful way to approach longer AI videos. Instead of treating every camera shot as a separate project, group closely connected shots into short sequences. Start a new sequence when the story reaches a natural break.
Should You Generate AI Video Shots Together or Separately?
I tested both approaches while making this video.
The difference was more noticeable than I expected.
What Happened When I Generated the Shots Separately?
I first tried generating the shots as individual clips.
For example, Shot 1 showed Lily entering the bookstore. I then generated Shot 2 separately, using the same Lily and bookstore Elements.
The references helped. Lily still looked like the same character, and the bookstore had a similar visual style.
But the spatial relationship was weaker.
In Shot 2, Lily walked through a section of bookshelves that did not match the space established in Shot 1. The model understood what Lily looked like and what the bookstore looked like. It did not fully understand where Lily had just been inside that bookstore.
This showed me an important limitation of reference-based consistency:
Visual identity is not the same as spatial continuity.
A location reference can tell the model what a bookstore should look like. It does not always tell a new generation where the character stood at the end of the previous clip.
What Happened When I Generated All Three Shots Together?
I then put the wide shot, tracking shot, and over-the-shoulder shot into one 15-second prompt.
The result felt more connected.
Shot 2 could follow the position and movement established in Shot 1 because both belonged to the same generation. The move toward the bookshelf also gave Shot 3 a clearer relationship to the previous action.
This does not mean you should always generate every shot together. The better choice depends on the scene.
Situation | Better starting point |
Same character, location, and continuous action | Generate the shots together |
Major location or time change | Start a new sequence |
One shot needs precise independent control | Generate it separately |
Longer story | Build several short multi-shot sequences |
For short scenes with continuous movement, I would start with a single multi-shot generation. Separate clips are still useful when a shot needs more control or the story moves to a new place.
How to Keep Characters and Scenes Consistent Across AI Video Shots
Good continuity starts before video generation.
First, use the same character reference whenever the same person appears. This gives the model a stable visual target for the face, hair, clothing, and overall appearance.
Do the same for important locations. A location reference helps preserve the architecture, color palette, furniture, and general visual identity of the scene.
Keep shared visual instructions stable too. If the first shot uses soft late-afternoon light and muted colors, do not rewrite the next shot as bright midday footage unless the story calls for that change.
For connected actions, think about space as well as appearance. A model needs to understand not only who is in the scene, but also where they are going.
This is why generating connected shots together worked better in my bookstore test. The shared generation gave the later shots more context about Lily's movement through the scene.
For a longer story, create a new sequence at a natural break. A change in location, time, or major action is often a good place to start again.
Which AI Models Can Generate Multi-Shot Videos?
Seedance 2.0 supports high-quality multi-shot audio-video generation up to 15 seconds. It accepts text, image, audio, and video inputs and can use multiple references to guide characters, scenes, camera movement, and other elements. For the hands-on workflow in this guide, I used the Seedance 2.0 Omni node available on Astorie.
Kling Pro 3.0 is another option for multi-shot workflows. Runway's current Multi-Shot Video app uses Kling Pro 3.0 to create a single video with up to five connected shots. Its Custom mode lets you define each shot before generation.
Newer models may support longer sequences. For example, ByteDance now lists Seedance 2.5 as a video model designed for 30-second storytelling. However, this tutorial focuses on Seedance 2.0 because that is the model used in my hands-on test.
Multi-Shot AI Video Prompt Template
You can use this structure as a starting point for other multi-shot scenes:
The shot blocks describe what changes from one cut to the next. The shared
Create a [duration]-second cinematic multi-shot sequence.
Use [character reference] as the main character.
Use [location reference] as the environment.
Keep the character, wardrobe, location, and lighting
consistent throughout the sequence.
Shot 1 — [time]:
[Framing]. [Character action].
[Camera movement].
Shot 2 — [time]:
[Framing]. [Character action].
[Camera movement].
Shot 3 — [time]:
[Framing]. [Character action].
[Camera movement].
Maintain the same [lighting], [color palette], and
[visual style] across all shots.
[Overall mood].
Use clear cuts between shots.
Do not add extra shots.instructions define what should remain stable.
Keep each shot simple. One clear action is usually easier to control than several actions packed into a few seconds.
Multi-Shot AI Video FAQs
What is a multi-shot AI video?
A multi-shot AI video contains several camera shots or angles within one sequence. For example, it might move from a wide establishing shot to a close-up and then to a reverse angle.
The shots should still share enough visual and narrative continuity to feel like one scene.
How do you keep the same character across AI video shots?
Use the same character reference across the sequence. Keep major identity details such as face, hairstyle, clothing, and accessories stable in the prompt.
For closely connected shots, generating them together can also help because the model has more context from the earlier parts of the sequence.
Should you generate AI video shots separately or together?
It depends on the scene.
In my test, generating three connected bookstore shots together produced better spatial continuity than generating them separately. The separate clips kept the character and location recognizable, but the position of the bookshelves and Lily's movement did not connect as well.
For continuous action in the same location, generating together is a strong starting point. Separate generation gives you more control when one shot needs special treatment.
How do you make a multi-shot AI video longer than 15 seconds?
Break the story into several short multi-shot sequences.
Each sequence should cover a connected part of the action. You can then place the sequences on a timeline, trim the transitions, and export the finished video.
This gives you more control than trying to generate an entire long story at once while still preserving continuity inside each scene.
Ready to try it on the canvas?
Open Astorie and fan your prompt across every frontier model in one workflow.