
Nano Banana 2 Workflow: How I Built a Consistent Post-Apocalyptic RPG Art Pack
See how I used Nano Banana 2 to build a consistent post-apocalyptic RPG art pack by separating world rules, reusable visual references, and temporary canvas operations.
Key takeaways
Treat character consistency and world consistency as separate problems instead of trying to control both with the same references.
A fixed art-direction block helped keep palette, materials, atmosphere, and rendering language stable across different assets.
Save approved designs as reusable references when their visual identity needs to survive across later generations.
Temporary transformations do not need to become permanent assets; they can stay connected inside the node graph.
The most useful framework was three layers: project-level world rules, asset-level reusable references, and workflow-level temporary operations.
Quick Answer
To build a consistent multi-image project with Nano Banana 2, I found it useful to separate character consistency from world consistency.
For this test, I created a small visual-development pack for a fictional post-apocalyptic RPG called Ashfall Relay. It included a hero character, a turnaround sheet, a weapon, a style frame, a save point, a ruined city, a boss, and a boss encounter.
The key was treating consistency as three connected layers:
Consistency layer | What I used |
Project-level consistency | A fixed art-direction block for palette, materials, atmosphere, and rendering language |
Asset-level consistency | Approved reusable references for the hero, boss, and other important designs |
Workflow-level control | Elements for reusable assets, temporary node outputs for one-off transformations, and Groups for organization |
A fixed art-direction block helped keep the palette, materials, atmosphere, and rendering language consistent across the project. Approved references helped preserve specific designs.
The main lesson was not to write more prompts. It was to decide what belonged to the whole world, what needed a reusable visual reference, and what only needed to survive one branch of the workflow.
What I Wanted to Solve With This Nano Banana Workflow
Generating one strong image is not the difficult part of an AI art workflow.
The harder problem starts when one project needs a character, environments, props, enemies, and key art that still feel connected.
For this test, I imagined a fictional post-apocalyptic RPG called Ashfall Relay.
The world is covered in drifting ash and ruined infrastructure. Old relay stations remain scattered across abandoned cities. The main character is a relay hunter who travels between these systems.
I wanted to create a small visual-development pack, not production-ready game assets. The set included a main character, a weapon, a style frame, a save point, a city environment, a boss, and a boss encounter.
The questions I wanted the workflow to answer were more useful than simply asking whether Nano Banana could make each image:
- Can the same character remain recognizable across different assets?
- Does a character sheet become useful after generation?
- How can unrelated subjects still look like they belong to the same game?
- Which images should become permanent references?
- When is it better to reuse an approved subject instead of generating it again?
Those questions shaped the workflow.
A Fixed Art-Direction Block Gave Every Prompt the Same Starting Point
I did not rewrite the game world from scratch for every image.
Instead, I kept one art-direction block and reused it across character, environment, weapon, and boss prompts.
My core visual language included:
A dusty, melancholic world of urban ruins, ash-filled air, retro-futuristic relay technology, worn metal, cracked concrete, torn fabric, and scavenged survival gear. Muted earth tones with faded teal and rust-orange accents. Painterly but detailed concept art, cinematic lighting, grounded design, readable silhouettes, and cohesive worldbuilding.
I then changed only the asset-specific instructions.
A city prompt added collapsed overpasses and abandoned buildings. The save point introduced a glowing relay structure and temporary shelter. The boss added corrupted machinery, cables, armor, and warning lights.
I did not run a separate A/B test without this block, so I would not treat it as proof that one prompt structure always produces better consistency.
What it did give me was a practical way to keep the palette, materials, atmosphere, and rendering language stable across prompts.
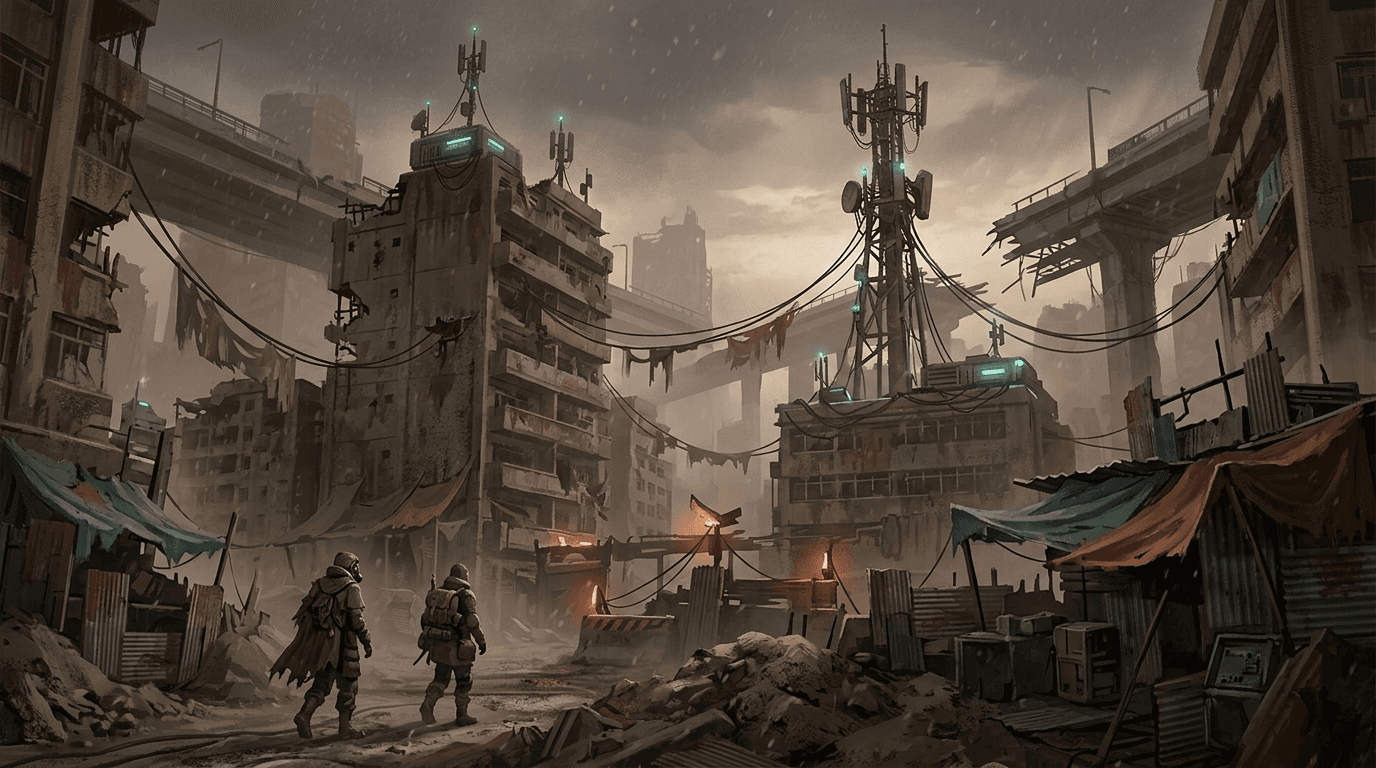
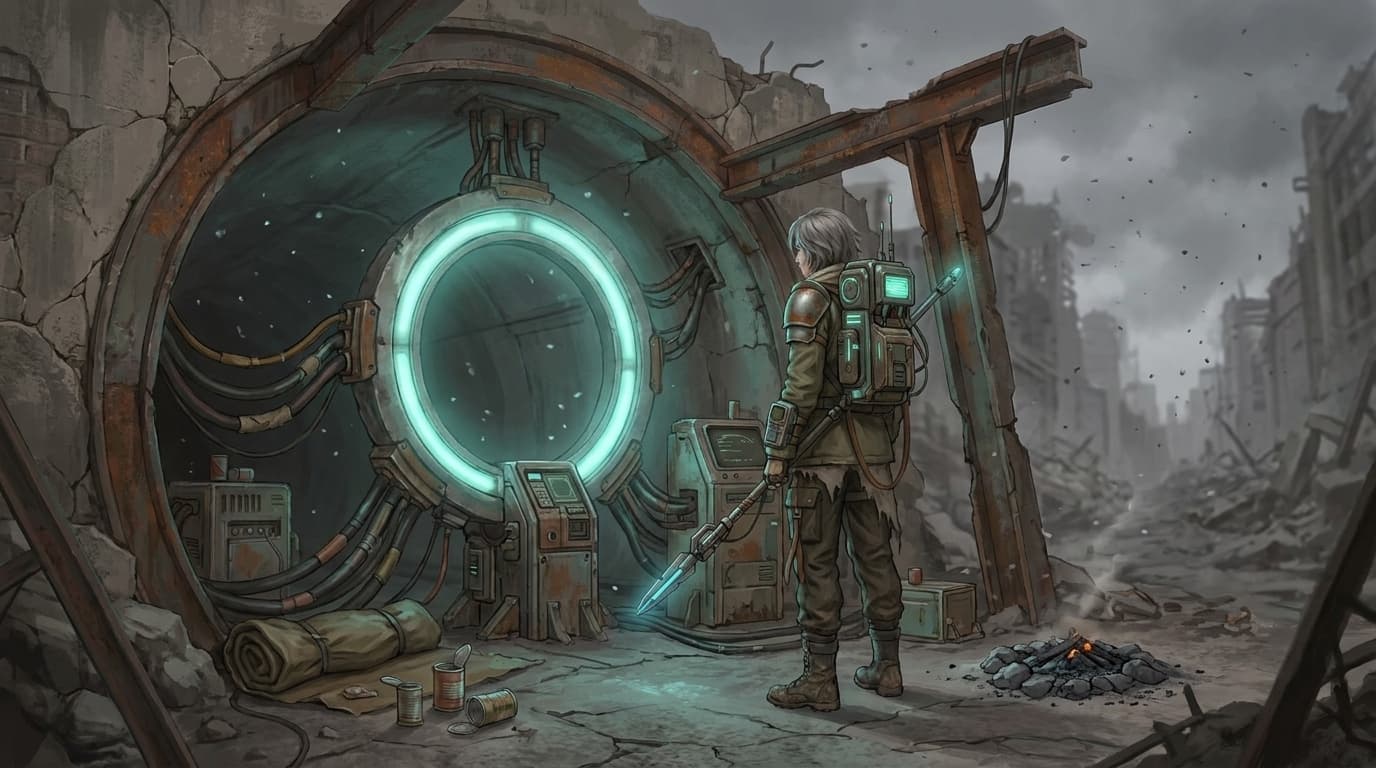
This became the first layer of the project:
Different subjects could change. The rules of the world stayed the same.
An Approved Hero Became the Character Anchor
The character needed a different type of consistency.
Text alone could describe her short ash-brown hair, faded olive jacket, off-white scarf, asymmetrical shoulder pad, and teal-lit relay backpack. But once I had an image I actually liked, I no longer wanted the model to reinterpret those details from scratch.
I saved the approved full-body concept as:
@Ashfall_Hero_Master
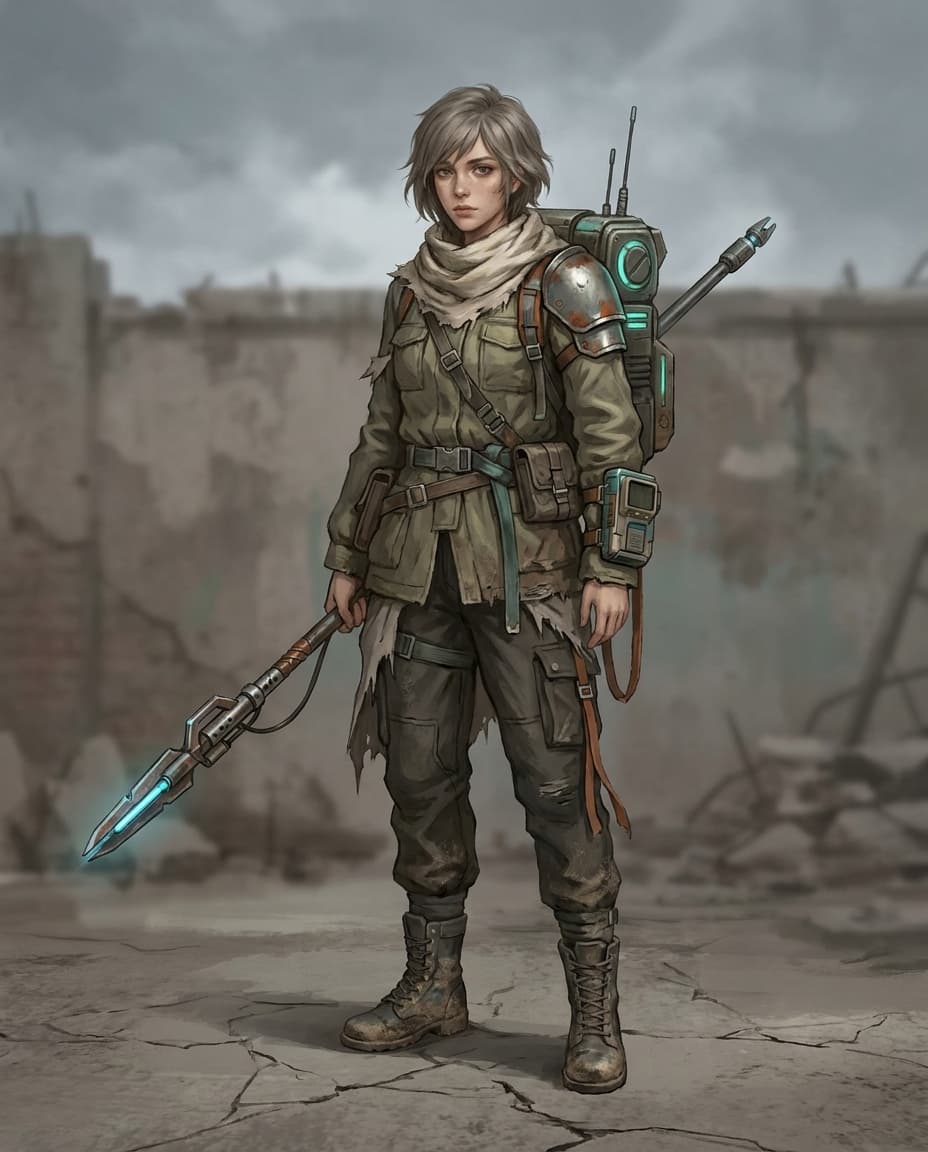
From that point on, the character image became the main identity reference.
This changed the role of the prompt. Instead of asking Nano Banana to invent the character again, I could ask it to place or reinterpret the approved character in a new context.
That distinction mattered.
World consistency came from repeated rules. Character identity came from an approved visual reference.
The Turnaround Sheet Became One Branch of a Larger Reference System
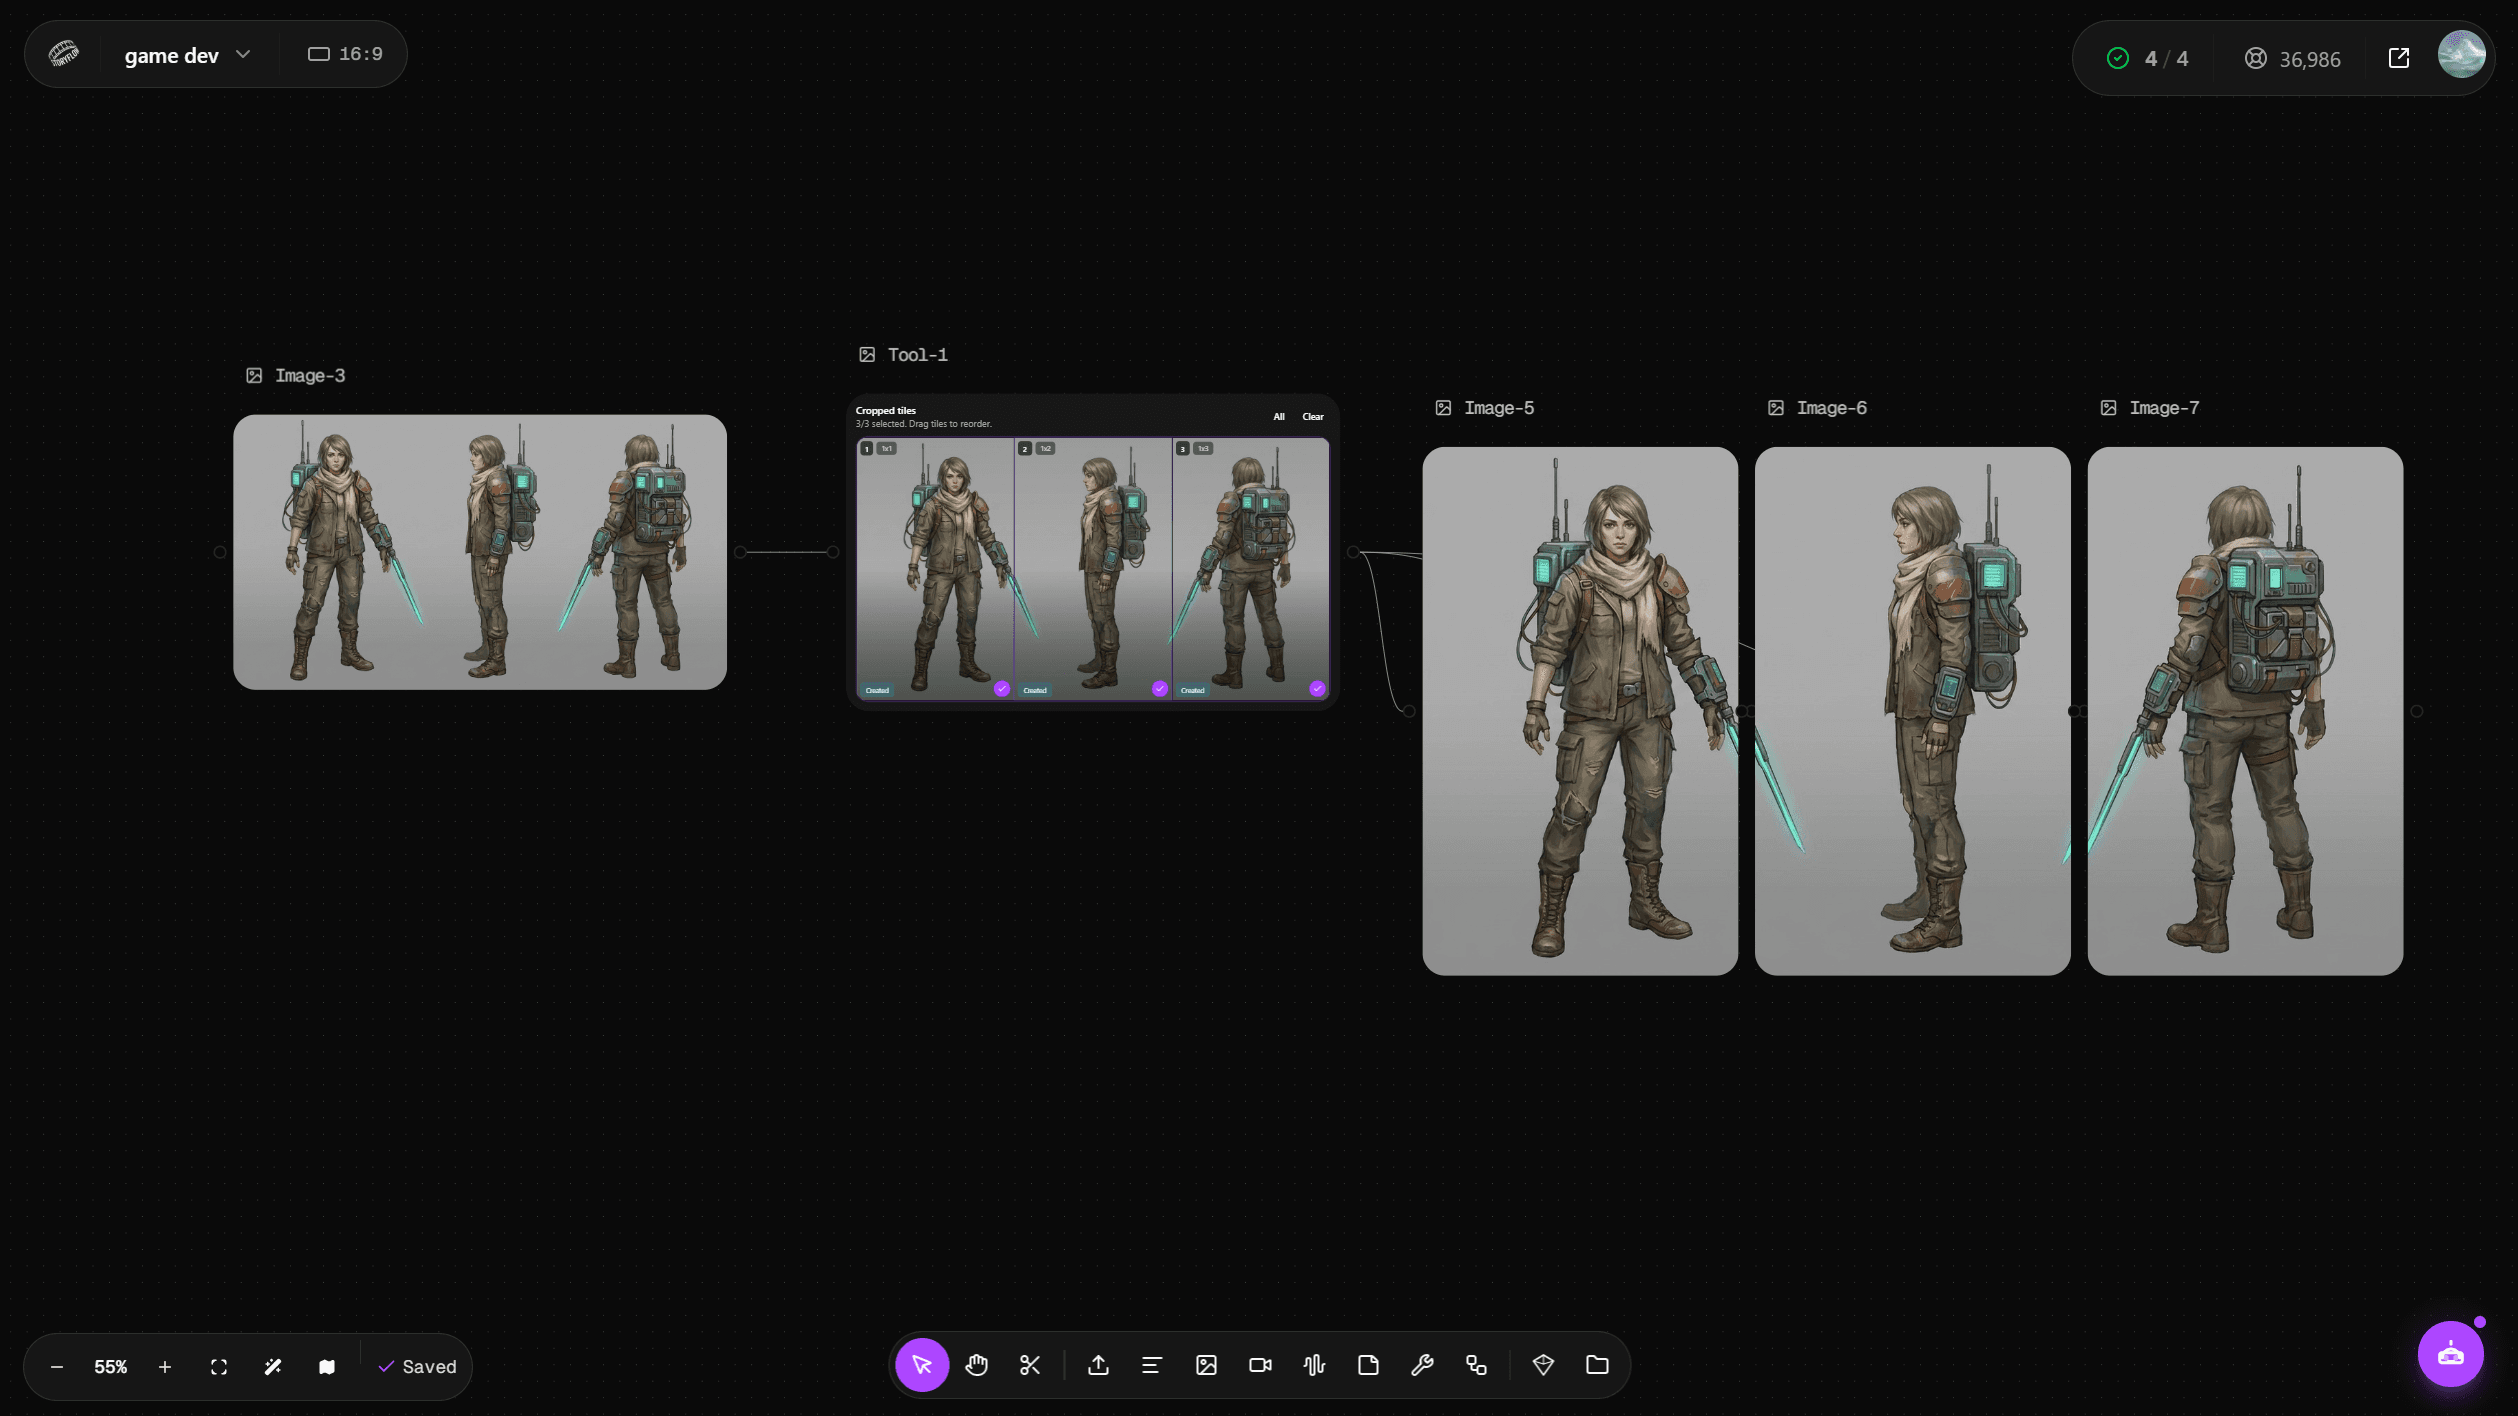
I then used @Ashfall_Hero_Master to generate a turnaround sheet with front, profile, and back views.
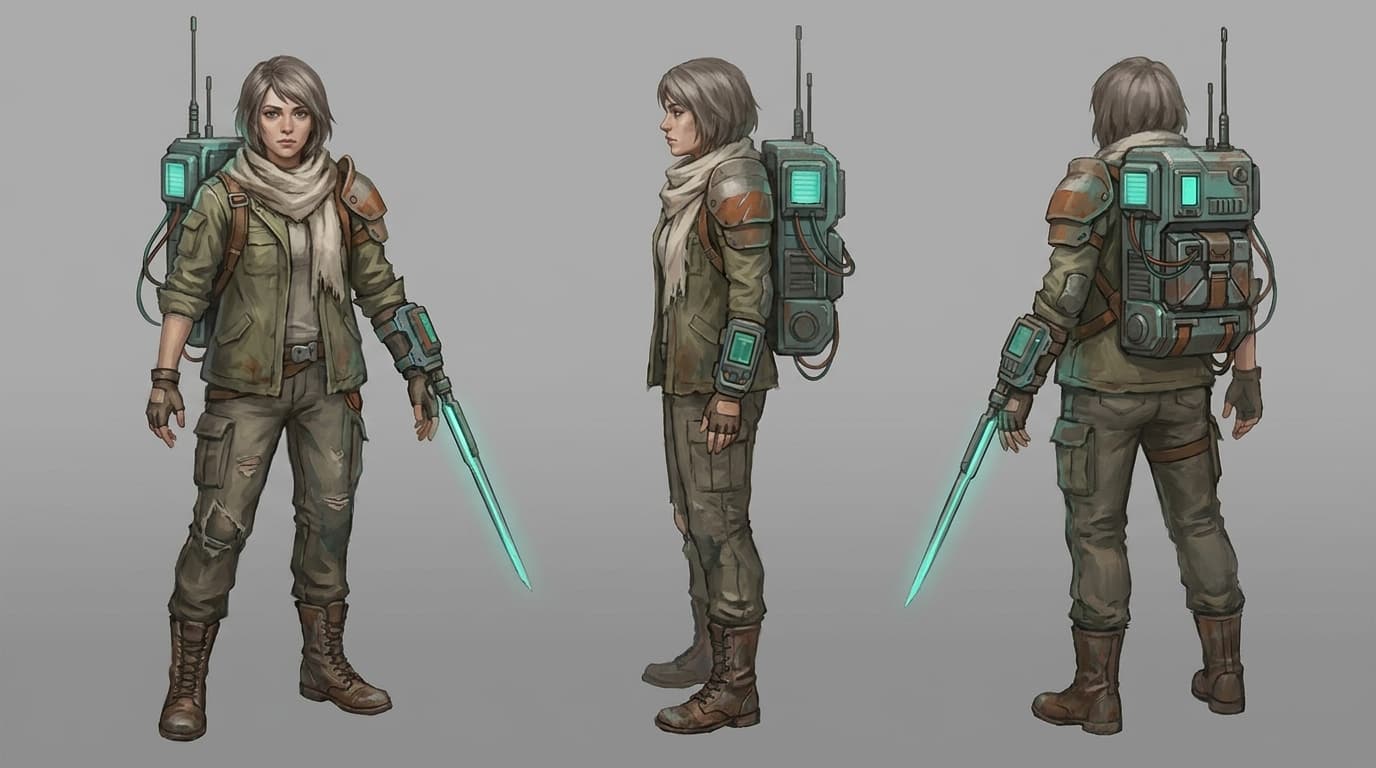
I connected that sheet to Grid Crop and separated the three views.
The cropped images could then be saved as individual Elements:
@Ashfall_Hero_Front
@Ashfall_Hero_Profile
@Ashfall_Hero_Back
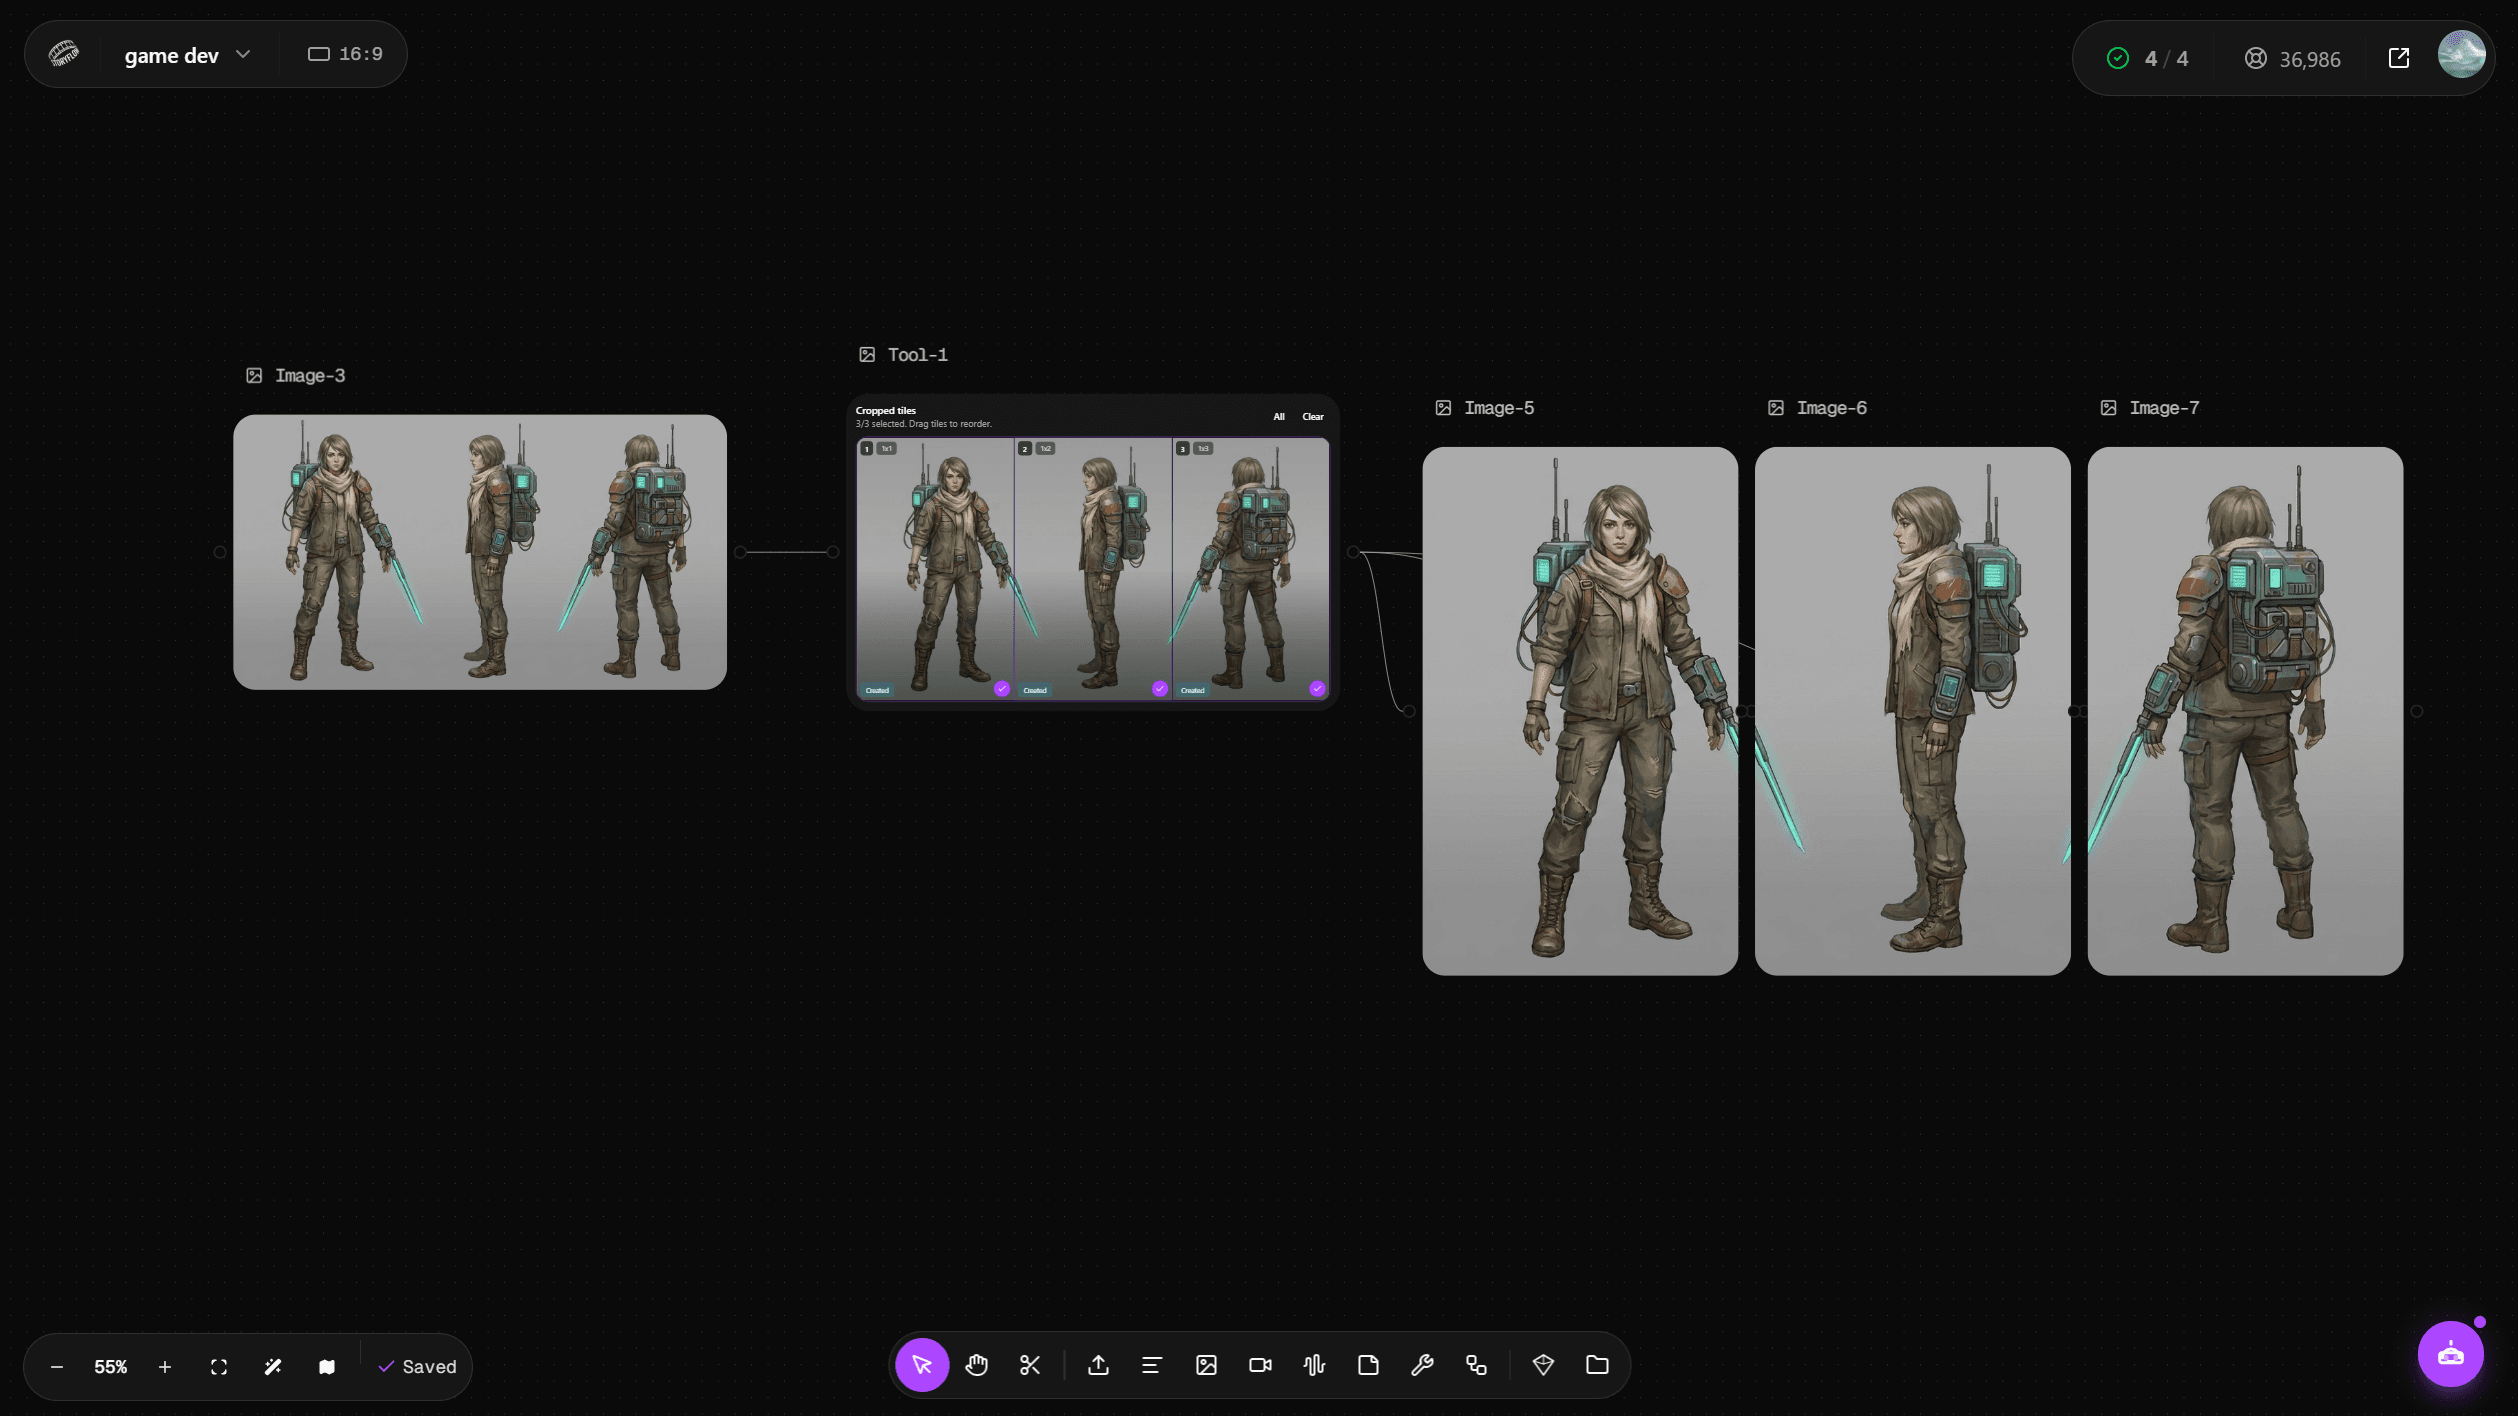
Turnaround → Grid Crop → Front / Profile / Back Elements
I did not need to turn this section into a full character-design workflow. The important point for this project was simpler:
the character branch created reusable references for the rest of the game-art system.
The turnaround was not valuable because it looked like a professional character sheet. It was valuable because its parts could support later generations.
Not Every Image Needed to Become an Element
As the project grew, I found it useful to separate permanent visual identity from temporary transformations.
Approved designs made sense as Elements because I expected to use them again.
That included the hero master, cropped character views, and later the approved boss design.
Intermediate tool outputs were different.
For example, I used Background Removal on an approved character image when I wanted to keep that figure but move her into another environment.
The isolated result could not be saved as an Element in my current workflow. That was not a problem. I connected the Background Removal output directly into the next image node and used it as the subject reference.
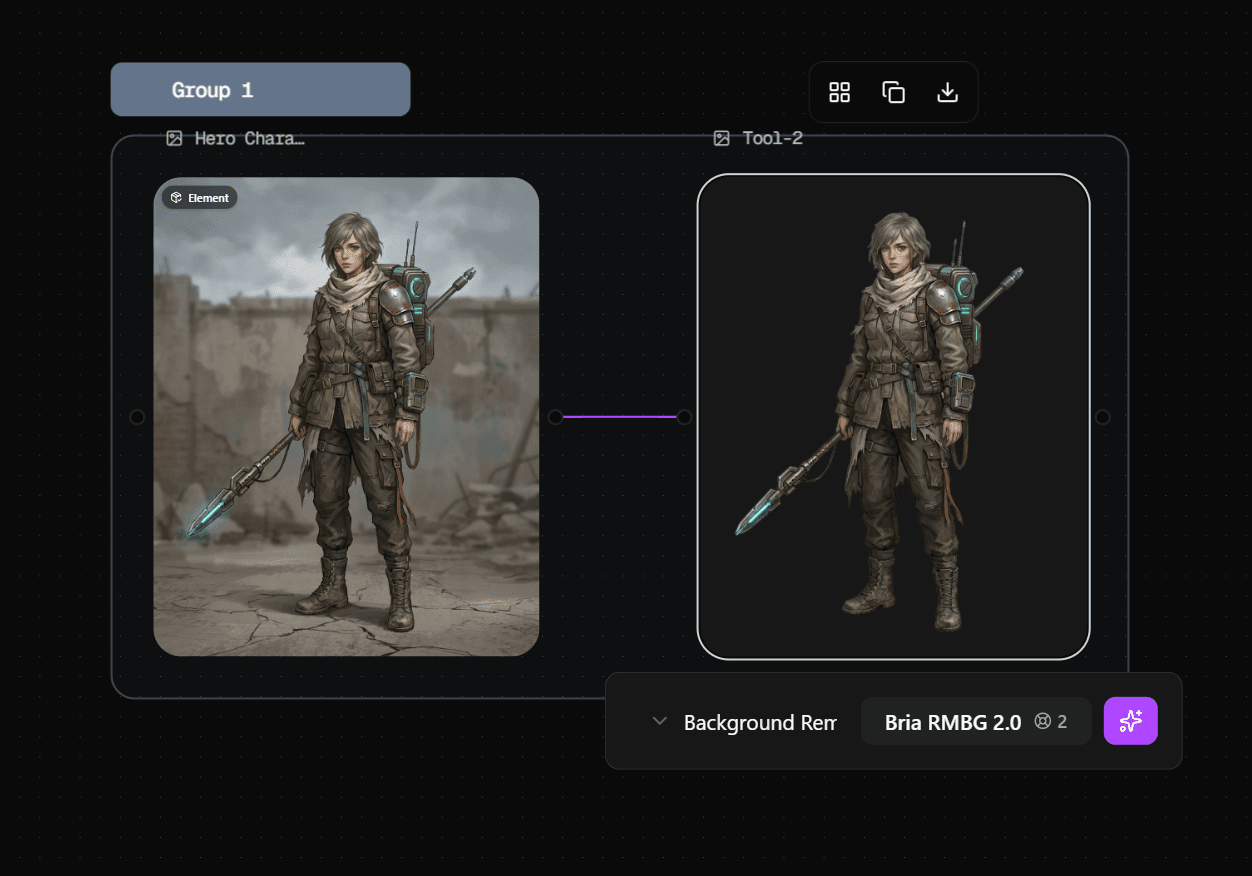
Approved character → Background Removal → New image node
This created a distinction that became more useful than simply saving everything:
Reusable design identity belongs in Elements. Temporary transformations can stay in the node graph.
The background-removed character was a good example.
The character was already right. I did not need a new permanent identity asset. I only needed that specific version to survive long enough to enter the next scene.
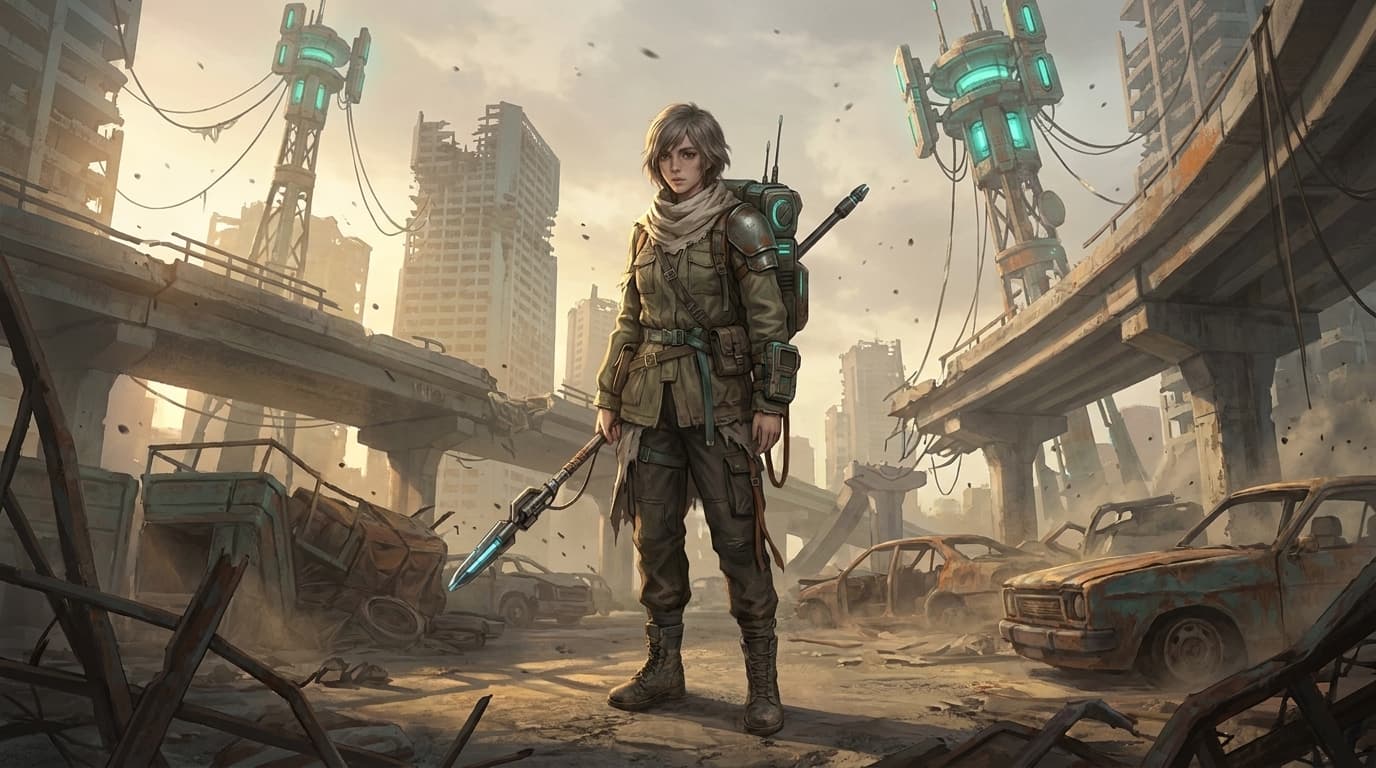
The new city still needed its own lighting, shadows, and atmosphere. But I did not have to ask the model to reconstruct the character from zero.
That kept Background Removal in its proper role here: not as another photo-editing technique, but as a way to pass an approved subject between parts of a larger workflow.
Character Consistency and World Consistency Needed Different Strategies
This became the clearest lesson from the project.
A main character, a ruined city, a save point, and a giant boss should not look alike.
They should look like they belong to the same universe.
That means identity consistency and style consistency need different controls.
For the character, I relied on approved visual references:
- the hero master
- turnaround crops
- reused subject images
For the world, I relied on repeated design rules:
- muted earth tones
- faded teal relay lights
- rust-orange warning accents
- worn industrial metal
- cracked concrete
- drifting ash
- painterly concept-art rendering
- melancholic lighting
The boss made this distinction especially clear.
It had a very different silhouette from the protagonist. It mixed corrupted machinery with organic forms, broken antennas, exposed cables, rusted plating, and glowing relay structures.
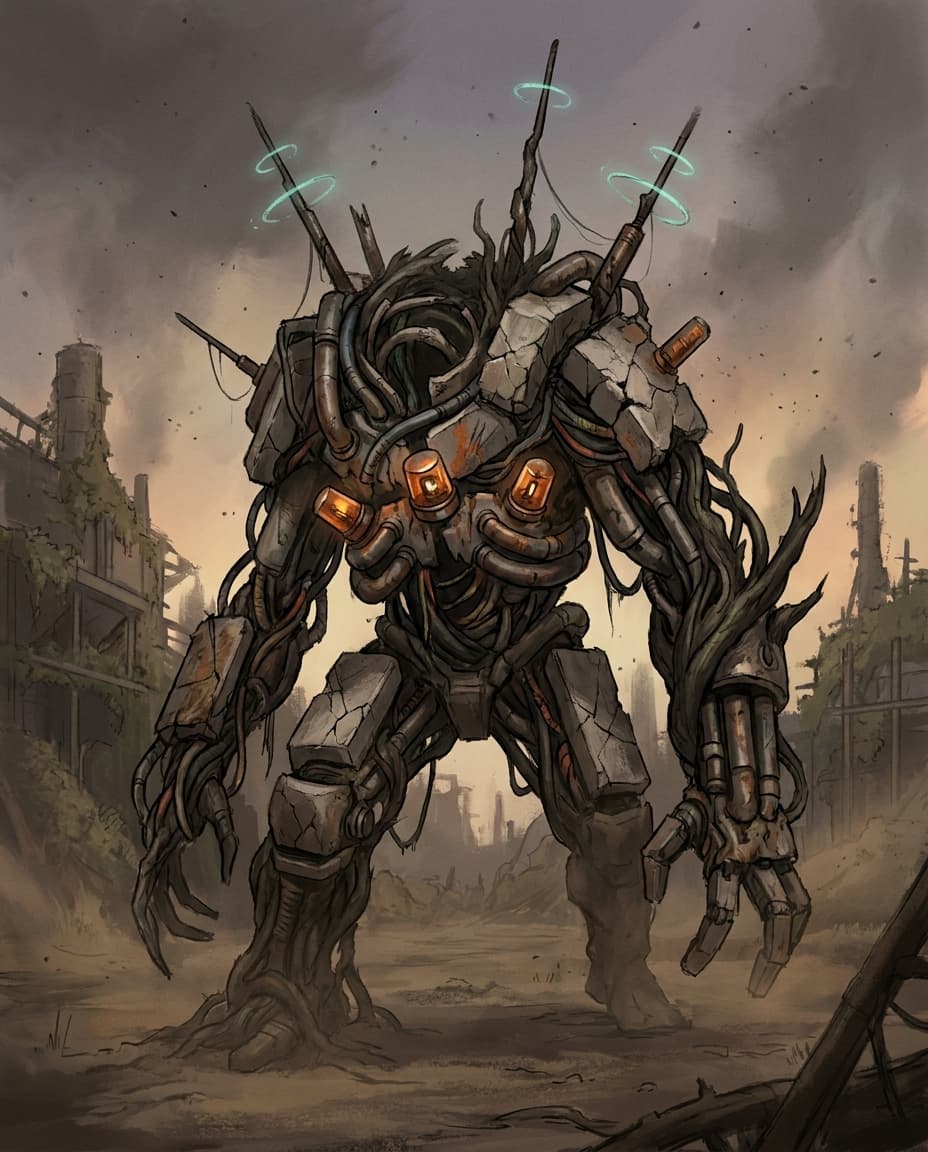
Nothing about the boss needed to resemble the hero.
But its materials, accent colors, technology, and atmosphere still placed it inside Ashfall Relay.
The goal was not visual sameness. It was visual belonging.
How I Checked Consistency Across the Art Pack
I did not judge consistency by asking whether every image looked similar.
I checked whether recurring identities stayed recognizable and whether different assets continued to follow the same world rules.
Consistency layer | What I checked |
Character identity | Hair, jacket, scarf, backpack, proportions, and recurring equipment |
World palette | Muted earth tones, faded teal, and rust-orange accents |
Materials | Worn metal, cracked concrete, fabric, and scavenged technology |
Technology language | Relay lights, antennas, cables, and industrial forms |
Rendering style | Painterly concept art, grounded silhouettes, and cinematic lighting |
Asset identity | Approved hero and boss designs retained their defining features when reused |
This was a more useful QA standard than asking whether the images simply “felt consistent.”
A city, a boss, and a character can look very different while still passing the same world-level checks.
At the same time, a recurring character or boss should preserve the details that make that design identifiable.
Approved References Were Useful Beyond Characters
Once I had a boss design I liked, I saved that design and reused it in the encounter scene.
The final generation could reference both the approved hero and the approved boss.
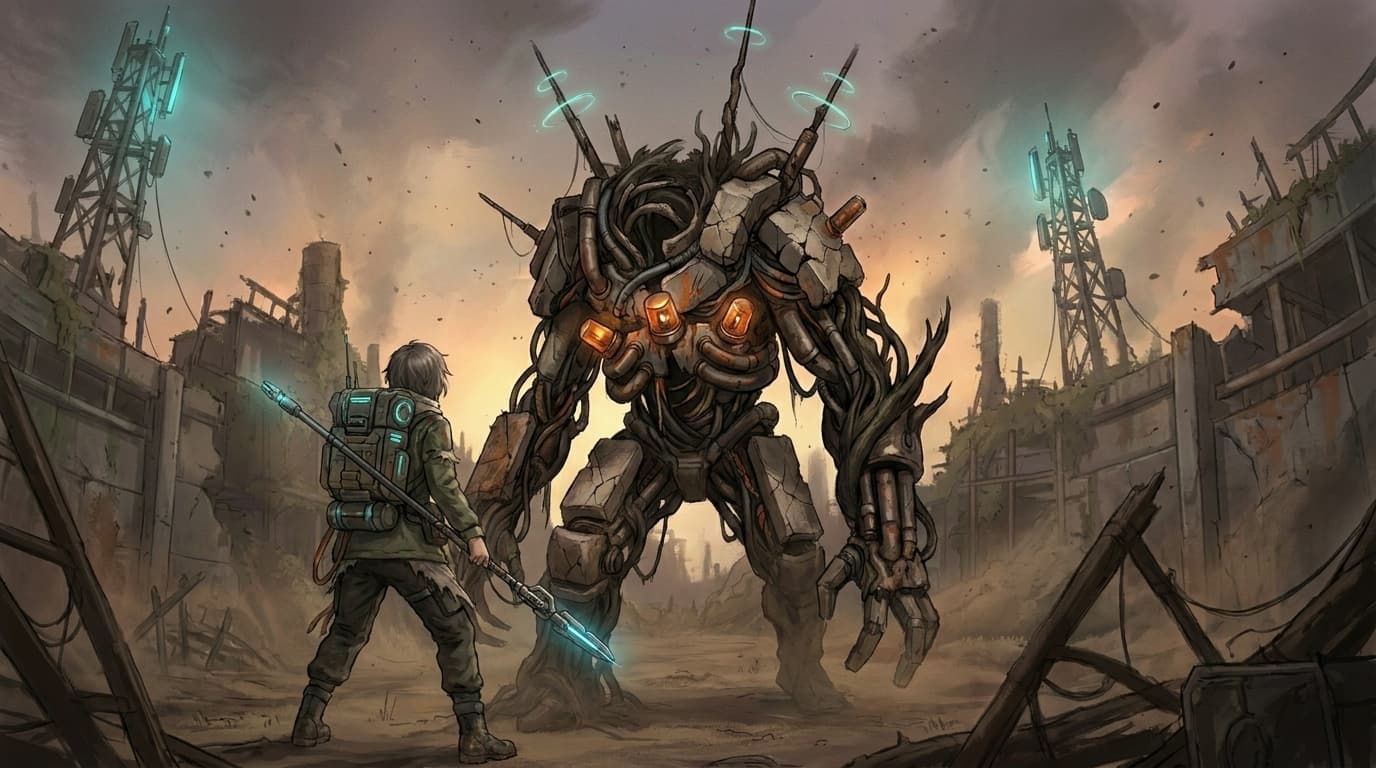
This avoided asking the model to redesign a complicated creature from a text description every time.
That principle extends beyond characters.
If a weapon, vehicle, building, creature, or other prop becomes important enough that its design should not change, it can become a reusable reference too.
The rule I would use is simple:
If a design has already been approved, reuse the design instead of describing it from memory.
Groups Became Useful Once the Canvas Grew
At first, I did not need much organization.
Later, the canvas contained the hero, turnaround sheet, cropped references, background-removal branch, weapon, style frame, environments, boss, and encounter scene.
At that point, I started grouping related nodes.
This did not improve generation quality. It simply made the project easier to navigate as individual images started becoming reusable assets.
A reusable workflow also needs to remain understandable after the project grows.
What Nano Banana 2 Still Did Not Solve Automatically
This workflow made the project easier to control, but it did not create a perfectly locked visual system.
A character reference can help preserve identity. It does not guarantee that every facial detail, accessory, proportion, or piece of clothing will remain identical in every generation.
A turnaround sheet has the same limitation. It provides more visual information, but it is still a set of reference images rather than a rigid 3D character model.
The world can drift too.
If a later prompt suddenly introduces a different palette, rendering technique, genre, or visual vocabulary, the project can begin moving away from the original direction.
That is one reason I kept the art-direction language relatively stable instead of continually adding new stylistic ideas.
It is also important to separate consistent concept art from production-ready game assets.
The images in this project were useful for visual development, reference building, and early world exploration. They are not automatically clean sprite sheets, animation rigs, 3D models, or final in-game assets.
The Framework I Would Use Again
After this test, I would not describe the workflow as one long sequence of nine steps.
It worked better as three connected layers.
Project-Level Consistency: Keep the World Rules Fixed
This layer applies across the entire project.
It includes:
Art direction
→ palette
→ materials
→ atmosphere
→ recurring technology
→ rendering language
The character, weapon, city, save point, and boss can all differ while still inheriting these rules.
Asset-Level Consistency: Save Approved Designs as References
Once a design matters enough to preserve, it becomes a reusable anchor.
For this project:
Hero Master
→ Turnaround
→ Cropped character references
Boss Master
→ Boss encounter
The same logic could apply to a recurring weapon, vehicle, location, or prop.
Workflow-Level Control: Keep Temporary Operations in the Node Graph
Not every intermediate result needs to become part of the permanent asset library.
Temporary operations can stay in the canvas:
Approved subject
→ Background Removal
→ Connected image reference
→ New scene
Groups then help keep those branches readable as the project expands.
The biggest improvement in this project did not come from making prompts longer.
It came from deciding which rules belonged to the entire world, which visual identities needed reusable references, and which intermediate results only needed to survive one branch of the workflow.
That is the point where Nano Banana became more useful to me as part of a visual-development system rather than a one-image generator.
FAQ
Can Nano Banana 2 keep the same character across multiple images?
It can keep a character recognizable when you reuse approved visual references, but I would not treat that as perfect identity locking.
In this project, I reused a master character image and cropped turnaround views rather than relying on the text description alone. I still checked later generations for changes in the face, clothing, equipment, and proportions.
Should I create a character sheet before generating scenes?
A character sheet can be useful when the same character needs to appear from several angles.
For this workflow, its main value came after I cropped the front, profile, and back views into separate reusable references. The sheet became one part of a larger reference system rather than the final goal.
How do I keep a Nano Banana 2 project in the same visual style?
Define the visual rules that should not change, then repeat them across prompts.
For Ashfall Relay, I kept the palette, materials, atmosphere, technology, and concept-art rendering language relatively stable while changing the subject-specific instructions.
Should every generated image become a reusable reference?
No.
I saved approved designs that I expected to reuse, such as the hero and boss. Temporary outputs, including the background-removed character used for one scene transition, could remain connected inside the node graph.
Can I move the same character into another environment without regenerating everything?
That was possible in my workflow by isolating an approved character and connecting the result directly into a new generation.
I used this when the subject was already satisfactory and the main change was the environment. The new scene still needed lighting and atmosphere that matched the character naturally.
Is Nano Banana 2 enough to create final game assets?
I would use this workflow for concept art and visual development, not assume that every generated image is production-ready.
A consistent still-image set is different from a finished sprite system, animation rig, 3D model, or final asset prepared for a game engine.
Related reading
Best AI Video Models for Product Ads in 2026
Which AI video models fit product ad workflows on Astorie.
Best AI Image Models for Brand Visuals
Brand consistency across image models on Astorie's canvas.
How to Create an AI Voiceover Video on Astorie
Audio narration plus video generation workflow on Astorie.
Ready to try it on the canvas?
Open Astorie and fan your prompt across every frontier model in one workflow.