

AI Video Inpainting: How It Works, Where It Helps, and Where It Fails

Video inpainting reconstructs a selected part of a video while trying to keep that reconstruction consistent across time. It can fill an area left by an unwanted object or revise a local detail. The difficult part is preserving the surrounding shot as the camera, subject and lighting change.
For a small revision in an otherwise approved shot, start with a local edit. Choose a mask-based compositor when the boundary must be tightly controlled, or test a prompt-based video editor when describing the change is simpler. Regenerate the shot when the requested change affects its underlying action, camera coverage or composition.
How video inpainting works across frames
A useful way to understand video inpainting is as three connected tasks: identify the area to change, reconstruct plausible content there, and keep its appearance consistent as the shot progresses. A clean replacement in one frame is only the beginning. The replacement must respect perspective, illumination, motion and any foreground object that crosses it.
In a mask-based workflow, the editor explicitly marks the area to fill. Adobe’s Content-Aware Fill documentation describes using a mask and a generated fill layer for unwanted-object removal. That is one concrete implementation, rather than a definition of every AI video editor. [1]
Prompt-based editing can instead describe an object and the desired change in words. The Astorie case below used an input-video prompt; its screenshots do not establish a painted mask or a pixel-lock control. Calling the result a local AI revision is more precise than claiming that Clara tested a dedicated masked inpainting interface.
Task | What must be reconstructed | What should remain protected |
|---|---|---|
Remove a distraction | Background previously hidden by the object, plus associated shadow or reflection when relevant | Nearby subjects, camera motion and scene geometry |
Recolor a prop | Its surface color under the existing light | Shape, material, folds, contact edges and foreground hands |
Repair a small area | Plausible detail consistent with neighboring frames | Identity and unaffected texture outside the repair |
Replace dialogue | A separate audiovisual revision problem | Performance, sync and approved picture as required |
Dialogue replacement needs its own audio and performance checks. See the separate guide to revising dialogue in an approved clip rather than treating it as the same task as removing a visual object.
Choose the method by what must stay fixed
The best starting point is the shot’s approval boundary. Write down the requested change and the elements that cannot change before choosing a tool.
Situation | Starting method | Reason to change course |
|---|---|---|
Small unwanted object against a simple background | Local removal or a tracked fill | Background detail cannot be reconstructed convincingly |
One prop needs a different color | Prompt-based video edit or a selective color/compositing workflow | Material, folds or nearby skin change with the color |
Exact logo, legal text or product dimensions must survive | Controlled compositing with explicit protected regions | A generative revision changes required brand details |
New performance, major camera move or different composition | Regenerate or reshoot with planned coverage | A local revision would effectively rebuild the shot |
These are editorial recommendations, not guarantees about a particular model. For the input-video route used in this article, follow the practical guide to edit an existing video with AI.
What a cushion recolor revealed in Clara’s test
Clara ran the following test in Astorie on November 11, 2026. A cream armchair, blue cushion, oak side table and white mug formed the scene. A person’s gray-sleeved arm moved across part of the cushion, creating a foreground boundary that a recolor needed to preserve.
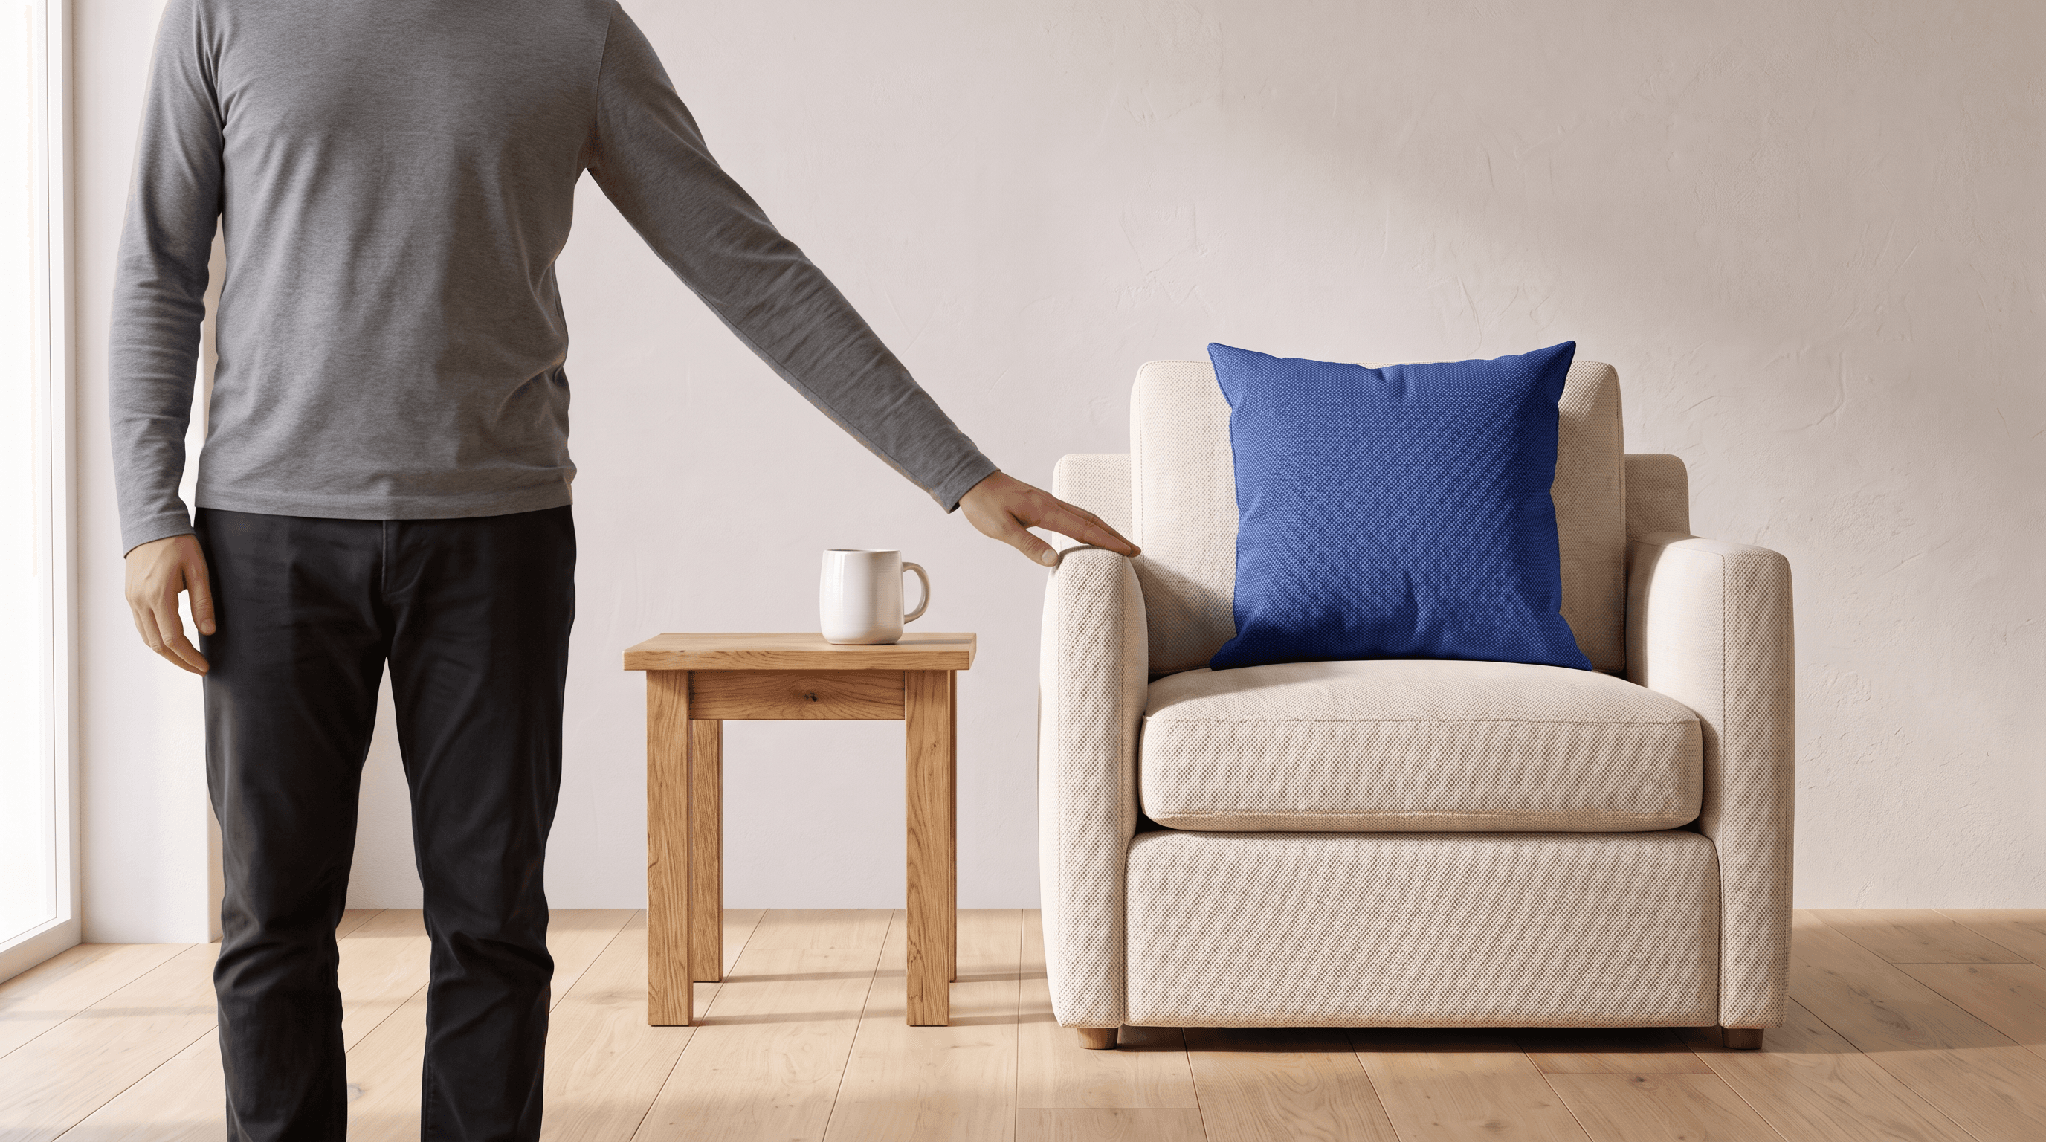
Figure 1. The reference still supplied for Clara’s moving-hand test. The blue cushion is the edit target; the hand, sleeve and furniture are protected context.
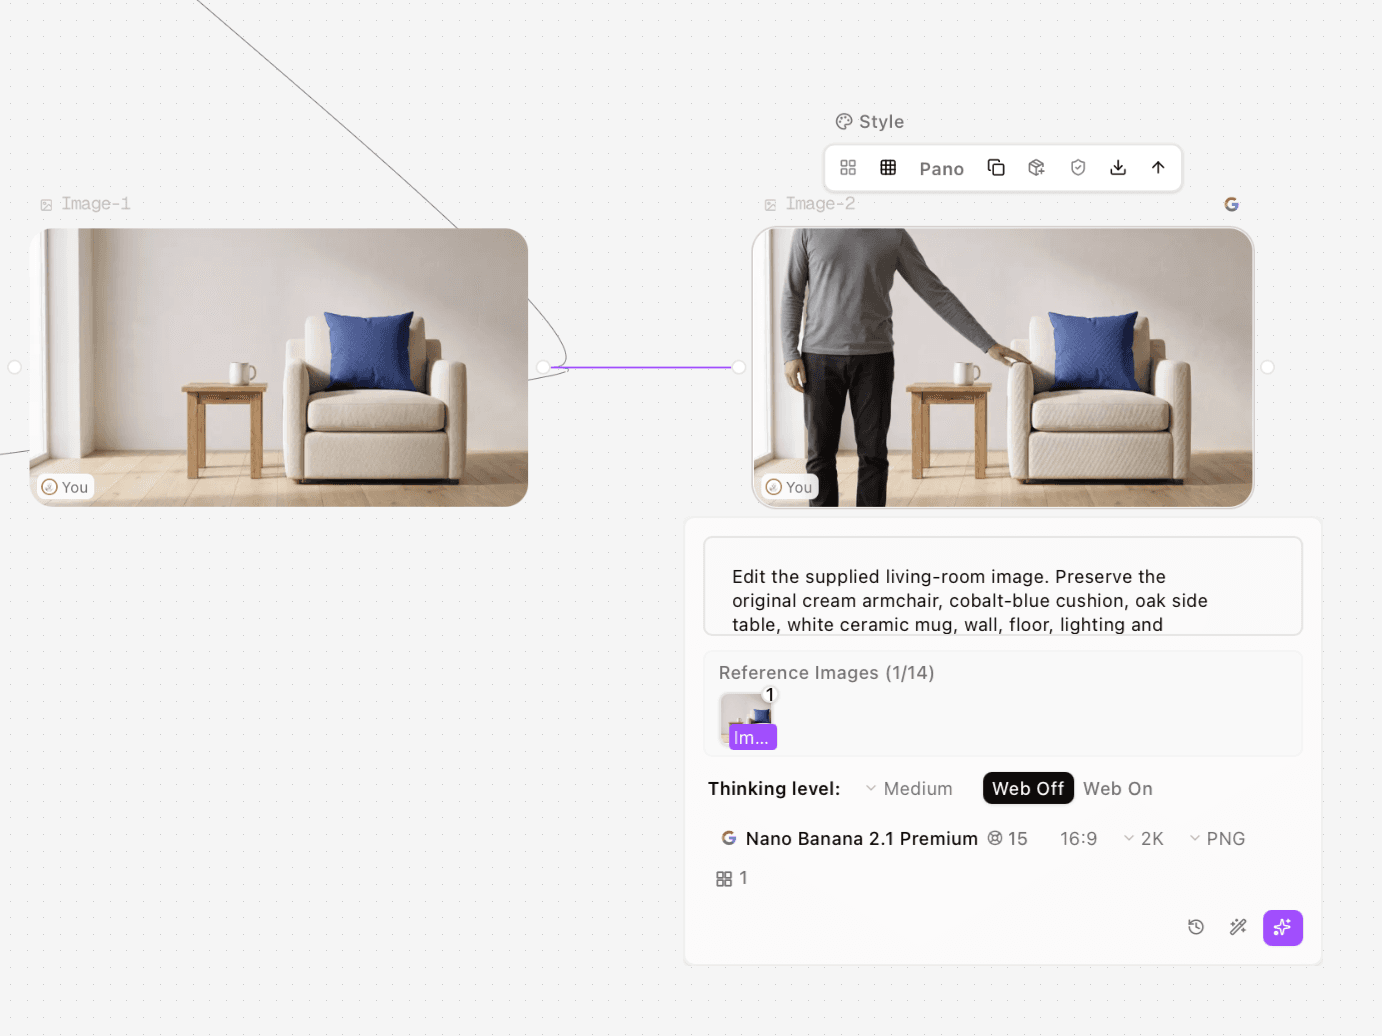
Figure 2. Clara’s reference-image setup in Astorie shows Nano Banana 2.1 Premium, Medium thinking level, Web Off, 16:9, 2K and PNG. This is still-image preparation, not the video edit.
The still became the first frame for a Veo 3.1 Fast I2V source clip. Gemini Omni Video then received that clip in the Input Video field. The UI names below are the labels visible in Astorie; they are not an inferred mapping to a separate vendor API version.
Stage | Actual input and UI settings | Exported file inspected |
|---|---|---|
Source motion | Veo 3.1, Fast, I2V; first-frame image; 720p; 8s | 1280 × 720; 24 fps; about 7.929s |
Recolor | Gemini Omni Video; Input Video connected; reference images empty; 16:9; 720p; 6s | 1280 × 720; 24 fps; about 5.667s |
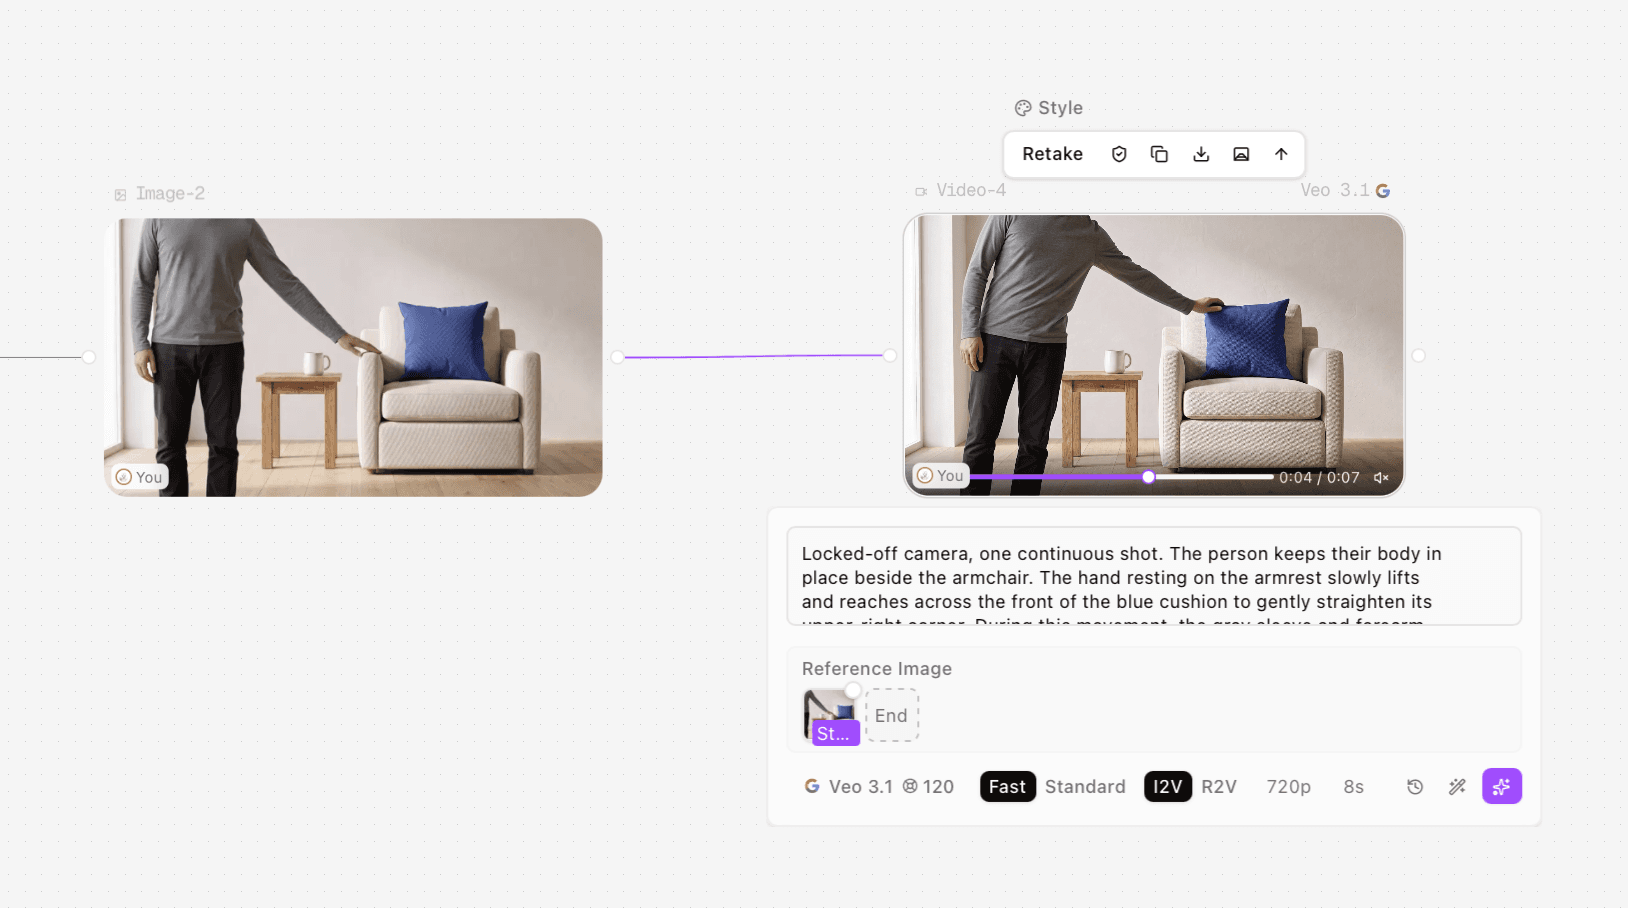
Figure 3. The source-generation setup and moving hand in Clara’s Veo 3.1 Fast clip. The source was generated before the recolor operation.
The verified opening of the executed edit prompt was: “Recolor only the cobalt-blue cushion to muted terracotta orange throughout the input video, starting from the very first frame. Do not animate a transition from blue to orange.” Clara confirmed using the full supplied prompt. This quotation is an excerpt, not a reconstruction of the entire input.
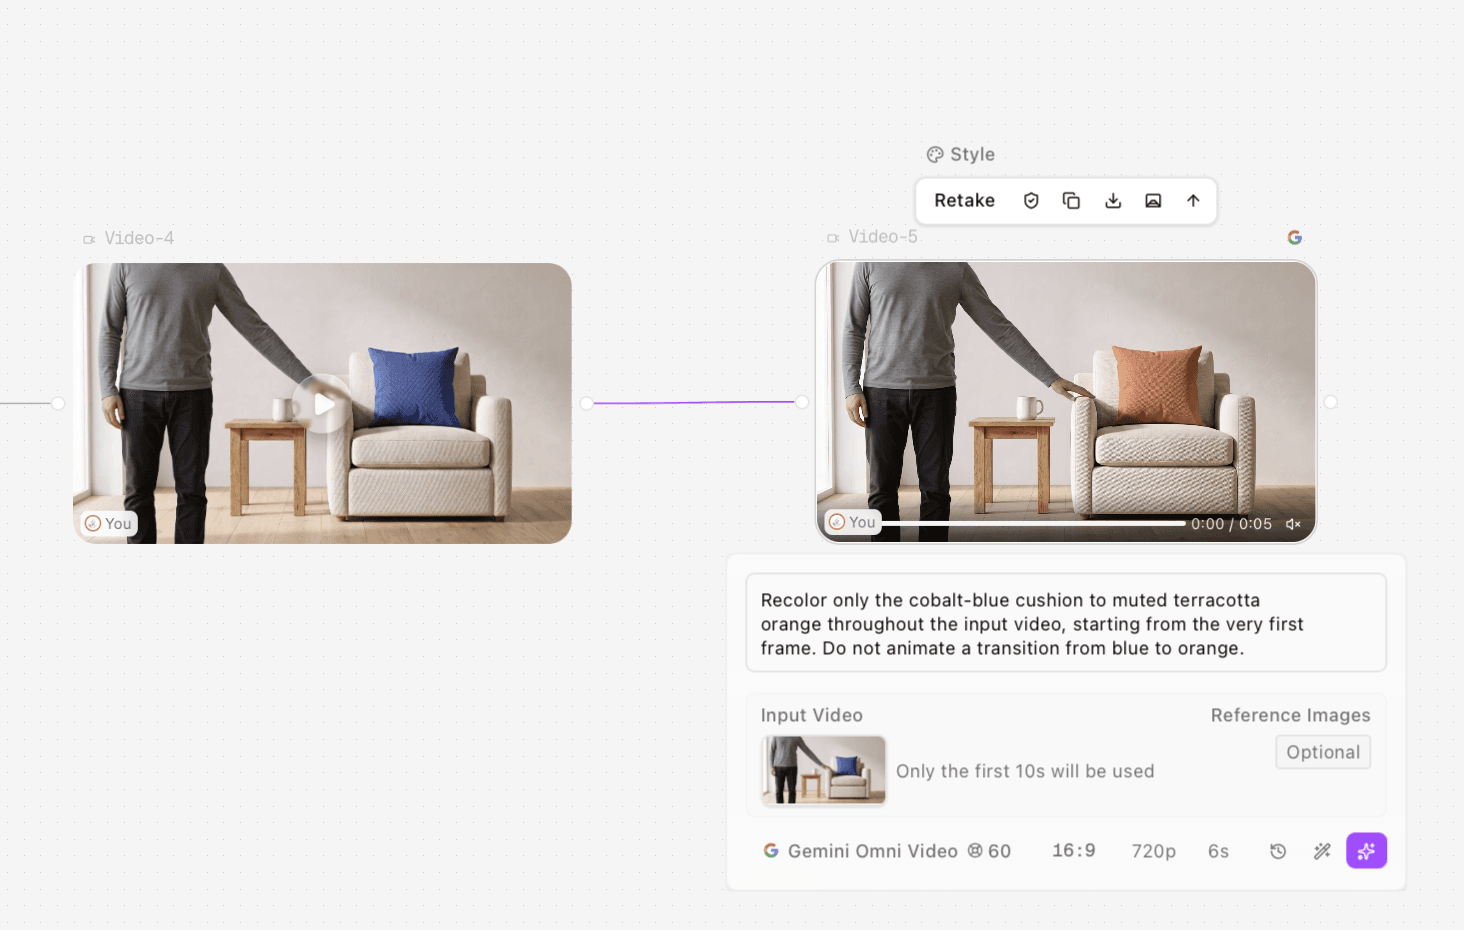
Figure 4. The completed Gemini Omni Video edit has the source connected as Input Video. The orange cushion is visible at the start; this single screenshot alone does not establish temporal consistency.
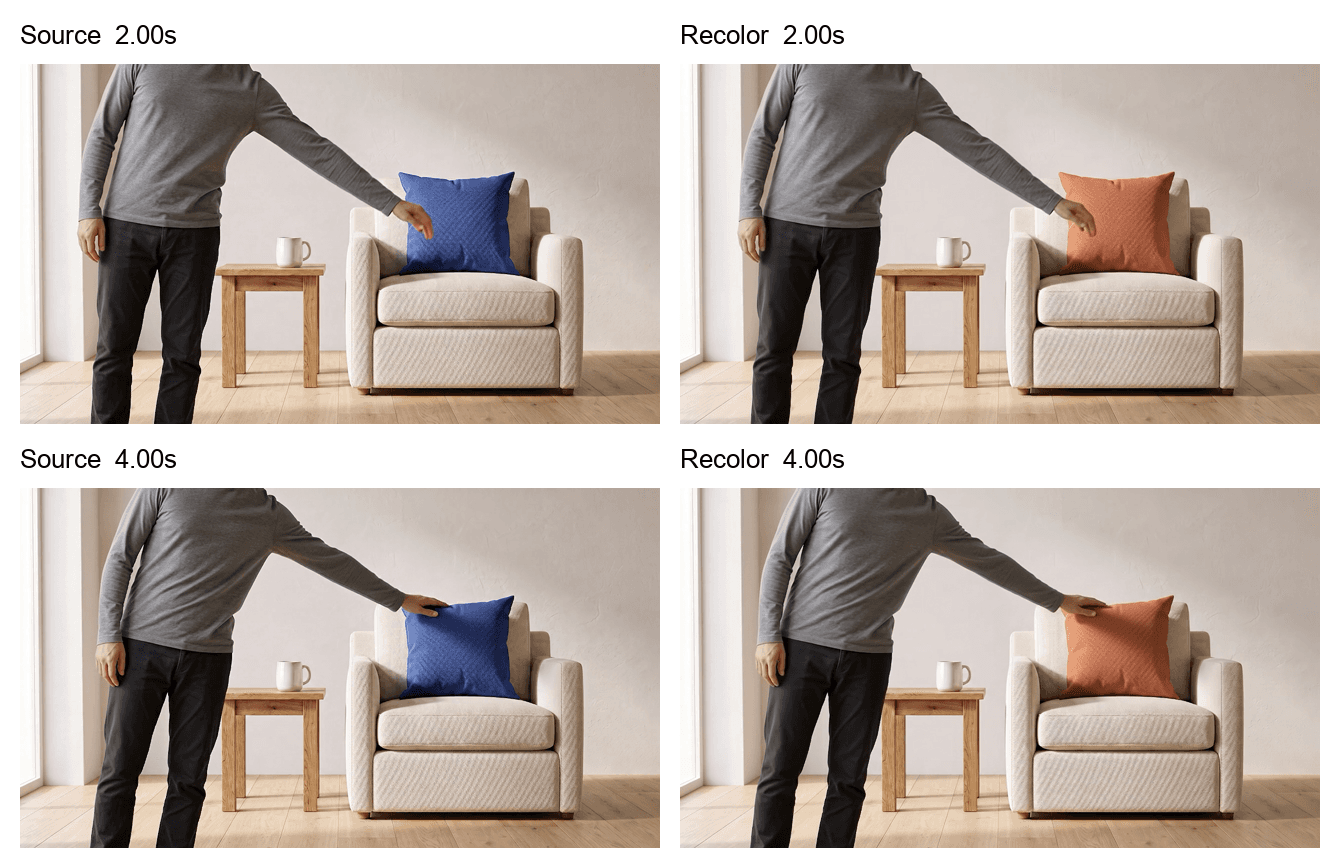
Figure 5. Matched source and edited samples at 2.00s and 4.00s. The cushion is orange in the edited samples, while its fine weave and folds differ from the source. Panels are labeled extractions, not new model outputs.
The cushion was orange throughout the inspected samples. No broad orange spill onto the gray sleeve or skin was obvious at the sampled resolution. However, the cushion’s fine weave and folds were altered or softened. That matters for a furniture advertisement in which the material itself is part of the product claim: the color revision can be useful while the material preservation remains unacceptable.
The output also ended earlier than the source, excluding the source’s final hand-return portion. The UI had been set to a shorter output duration, so this is a planning and delivery issue rather than proof of unexplained truncation. Check the usable action range before inserting an edited result into a locked timeline.
Where local reconstruction tends to become difficult
Treat the following as review triggers. They explain what to inspect; they do not predict that every model will fail on every such shot.
Trigger | Visible failure to look for | Practical response |
|---|---|---|
Foreground hand crosses the target | Color leaks onto skin; fingers merge with the replacement | Inspect contact edges frame by frame; narrow the revision or use compositing |
Fine fabric, hair or repeating detail | Weave changes, detail swims or folds shift | Compare against the approved source at useful viewing size |
Camera movement | Reconstructed texture slides against the scene | Track stable landmarks and review the moving interval |
Shadow or reflection belongs to the object | Object disappears but its visual effect remains | Include the associated effect in the edit brief and review it separately |
Exact performance must survive | Hands settle early or action timing changes | Compare action beats and switch to a more controlled method if needed |
A prompt that says “preserve everything else” expresses intent. It is not evidence that every unaffected pixel, performance beat or technical specification was preserved.
Decide whether to accept the revision
Review the target, the protected regions and the delivered file as separate decisions. First ask whether the requested change is complete from the opening frame through the usable range. Then inspect adjacent skin, fabric, edges, text and reflections. Finally verify duration, frame size, frame rate and audio against the delivery brief.
If the revised color is right but the material is wrong, keep the output as a candidate rather than approving it as a finished commercial shot. A small compositing repair may be enough. If the required performance or product identity has changed, regenerate with better references or return to the original footage.
Frequently asked questions
Is video inpainting the same as regenerating a video
No. Inpainting focuses on a selected area within existing footage. Regeneration creates a new rendition of the shot and can change its structure more broadly. A prompt-based editor can still alter areas outside the requested target, so inspect the actual output rather than relying on the label.
Can it preserve everything outside the edit exactly
Do not assume that from a text instruction. If exact preservation is a requirement, choose a workflow with explicit regional control and compare the result with the approved source. The cushion test did not demonstrate pixel-for-pixel preservation.
Can a screenshot prove that the edit works through the clip
A screenshot proves only the displayed moment and visible setup. The source and output videos are linked here so the time-dependent result can be checked.
Should a failed local edit always be retried
Retry when the failure is specific and the next instruction addresses it. Change methods when the task requires a level of control the current route has not demonstrated. Repeating an unchanged request is not a delivery plan.
Test method and sources
All hands-on material in this article was generated by Clara in Astorie on November 11, 2026. The source and edited clips were compared using samples at 0.25-second intervals over the shared range, with closer attention to the hand crossing the cushion. This supports the frame-specific observations above, not a certification of every intermediate frame, continuous motion or audio quality. Audio was not listened to for this article. The initial no-person living-room clips were excluded from the analysis because their video files were not supplied. No extra unreported runs, elapsed-time claims or actual-charge claims are included.
[1] Adobe After Effects documentation on Content-Aware Fill, checked November 11, 2026. Used to distinguish a documented mask-based fill workflow from the prompt-based case tested here.
Ready to try it on the canvas?
Open Astorie and fan your prompt across every frontier model in one workflow.