

AI Frame Interpolation: How to Convert Video to 60 FPS
AI frame interpolation creates intermediate frames so a clip can play at 60 FPS without making the action run faster. The useful question is whether those added frames help your shot: a clean tracking move may benefit, while a hand crossing a face can expose a bad estimate.
We used a five-second courtyard shot of a cyclist riding behind a dark post. The source was 24 FPS; the downloaded Topaz result was 60 FPS and stayed about five seconds long. Start with the two complete clips below, played at 1x, and follow the bicycle as it disappears and returns.
Source: the 24 FPS cyclist shot, before interpolation.
Topaz result: 60 FPS at normal running time. The downloaded file is also 3840 × 2160.
What AI frame interpolation changes
Frame rate describes how many frames play each second. Resolution describes the pixel dimensions of each frame. Playback speed describes how quickly the action unfolds. These are separate choices, even when one processing tool offers more than one of them.
As Topaz explains frame interpolation, the process synthesizes frames from existing footage. Simply exporting a 24 FPS timeline at 60 FPS can repeat frames; it does not, by itself, create new moments of motion.
Your goal | What to change | What to check |
|---|---|---|
A 60 FPS version at the original speed | Interpolate to 60 FPS; preserve running time | Action duration and moving contours |
Slow motion | Create sufficient intermediate frames and retime deliberately | Slower action and the treatment of sound |
A larger picture | Increase output dimensions | Fine detail and edge artifacts |
Less flicker | Address brightness changes over time | Exposure consistency across the sequence |
Choose 60 FPS when it fits the destination and the intended look. A 24 FPS dramatic scene does not need conversion just because a higher number is available. If the delivery also needs a larger frame, keep that as a separate decision when using the video upscaler.
Convert a clip to 60 FPS in Astorie
1. Bring in the shot you want to keep
Create or open a project, import your video and place it on the canvas. Trim away unwanted takes before processing, and keep the original available for comparison. You can use existing footage; generating a new video is unnecessary for this step.
For this example, the source was generated with Seedance 2.5 in Omni mode, Draft off, 16:9, 1080p and a five-second duration. Its downloaded frame rate was 24 FPS. The broad post near the center makes it easy to find the difficult part of the shot.
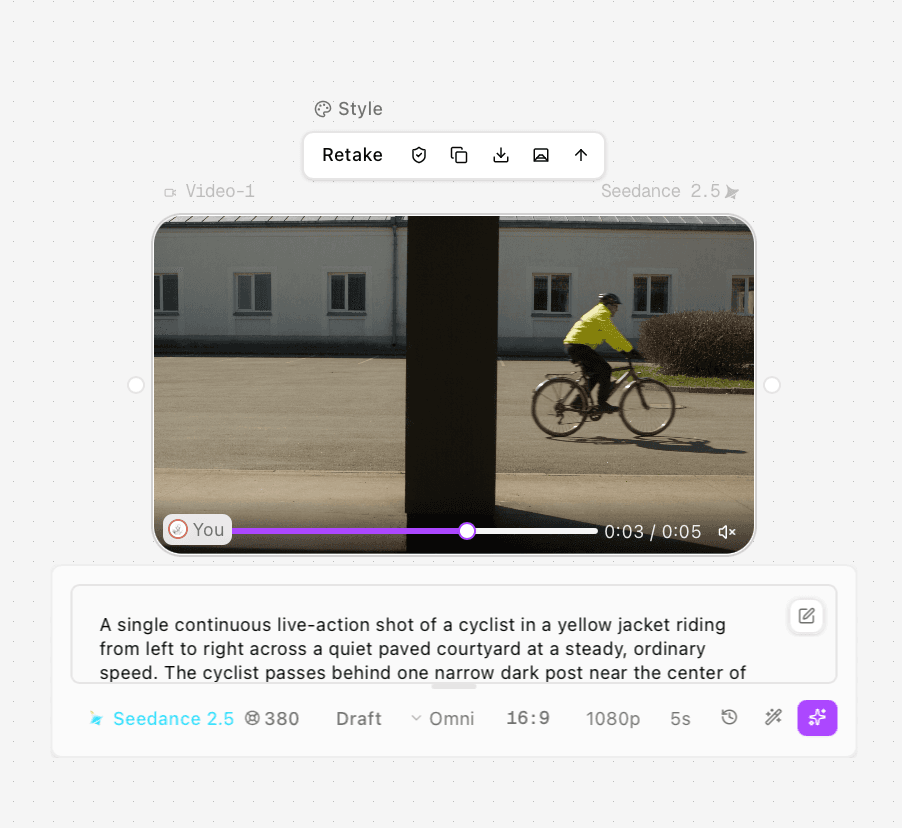
Figure 1. The source node shows the cyclist scene and its Seedance 2.5 settings.
2. Connect Topaz Video Upscale
Add a Tool node, choose Video Upscale and select Topaz Video Upscale. Connect the source video to that node. The Tool node guide shows where processing tools sit in the canvas workflow.
3. Set the interpolation controls
Control | Setting used here |
|---|---|
Upscale Factor | 1x |
Frame Interpolation | On |
Target FPS | 60 FPS |
Use H.264 | Off |
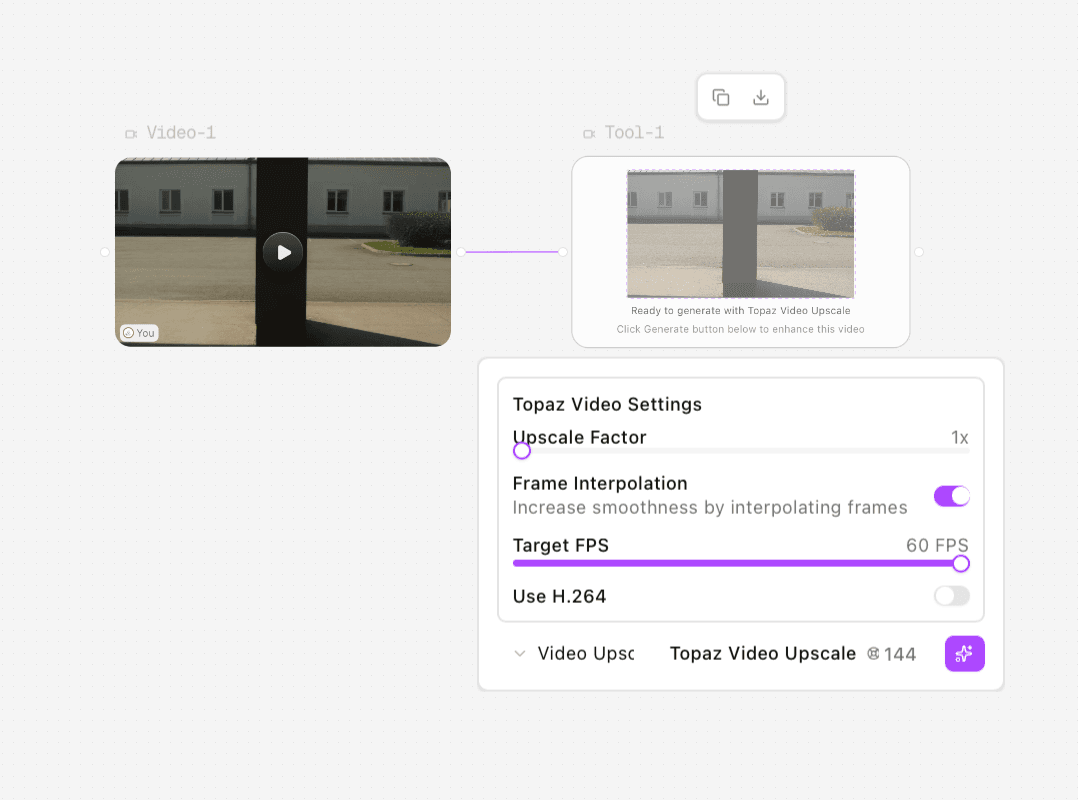
Figure 2. Turn on Frame Interpolation, set Target FPS to 60 and leave Upscale Factor at 1x.
The toggle and target are the relevant controls for this conversion. The H.264 switch is an encoding choice; it is not the interpolation switch. Keep the export settings required by your editor or delivery destination, and confirm what the downloaded file actually contains.
4. Generate, download and inspect the file
Run the Tool node and wait for the result to finish. Download the processed video from its result controls. Open the exported file in a player or editor that reports its frame rate, dimensions and duration; the canvas preview alone cannot establish the delivery format.
Downloaded file | Frame rate | Dimensions | Video duration |
|---|---|---|---|
Source | 24 FPS | 1920 × 1080 | About 5 s |
Topaz result | 60 FPS | 3840 × 2160 | About 5 s |
The download reached 60 FPS and kept the action at its original speed. It also came back at 4K despite the 1x setting. If your delivery needs 1080p, resize it in your finishing editor after checking the export.
Check the post crossing before you keep the result
Watch the whole shot at its intended speed first. Then step through the moment when the cyclist goes behind the post. The model must estimate the rider and bicycle as visible areas disappear and reappear; a paused frame elsewhere in the courtyard tells you little about that transition.
- Follow the front wheel and fork as they approach the post. Look for a second contour, a bend or a brief change in wheel shape.
- Check the rider’s yellow sleeve and torso at the post edge. A bright edge makes a short-lived halo easier to spot.
- Watch the rear wheel and shadow as they emerge. Compare with the same moment in the source so you do not blame interpolation for an existing defect.
- Listen through the download and check the end of the shot. A file can report the expected duration while still needing a sound or sync correction.
If you will replace the sound in the edit, keep that decision separate from the frame-rate conversion. Check the final picture and sound together before export.
When to keep the original cadence
Keep the source when the interpolated version draws attention to warped edges or makes a deliberately restrained shot feel too fluid. Try a short section before processing a longer sequence, especially around cuts, overlapping people, thin spokes, hair or fast camera movement.
If the source itself has a malformed bicycle or an unstable face, return to that source problem first. Adding frames gives you more images of the movement; it does not establish the correct missing geometry. A simpler shot or a better take may be the more useful fix.
FAQ
Does converting 24 FPS to 60 FPS make a video faster?
No, if you interpolate and preserve the running time. The added frames fill the same period. Interpreting the original frames at a different playback rate is a separate retiming operation.
Is frame interpolation the same as upscaling?
No. Interpolation changes temporal sampling; upscaling changes pixel dimensions. Our Topaz export changed both, which is why you should check both properties after download.
Can interpolation fix flicker or motion blur?
Do not rely on it for either task. Flicker is a change in brightness over time, and motion blur is already part of each frame. Review those problems separately before choosing a finishing operation.
Why can the 60 FPS version look wrong around an obstruction?
The visible parts of the subject change at an obstruction. Intermediate frames can contain an incorrect outline as the subject disappears or returns. Compare that moment against the source and keep the version that serves the shot.
Ready to try it on the canvas?
Open Astorie and fan your prompt across every frontier model in one workflow.