
AI Video Production Pipeline: 7 Stages From Brief to NLE Handoff
An AI video production pipeline is a controlled path from brief to finished master: define the audience and delivery, write the script, build a shot plan and continuity bible, route each shot to the right generation method, review candidates against named criteria, package the approved assets, and finish them in a nonlinear editor. The pipeline succeeds when every take can be traced back to its prompt, references, version, and approval decision.
Astorie can serve as the connected generation workspace inside that system, keeping model branches and shared references visible on a canvas. The NLE remains the finishing authority for picture, sound, captions, color, graphics, and delivery. This boundary prevents the generation workspace from being mistaken for a final post-production environment.
AI Video Production Pipeline: Key Takeaways
• Plan by shot function and production constraint, not by loyalty to one model.
• Approve concept, continuity, and finish at separate gates.
• Every NLE handoff needs approved picture and audio, shot IDs, final script or captions, and delivery settings; larger productions may also need stems, rights metadata, prompt lineage, and decision history.
• Create a high-quality master first, then derive platform versions from the approved timeline.
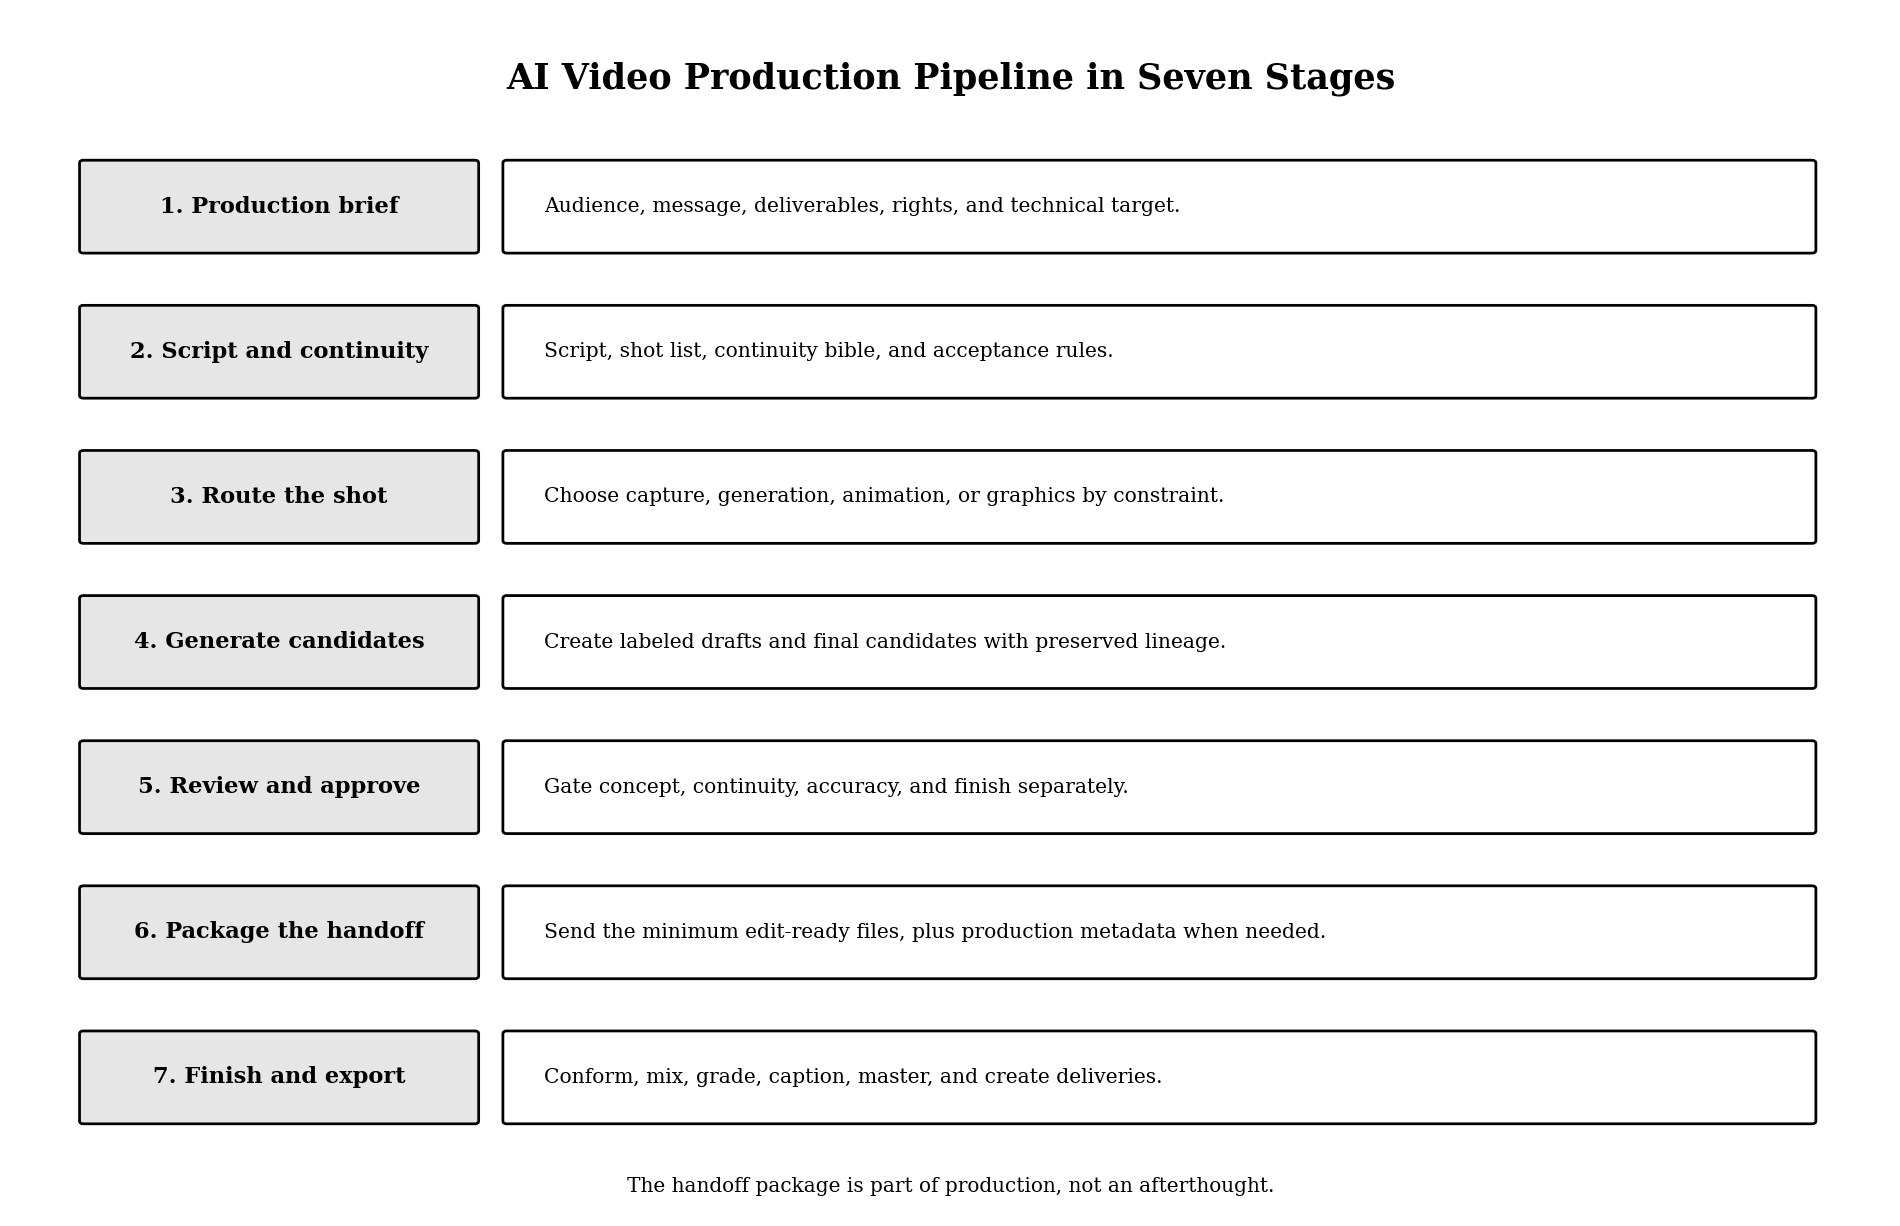
Figure 1. The AI video production pipeline from brief to NLE.
The AI Video Production Pipeline in One View
Stage | Main deliverable | Gate | Failure that stops the pipeline |
1. Production brief | Audience, message, deliverables, rights, technical target | Purpose approval | Success cannot be defined |
2. Script, shot list and continuity bible | Timed script, shot functions, canonical references | Production approval | Shots lack function or references conflict |
3. Route the shot | Method and model route for each shot | Feasibility approval | Route cannot meet the hardest constraint |
4. Generate candidates | Labeled takes with prompts, settings, and references | Concept approval | No take performs the intended beat |
5. Review and approve | Approved picture and audio assets | Continuity approval | Identity, geography, physics, accuracy, or timing fails |
6. Package the NLE handoff | Edit-ready assets, text, IDs, specs, and required metadata | Handoff approval | The editor cannot identify or place the assets |
7. Conform, finish and export | Conformed timeline, master, and deliveries | Release approval | Captions, mix, color, rights, or specs fail |
Stage 1: Write a Production Brief That Can Stop Bad Work
The brief should specify audience, message, duration range, aspect ratios, destinations, languages, required claims, prohibited claims, approval owner, deadline, rights constraints, and delivery requirements.
Add acceptance criteria that can reject an asset. “Cinematic” is not an acceptance rule. “The product label remains readable in every hero shot” and “the explanation is clear without sound” are usable rules.
Decide the source of truth for every protected element: script, product, character, wardrobe, location, palette, typography, voice, and legal copy. Do not let a prompt become the only record of an approved decision.
Stage 2: Build the Script, Shot List, and Continuity Bible
Script
Write the complete argument and mark claims that need verification. For dialogue or narration, include pronunciation notes and timing after a read-through.
Shot List
Give every shot an ID, purpose, duration, framing, action, camera, audio, references, route, and acceptance rule. A shot that cannot justify its role should not enter generation.
Continuity Bible
Collect canonical references for people, products, wardrobe, props, environments, screen direction, palette, typography, lighting, and audio identity. Add anti-references that show what must not appear.
The continuity bible is more important than a long prompt. It separates stable production decisions from instructions that change per shot.
Stage 3: Route Each Shot to the Right Production Method
Use real footage or screen capture when accuracy and evidence matter most. You gain fidelity to the real product or event; you give up some visual freedom. Switch when a generated approximation would misrepresent a real interface, process, or person.
Use image-to-video when the opening composition or subject identity is already approved. You gain a strong anchor; you give up some freedom to redesign the scene. Switch when text-to-video keeps changing the subject or layout.
Use reference-to-video when motion, identity, environment, and audio need separate controls. You gain role-based direction; you give up simplicity. Switch when one source image cannot carry the shot brief.
Use an avatar or dedicated lip-sync workflow when speaking performance is the core job. You gain more controllable dialogue; you give up some cinematic variation. Switch when speech accuracy matters more than open-ended motion.
Use diagrams and motion graphics when the video must explain a system. You gain clarity and exact labels; you give up realism. Switch when generated scenes add atmosphere but not understanding.
Stage 4: Use a Practical Three-Pass Generation Process
For projects where generation cost and continuity matter, a useful structure is three review levels. It is a production framework, not a universal industry standard; a simple one-shot job may combine or skip passes.
Pass 1: Concept Draft
Use the lowest-cost route that can prove framing, action, and camera logic. Reject a bad concept before polishing it.
Pass 2: Reference Lock
Confirm identity, product geometry, wardrobe, environment, screen direction, palette, and audio. Change one major variable at a time so a reviewer can explain why a take improved.
Pass 3: Final Candidate
Render only approved concepts at the required quality. Preserve handles when available, and keep the prompt, model or route, settings, references, and version label with the file.
Astorie is most useful here when a shared reference must feed several model branches or multiple shots. You gain a visible graph and easier reuse; you give up the low setup of a single generator. Switch when repeated downloads, missing prompts, or inconsistent references become a recurring production cost.
Stage 5: Review at Three Separate Gates
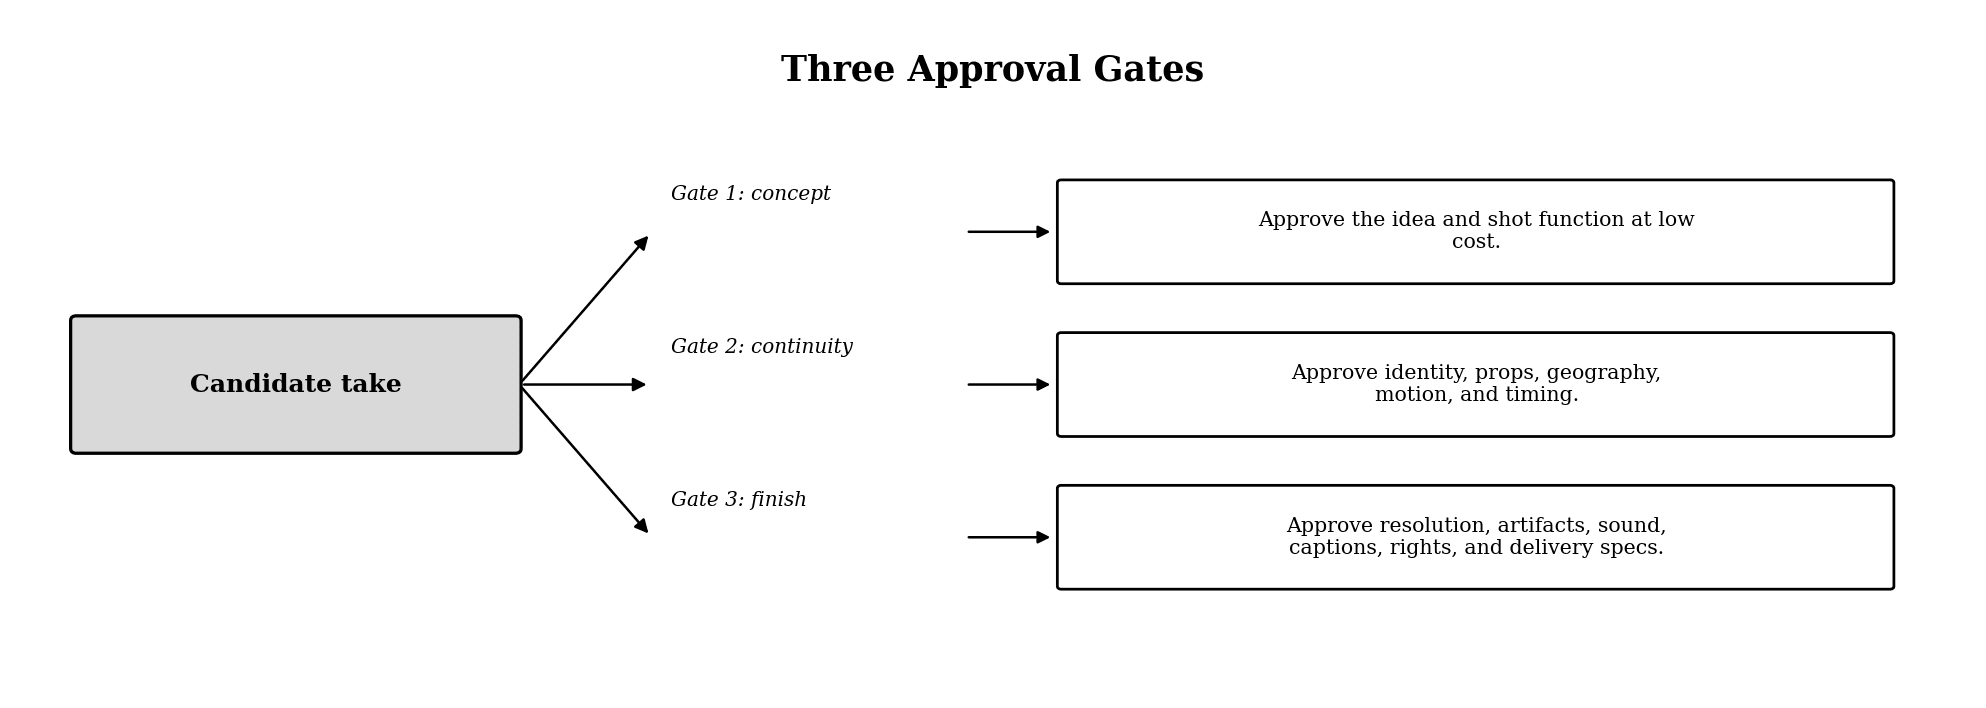
Figure 2. Concept, continuity, and finish approval gates.
Concept review asks whether the take performs the intended story beat. Continuity review checks identity, props, geography, motion, lighting, and sound against adjacent shots. Finish review checks artifacts, captions, audio, color, rights, and technical delivery.
Do not collapse these reviews into one meeting. A polished take can distract reviewers from a continuity error; a continuity-perfect take can still fail the explanation.
Stage 6: Package the NLE Handoff
The handoff package should let an editor understand what each file is, where it belongs, what is approved, and what remains uncertain.
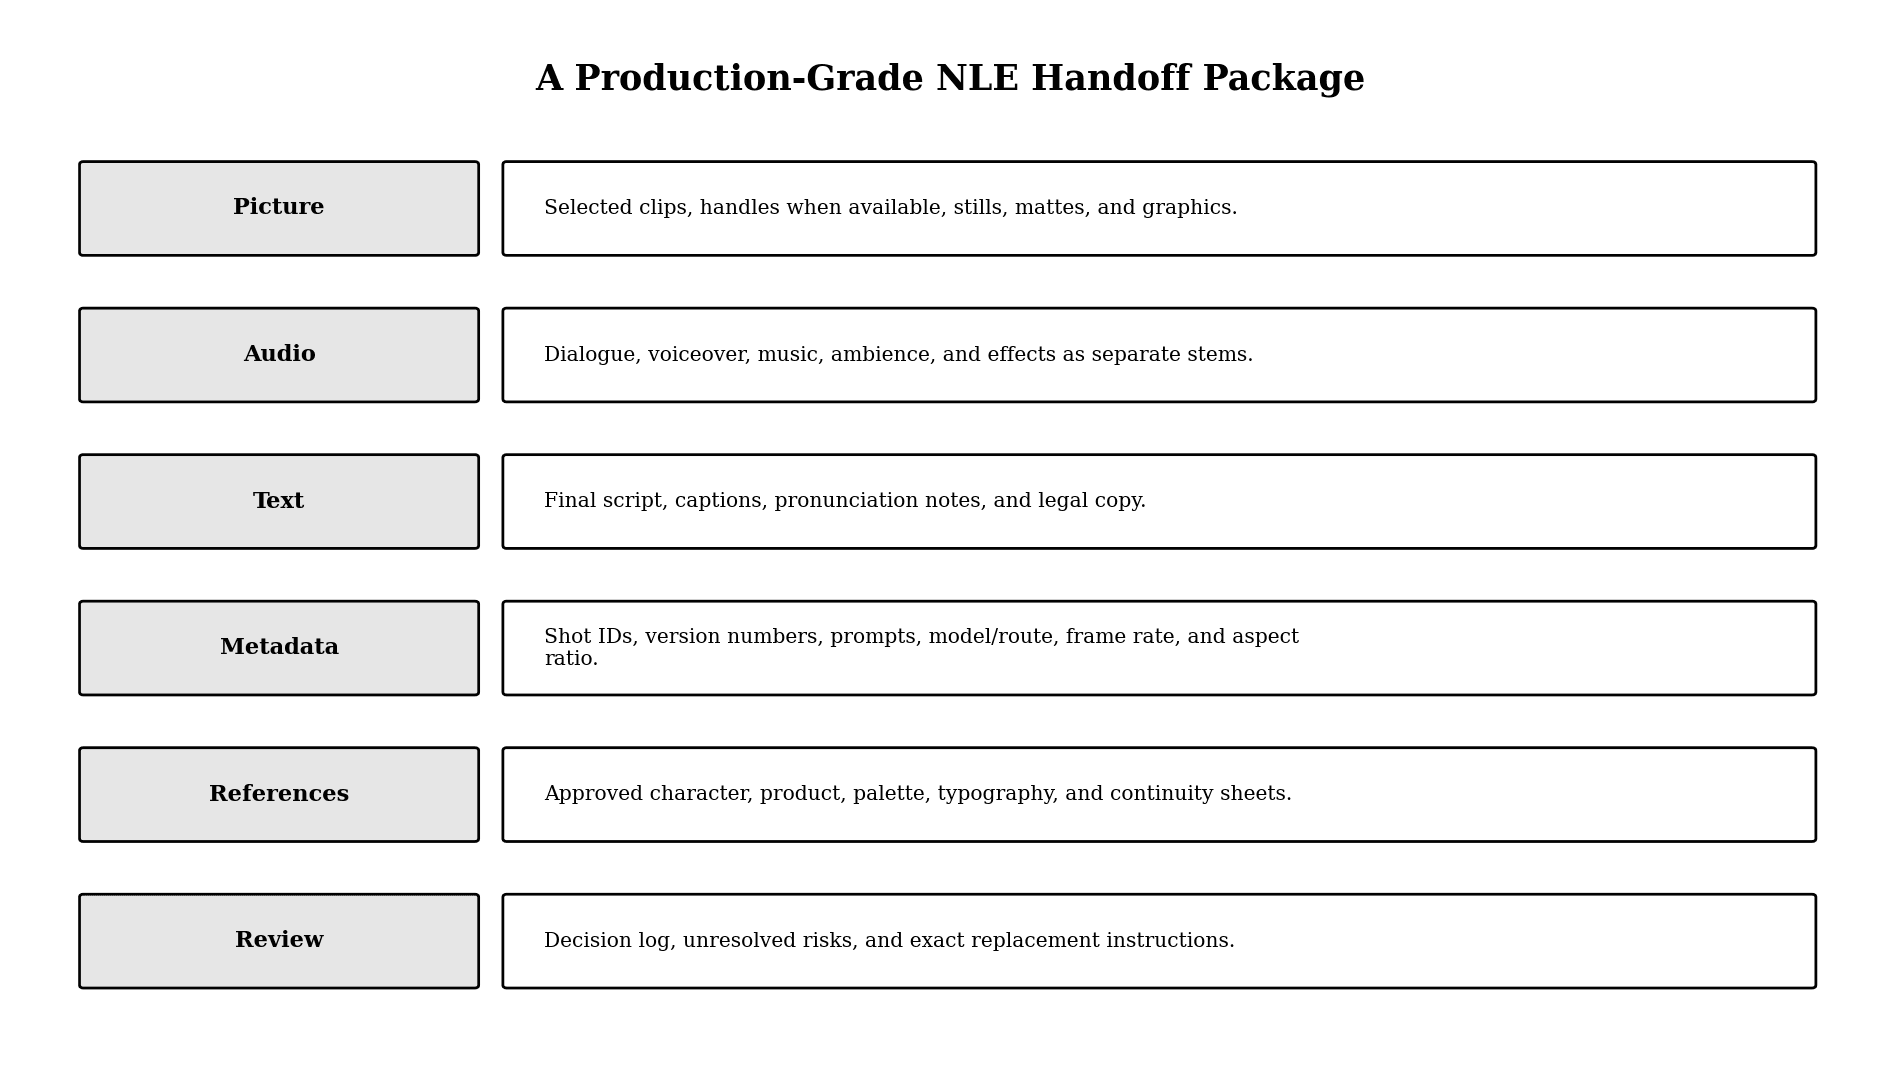
Figure 3. A production-grade NLE handoff package.
Minimum handoff
• Approved picture and the audio used for the cut.
• Shot IDs and approval state.
• Final script or captions.
• Frame rate, aspect ratio, resolution, and any editor or client delivery requirement.
Production-grade handoff
Add separate dialogue, narration, music, ambience, and effects stems when the editor needs to remix, localize, or replace audio. Add rights metadata, prompt and reference lineage, legal copy, a manifest, and decision history when the production risk or review process justifies them.
Use a stable folder structure:
01_BRIEF / 02_SCRIPT / 03_REFERENCES / 04_PICTURE / 05_AUDIO / 06_GRAPHICS / 07_CAPTIONS / 08_PROJECT / 09_MASTERS / 10_DELIVERIES
Use filenames such as PRJ_S012_TK03_v04_APPROVED_2398_16x9.mov. The exact syntax can vary, but shot ID, take, version, state, frame rate, and aspect ratio should be recoverable without opening the file.
For a production-grade package, keep dialogue, narration, music, ambience, and effects as separate stems. Include the final script, caption file, pronunciation notes, and applicable legal copy. A manifest can list the model or route, prompt, references, settings, source rights, and known limitations for each approved generated asset.
Stage 7: Conform and Finish in the NLE
Import the approved assets, confirm frame rate and color interpretation, and rebuild the intended order using shot IDs. Lock picture only after timing, continuity, and transitions pass review.
Then complete dialogue editing, music and effects, loudness review, color correction and matching, graphics, captions, and quality control. Adobe Premiere and DaVinci Resolve both support structured import, timeline editing, captions, audio, color, and export workflows; use their current documentation for project-specific formats and settings.
Create one high-quality master, then make platform deliveries from that approved source. Avoid exporting a compressed social file and using it as the master for later versions.
Model Routing Without a False Universal Winner
The right model can change from shot to shot. Use a routing card with these fields:
• Hardest constraint: identity, motion, dialogue, typography, environment, editability, or speed.
• Required inputs: text, image, video, audio, or multiple references.
• Required duration and aspect ratio.
• Acceptance criteria and known failure modes.
• Route-specific limits, price, rights, and availability checked on the production date.
• Fallback method if the preferred route fails.
Switch models when the current route repeatedly fails one named criterion, not because a newer model appears. Every switch adds a new behavior, license path, and review burden.
Common Pipeline Failures
Starting Generation Without a Shot Function
The team produces visual inventory instead of a sequence. Return to the shot list and state what the viewer must understand or feel after each shot.
Losing Lineage
A good take cannot be revised because nobody knows its prompt, reference set, or route. Store metadata with the asset at creation time.
Approving Beauty Before Continuity
The strongest individual frame may break the sequence. Review adjacent shots together before final rendering.
Mixing Draft and Final Files
Use explicit states and separate folders. A filename without a version and approval state invites accidental publication.
Sending Only Flattened Audio When Revisions Are Expected
A mixed track prevents dialogue repair, localization, and music changes. When those revisions are in scope, deliver stems and the final reference mix; for a simple locked edit, the approved mix may be sufficient.
Treating the NLE as a Rescue Plan
An editor can cut around some defects but cannot recover missing identity, impossible blocking, or an unsupported claim. Reject those problems upstream.
Hands-On Case: From MORROW Brief to External NLE Handoff
The MORROW case reached a structured external-editing handoff but not an in-app NLE export. The evidence below is therefore strongest for Stages 1–6. Stage 7 remains the controlled external finishing step described earlier in this guide.
Stage evidence from the MORROW production
Pipeline stage | Evidence produced | Gate outcome |
1. Brief | Viewer outcome, audience, 16:9 target, approximate 30-second runtime | Approved |
2. Script & Shot | Locked script/timing, five-beat storyboard, continuity contract | Approved |
3. Route | GPT Image 2.5 stills; Seedance 2.5 and 2.0 motion tests; ElevenLabs narration; Minimax music | Approved with per-route limits |
4. Generate | Five stills, six motion attempts, two music candidates, one narration | Candidates labeled |
5. Review | Brand, physics, camera, audio, and delivery checks | Motion rejected; stills and audio approved |
6. Handoff | A13 asset selection plus A14 picture order and workspace limitation | Ready for external editor |
7. Finish | Not completed in the tested Astorie workspace | External NLE required |
A13: select the approved assets before packaging
A13 documented which visuals were approved and why motion tests were excluded. That distinction matters: a handoff should not force the editor to rediscover review decisions by watching every generated file.
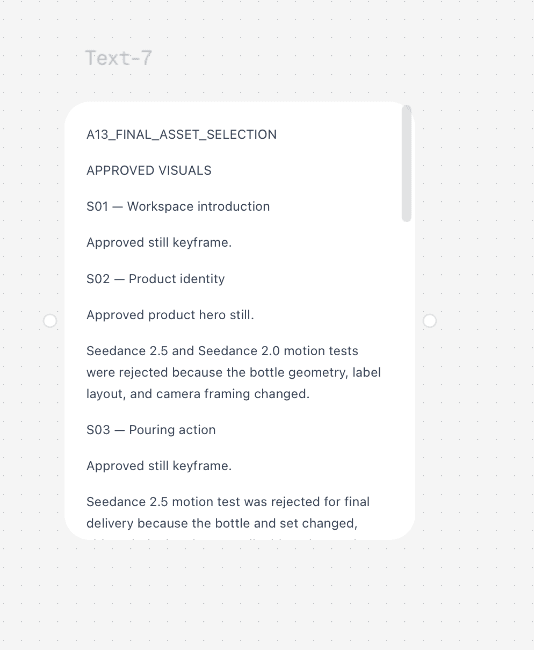
Figure 4.1. A13 final asset selection records approved stills and rejected motion.
The tested workspace did not expose a direct NLE export
The tool menu exposed image upscale, video upscale, video editing, image drawing, image cropping, lipsync, camera control, key-frame extraction, background removal, image relighting, and layer processing. It did not show Sequence Builder or direct NLE export. This is a statement about the tested workspace and date, not a universal claim about every Astorie account or future release.
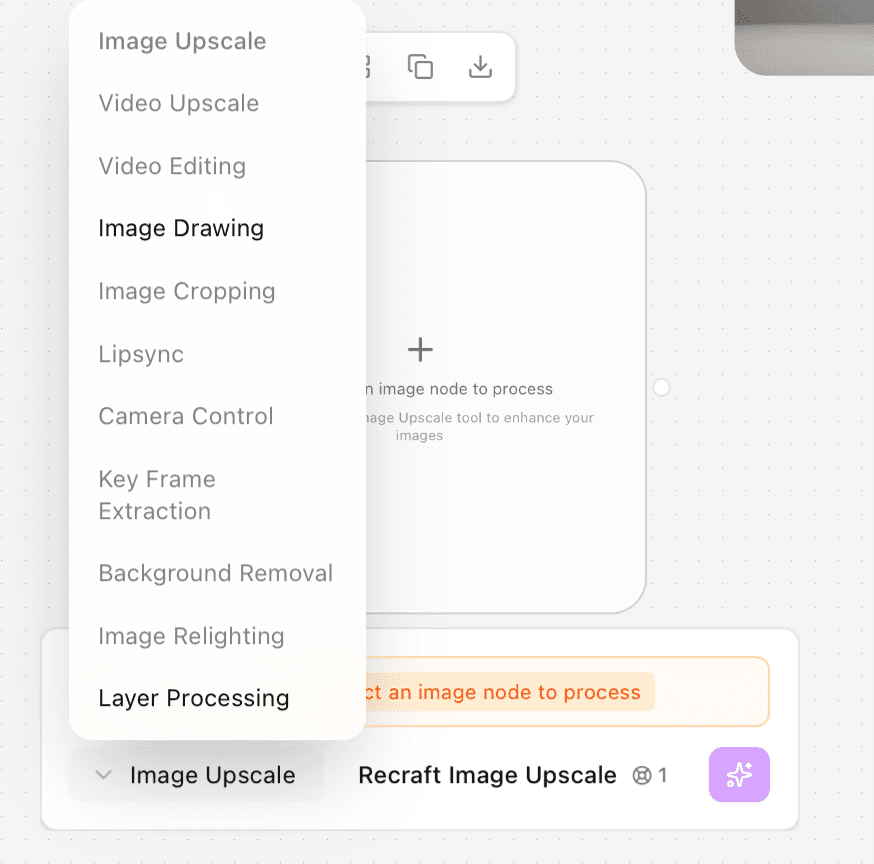
Figure 4.2. The available tool menu in the tested workspace; no Sequence Builder or direct NLE export is shown.
Minimum handoff package
The downloaded package contained approved images, narration, music, rejected motion files retained for decision history, and a selection archive. File names alone were not treated as the edit decision; A13 and A14 supplied picture order, timing intent, exclusions, and the final-hold instruction.
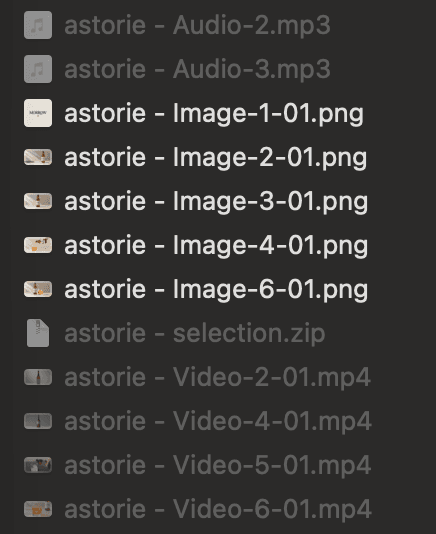
Figure 4.3. Downloaded MORROW assets: approved audio and stills plus retained motion tests.
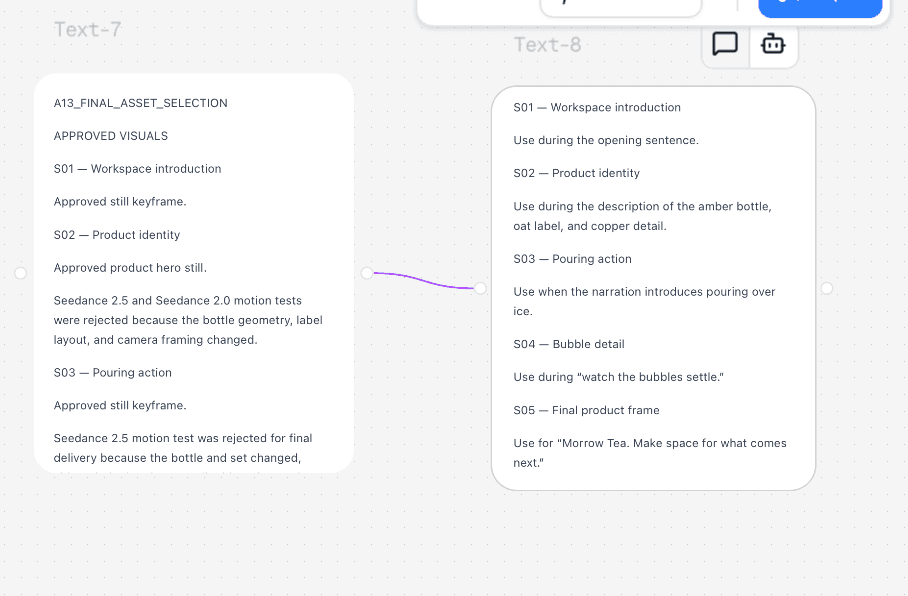
Figure 4.4. A13 connected to the first picture-order handoff note.
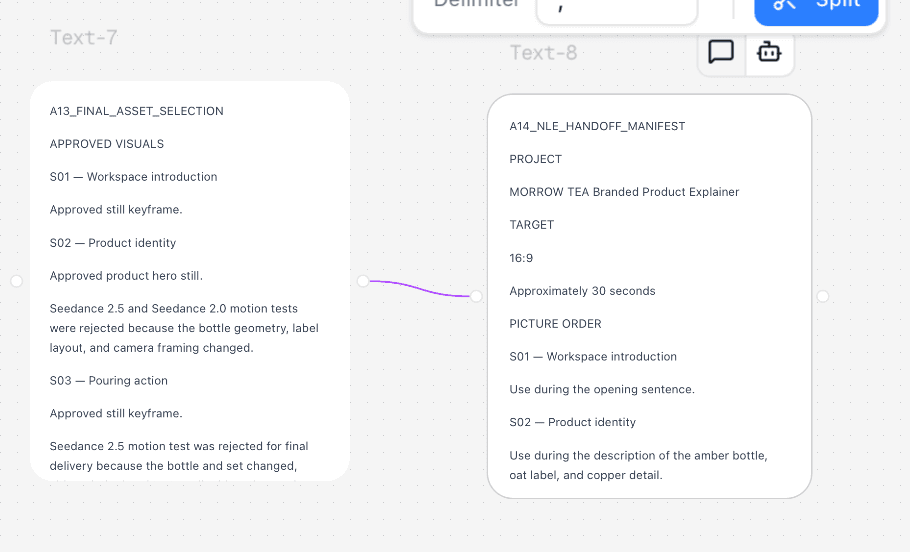
Figure 4.5. A13 connected to A14, the structured NLE handoff manifest.
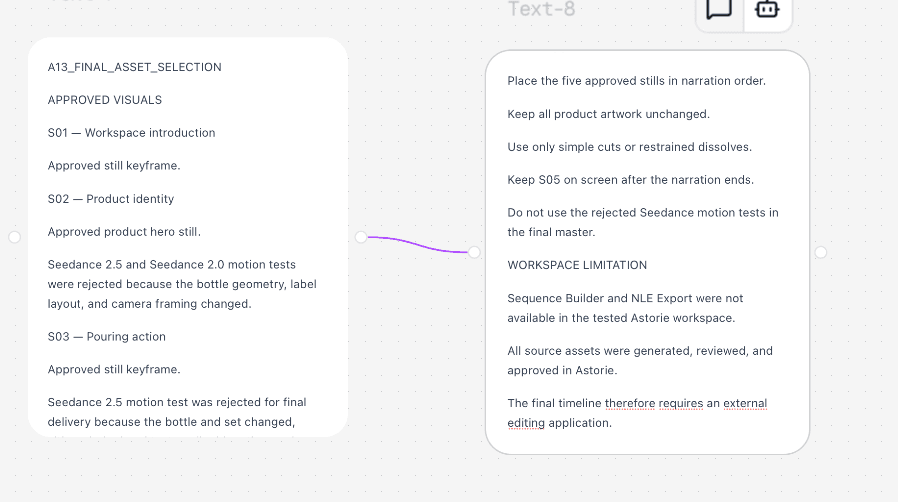
Figure 4.6. A14 records edit rules and the workspace limitation.
Handoff decision
Sequence Builder and direct NLE export were not available in the tested Astorie workspace. All source assets were generated, reviewed, and approved in Astorie, and the final timeline therefore requires an external editing application. The minimum package is still usable because it contains approved picture, narration, music, picture order, runtime target, rejection notes, and a final-hold instruction. A production-grade package should add frame rate, source resolution, caption text, rights metadata, audio stems, and export specifications before the editor begins.
Frequently Asked Questions
What is the minimum AI video production pipeline?
At minimum: brief, script or shot plan, canonical references, labeled candidate takes, a continuity review, an NLE handoff, a finished master, and an archive containing prompts and decisions.
Do I need one AI video model or several?
Start with one route. Add another only when a specific shot constraint repeatedly fails. A multi-model workflow helps when the project contains genuinely different jobs; otherwise it increases review and versioning cost.
What should I export for the NLE?
Export the highest practical quality the selected route and storage plan support, preserve source frame rate and aspect ratio metadata, and follow the editor or client specification. Keep audio stems separate when remixing, localization, or later replacement is expected. Do not assume one codec is correct for every NLE or delivery.
Where does Astorie end and the NLE begin?
Use Astorie to organize references, prompts, branches, variants, and selected generated assets. Use the NLE for frame-accurate conform, sound, color, captions, graphics, mastering, and delivery.
How do I budget AI video generation?
Budget attempts, not only seconds. Estimate concept drafts, continuity corrections, final candidates, and one fallback route. The usable-output cost is the total generation spend divided by approved shots, not the price of the first render.
Ready to try it on the canvas?
Open Astorie and fan your prompt across every frontier model in one workflow.