

How to Remove Objects from Video with AI
To remove an object from a video with AI, connect the original clip to a video editor and describe what should disappear. Include its reflection, shadow and movement, then name the subject and action you want to keep. Compare the result with the source before replacing the shot in your edit.
We tried this in Astorie with a red cup beside a backpack, then with a hand crossing the cup and a reflective surface. The cup disappeared in the comparison frames, but the hand-contact edit also changed the performance. The steps below show how to make the request and where to look when the result falls short.
How to remove an object from a video with an input clip
Reuse the existing shot instead of generating a new scene to hide one distraction. Keep the original export, identify its required action and usable range, and list the target plus its shadow, reflection or color spill. That short brief becomes both the prompt input and the result checklist.
Start with a simple, clearly separated target. Our first shot places a red paper cup beside a dark-green backpack on a gray bench. With the camera locked off, the nearby bench and wall give the editor a clear background to reconstruct.
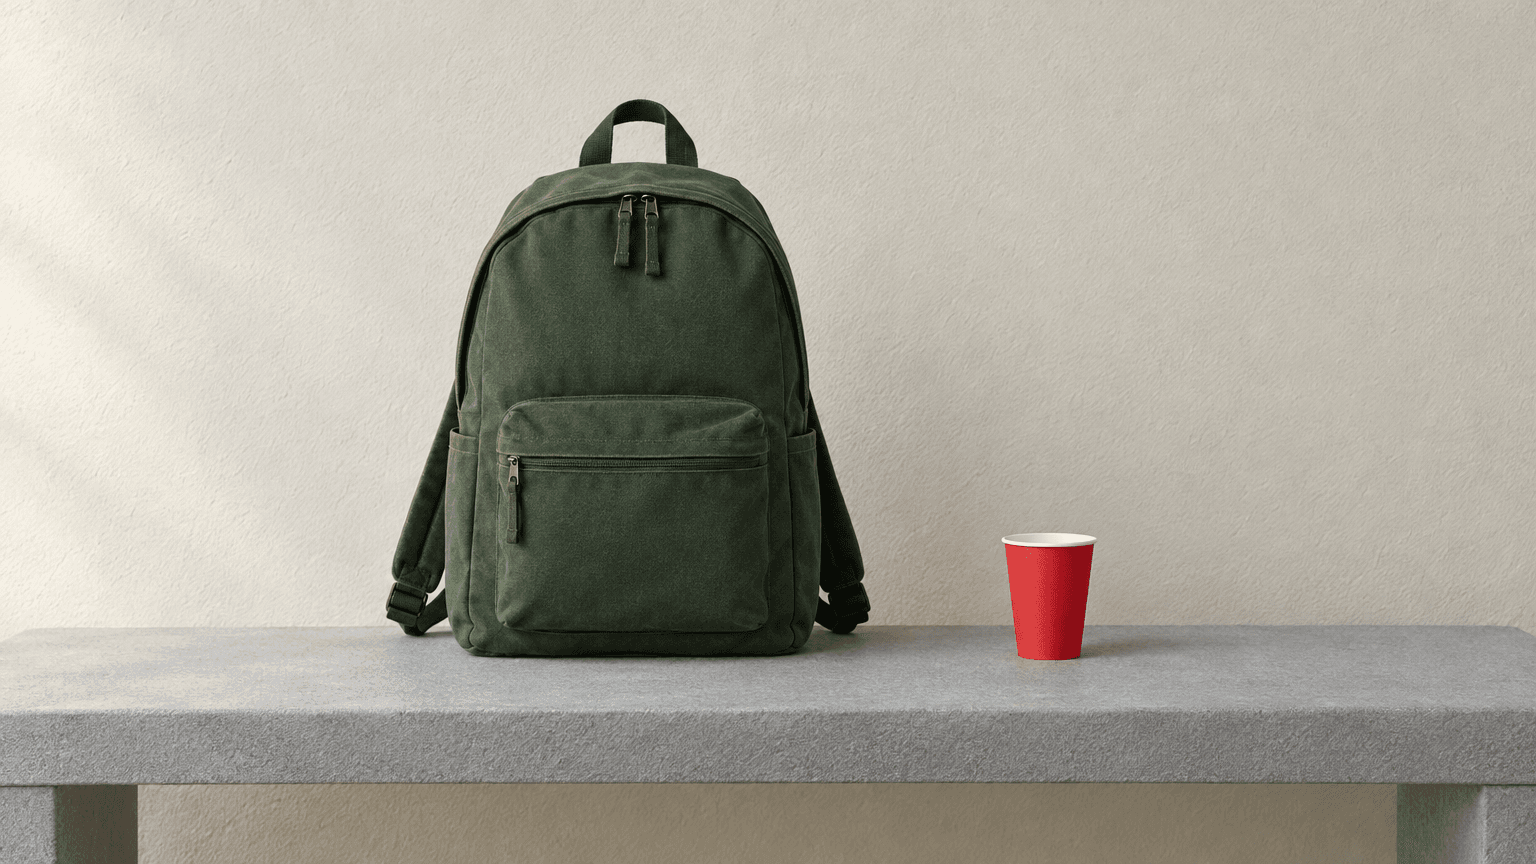
Figure 1. The red cup is separated from the backpack, with visible wall and bench texture around the removal area.
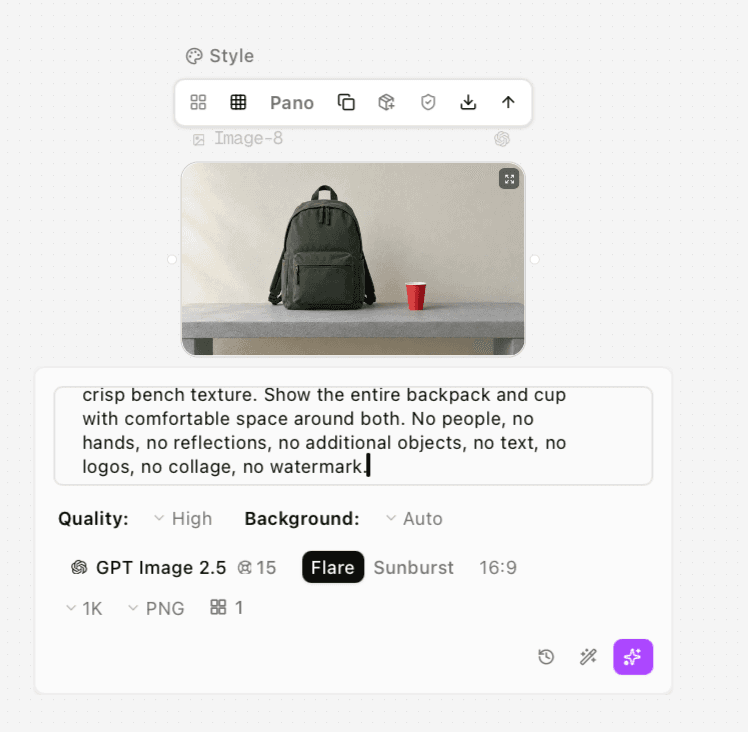
Figure 2. The starting still uses GPT Image 2.5, Flare, High quality, Auto background, 16:9, 1K and PNG.
Step 1 Load the original video on the canvas
Open your Astorie project and add the source video to the canvas, using Upload for a file you already have. Keep it as an original node so the edited candidate can be compared beside it. If you first generate a source clip from an image, that is a separate preparation step.
If you make a source from a still, keep that step separate from the removal. Our source-generation setup uses the still in Reference Images; the later edit uses the resulting moving clip in Input Video.
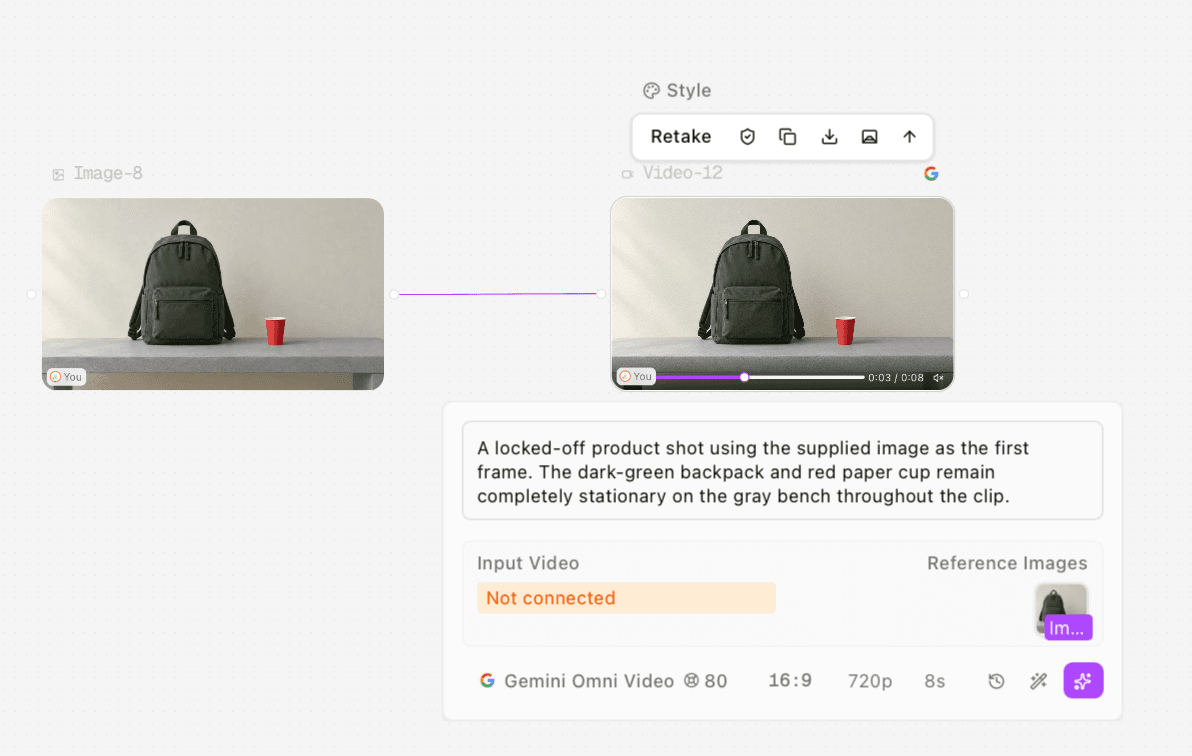
Figure 3. The baseline motion source used Gemini Omni Video with the still as a reference image, 16:9, 720p and 8s. Input Video is not connected at this source-generation stage.
Step 2 Open Video Edit from the source
Choose Video Edit from the source video node, then select Gemini Omni Video for the route used here. Check that the source thumbnail appears in Input Video before generating.
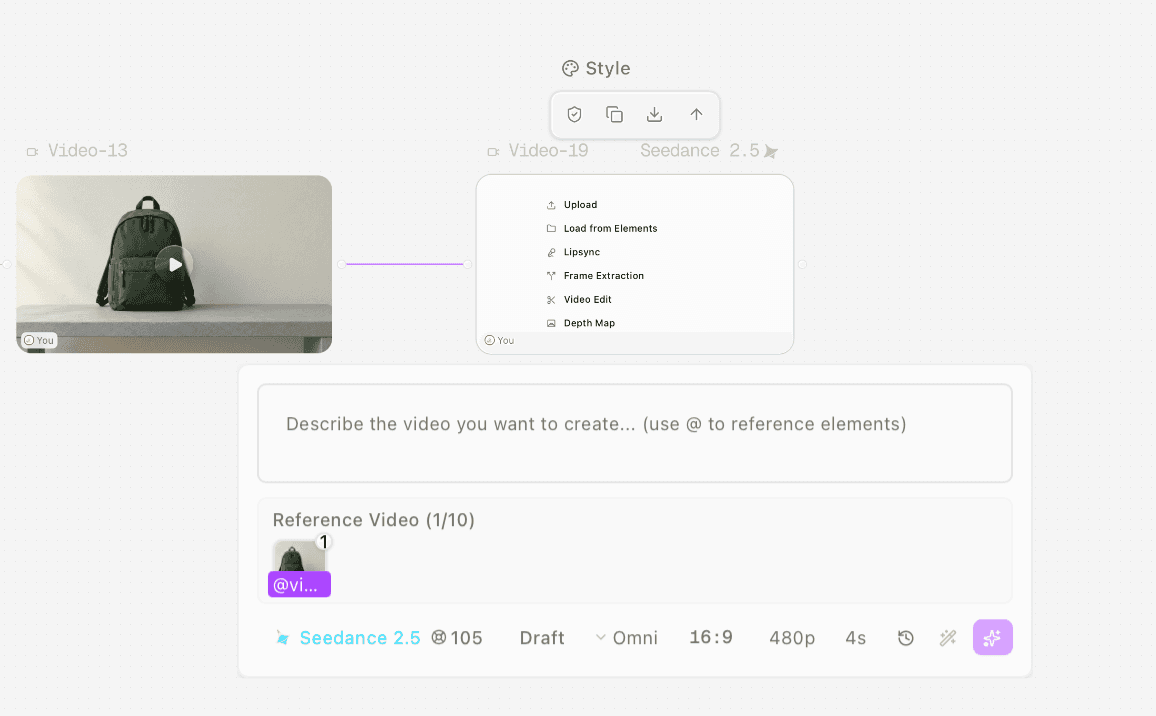
Figure 4. Open Video Edit from the source node, then choose the model you intend to use. This menu view shows a newly opened Seedance 2.5 node; our removal examples use Gemini Omni Video.
Our removal nodes use the moving clip in Input Video and leave Reference Images empty. For the surrounding steps, follow the guide to editing an existing video.
Step 3 Describe the target and the area to reconstruct
Name the object, its position and associated effects, then list the subject, performance and camera details you want to keep. Make the request specific enough that you can compare each of those details with the source.
Use the templates below as starting points for your own footage. Replace the object and setting with what is actually in your clip, including any movement or overlap.
Suggested template for a simple removal: “Remove only the red paper cup to the right of the dark-green backpack, including its white rim and its contact shadow. Reconstruct the area behind and beneath it with the surrounding cream wall and gray bench texture. Keep the backpack, its straps and zippers, the bench geometry, lighting and camera framing unchanged. Apply the removal throughout the clip, beginning with the first frame. Do not add objects or change the shot.”
Check the named details after generation, especially straps, zippers and the edge where the cup touched the bench.
Step 4 Set the output and generate one candidate
For our removals, we connected the source as Input Video in Gemini Omni Video, left Reference Images empty and selected 16:9, 720p and 6s. Keep the completed output beside the original so you can compare the same moments.
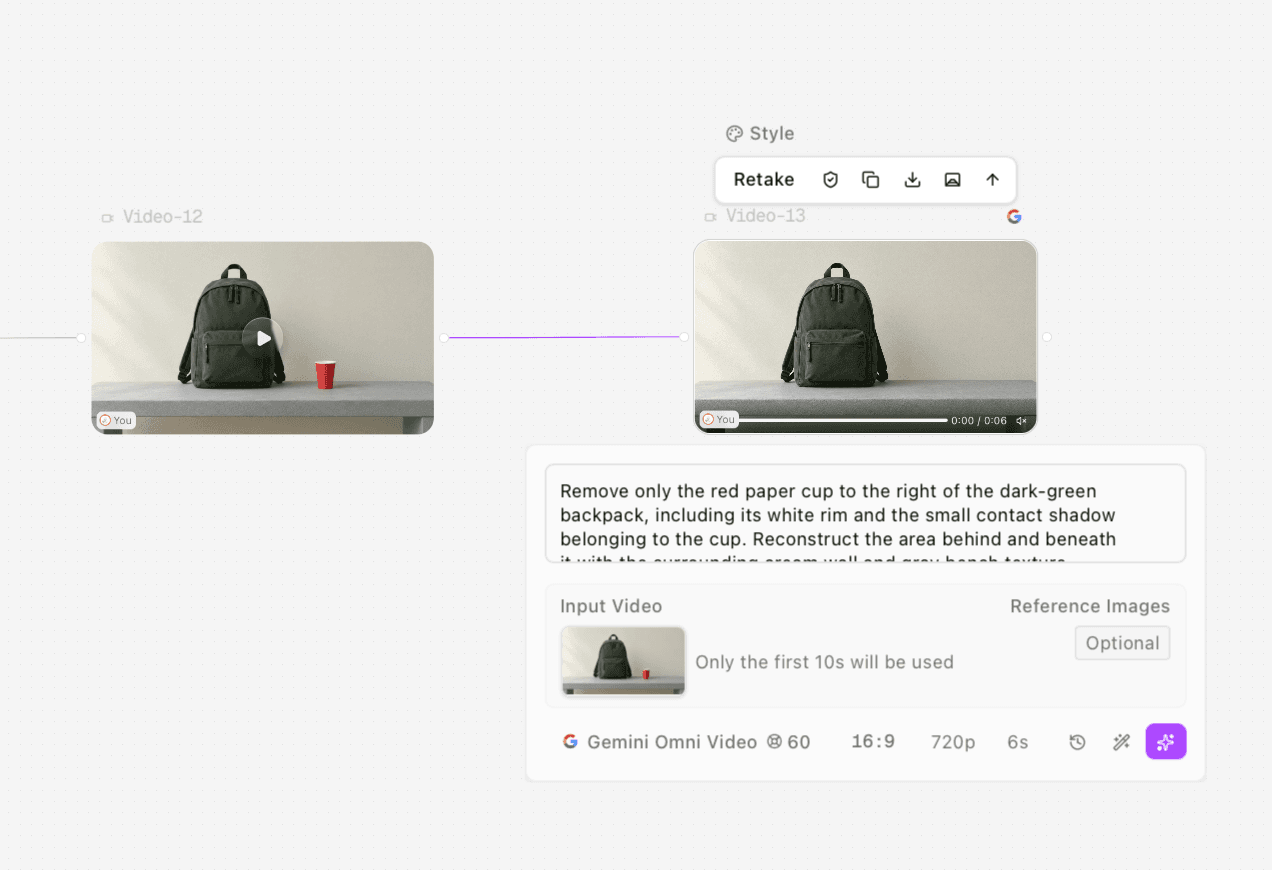
Figure 5. The completed baseline removal node shows the source video connected in Input Video. The red cup is absent from the displayed result.
Check the quote shown in your node before generating. A price displayed in an older screenshot may differ from the quote for your current settings.
Step 5 Compare the target and protected regions
Check the opening, middle and end, then the moments when the object moves or becomes hidden. Compare the filled bench and wall, the backpack’s details and any remaining shadow. A clean fill can still be unusable if the hand or product changes.
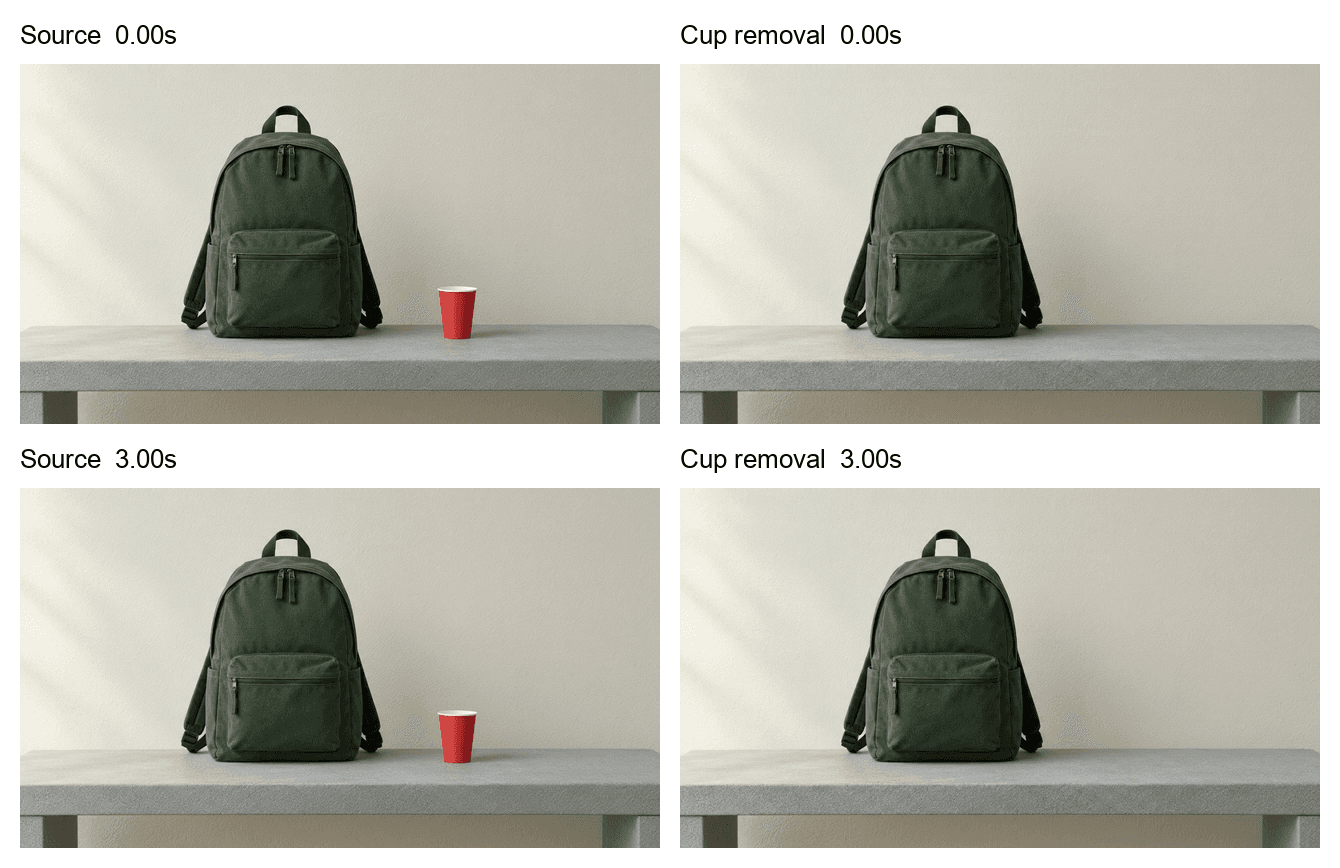
Figure 6. At the opening and 3 seconds, the cup is absent and the backpack’s broad outline remains. Look closely at the filled bench and nearby edges.
Baseline source with backpack and red cup on the bench.
The red cup is removed from the bench. Compare the filled area with the source.
Step 6 Download and check the actual file
Download the completed MP4 from the result toolbar and give it a distinct filename. Reopen that file to check the duration, dimensions and action you need; use the downloaded video when planning your cut.
Case | Source file | Edited file | Consequence |
|---|---|---|---|
Simple bench | 1280 × 720, 24 fps, 8 seconds | 1280 × 720, 24 fps, 6.5 seconds | Recheck usable range and handles |
Hand reveal and contact | 1280 × 720, 24 fps, about 8 seconds | 1280 × 720, 24 fps, about 6 seconds | The same-length performance was not delivered |
Moving camera and reflection | 1344 × 768, 24 fps, 8 seconds | 1280 × 720, 24 fps, 6.5 seconds | Check dimensions, framing and range before conforming |
The removal outputs are shorter than their sources, so check that the required action and handles still fit. Conform the selected result to your edit and restore or finish the approved sound before delivery.
When a hand crosses or picks up the object
Use the entire moving clip, not a still of the uncovered cup. Check before the crossing, at maximum occlusion, during the reveal and after contact. The fill must respect the hand in front of it, and an object that is lifted must be removed at its new position too.
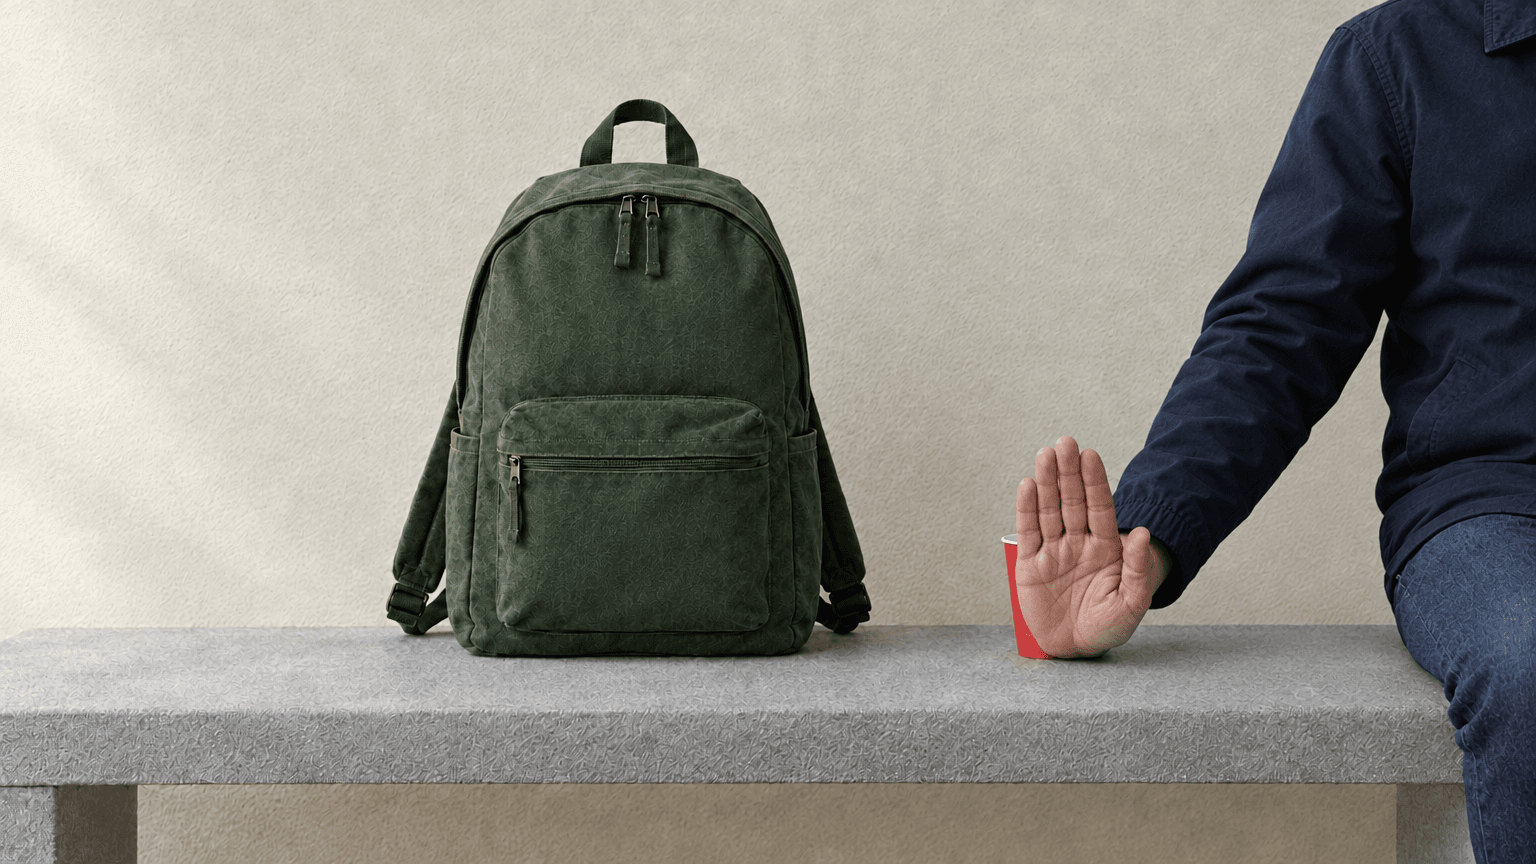
Figure 7. The hand partly hides the cup in this starting reference, making the reveal and contact the important moments to check.
Our Veo 3.1 Fast source begins with the cup partly hidden, then reveals and lifts or repositions it. That makes the target harder to remove than a stationary cup: the edit has to follow it off the bench while retaining the hand in front.
Suggested template for a moving target: “Remove the red paper cup from the entire input video, including its rim and associated shadow. Follow its actual movement: remove it from the bench and from the person’s hand when it is lifted or repositioned. Reconstruct the background naturally while preserving the hand’s anatomy, motion, sleeve and the backpack. Do not remove the hand or create a new object.”
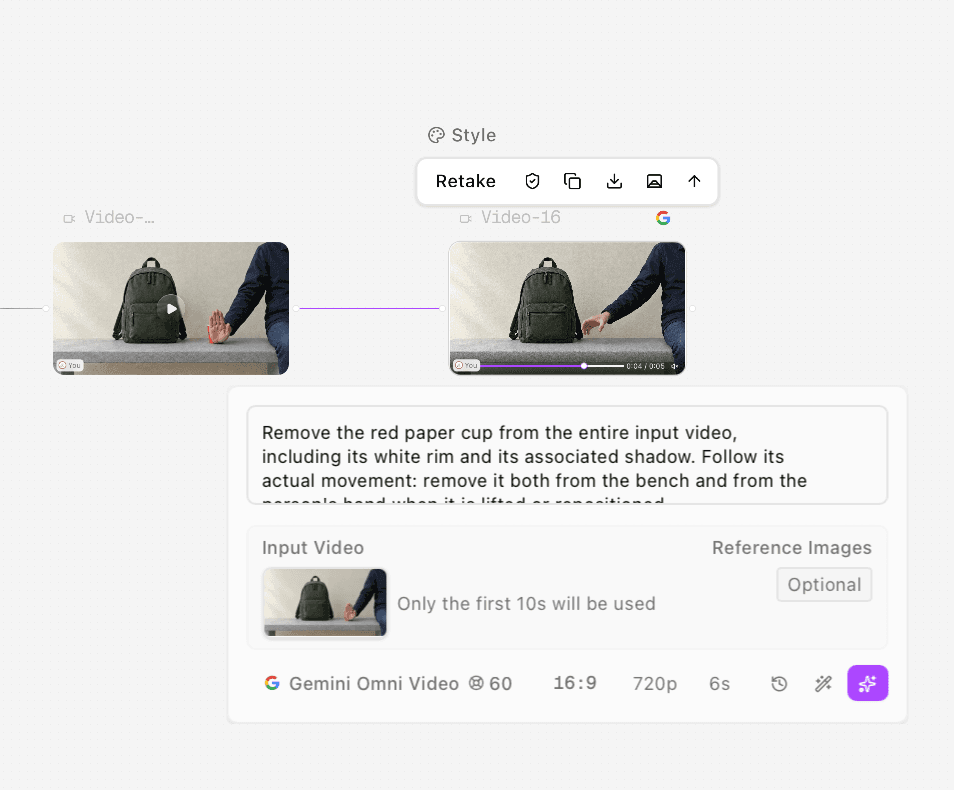
Figure 8. The completed contact-case edit uses the actual moving source in Input Video. The prompt explicitly follows the cup when it leaves the bench.
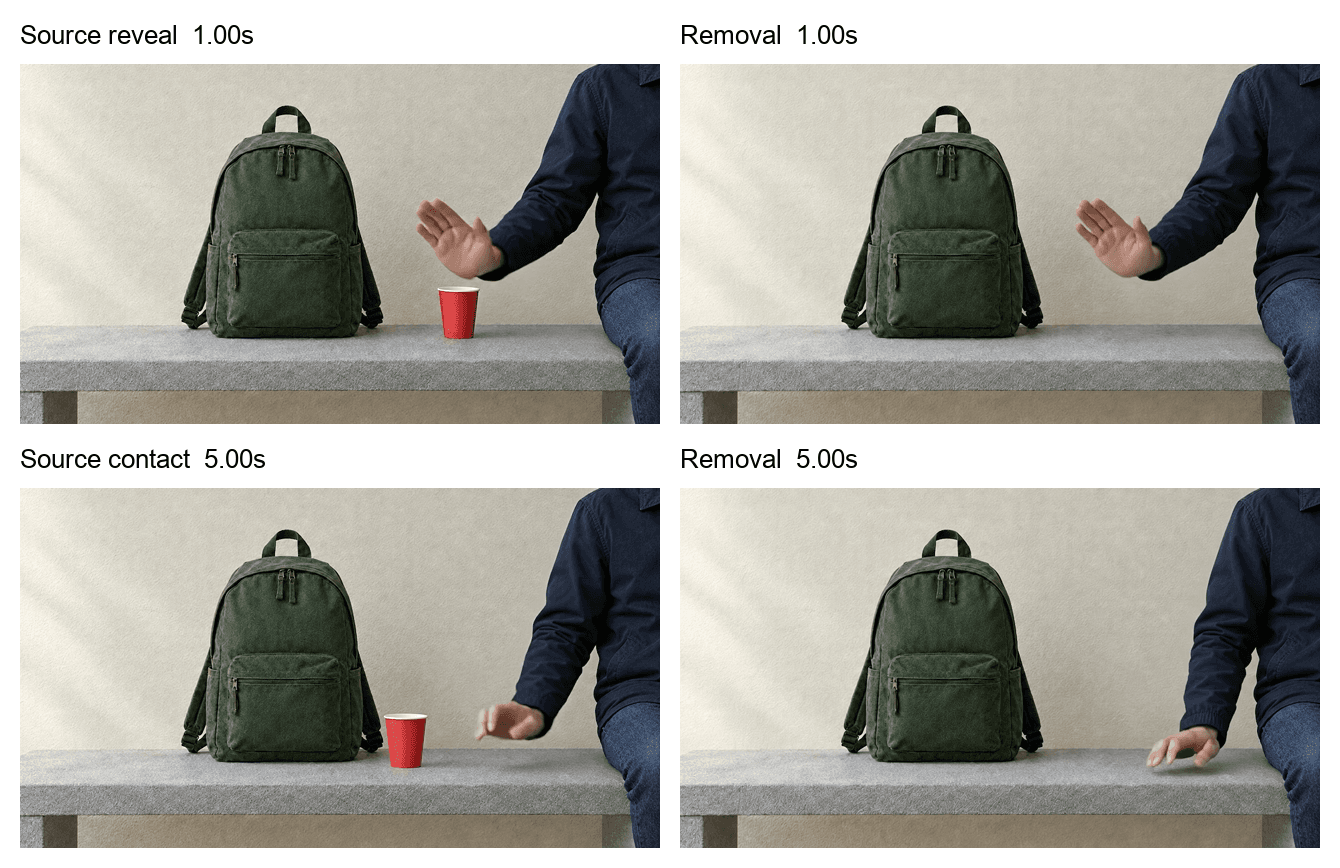
Figure 9. The cup is absent around the reveal and later contact, but the hand settles earlier near the end of the shorter output.
Hand-occlusion source that later lifts or repositions the cup.
The cup-removal result changes the later hand timing. Compare the performance as well as the fill.
Remove the reflection while preserving the product reflection
A reflection is another image of the unwanted object. Leaving it behind can make the removal immediately obvious. Describe the target reflection explicitly and distinguish it from reflections that belong to protected objects.
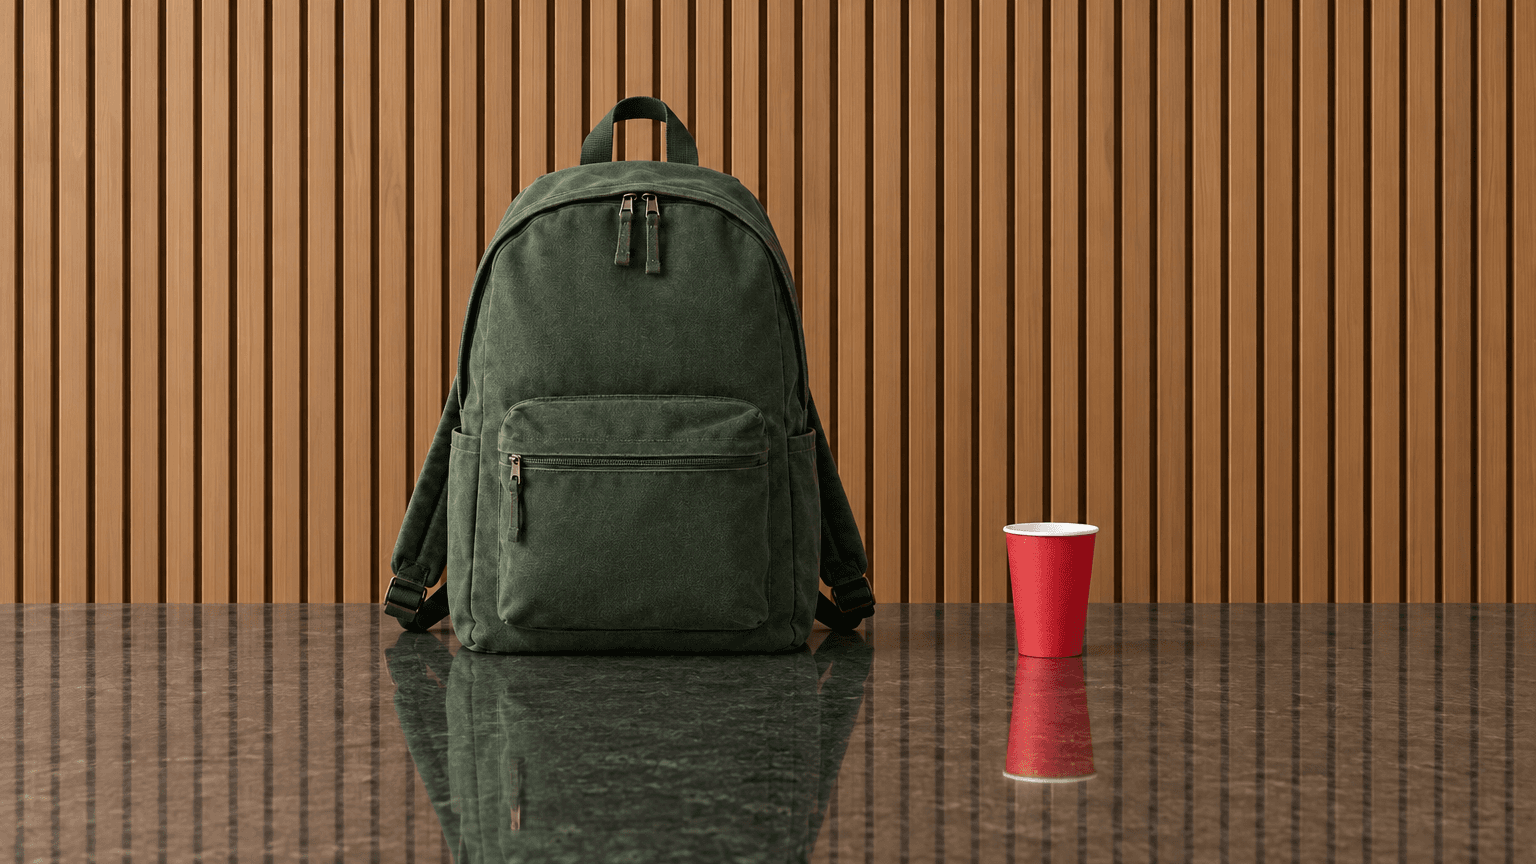
Figure 10. The reflection reference places the backpack and cup on polished dark stone. The red cup reflection and the backpack reflection are distinct review regions.
We made the reflective source with MiniMax H3 Omni, selecting 768p and 8s. The camera moves slightly, so the reconstructed stone and reflections need to remain plausible as the view changes.
Suggested template for a reflective surface: “Remove the red paper cup and its entire red reflection from the input video, including the white rim, reflected rim, contact shadow and any red color spill on the polished countertop. Reconstruct the stone texture and its reflections consistently with the camera movement. Preserve the dark-green backpack, its own reflection, wood-slat wall and lighting.”
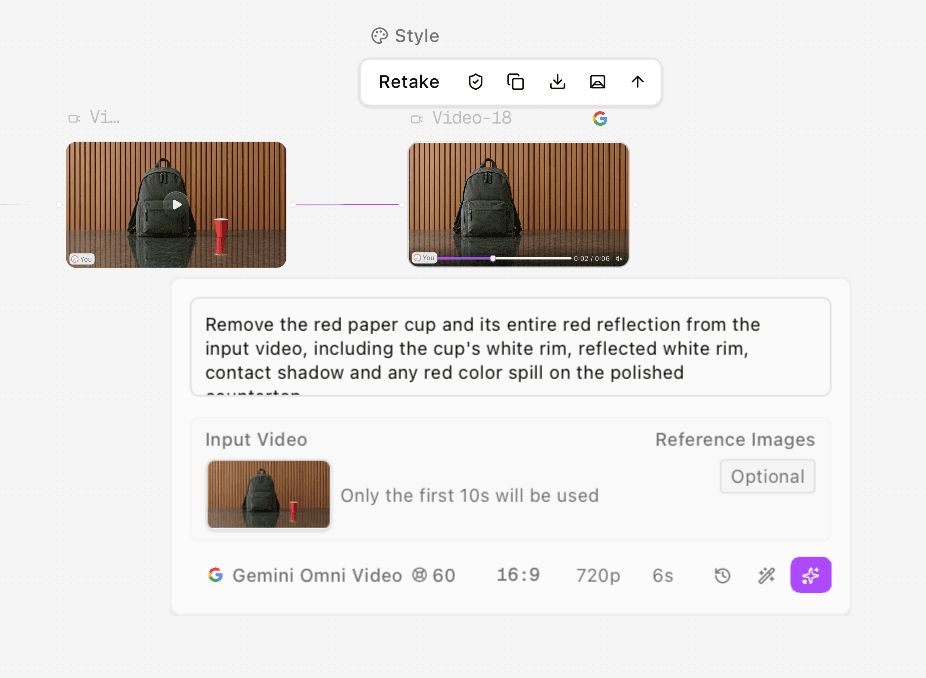
Figure 11. The removal instruction names both the cup and its reflection, with the moving source connected as Input Video.
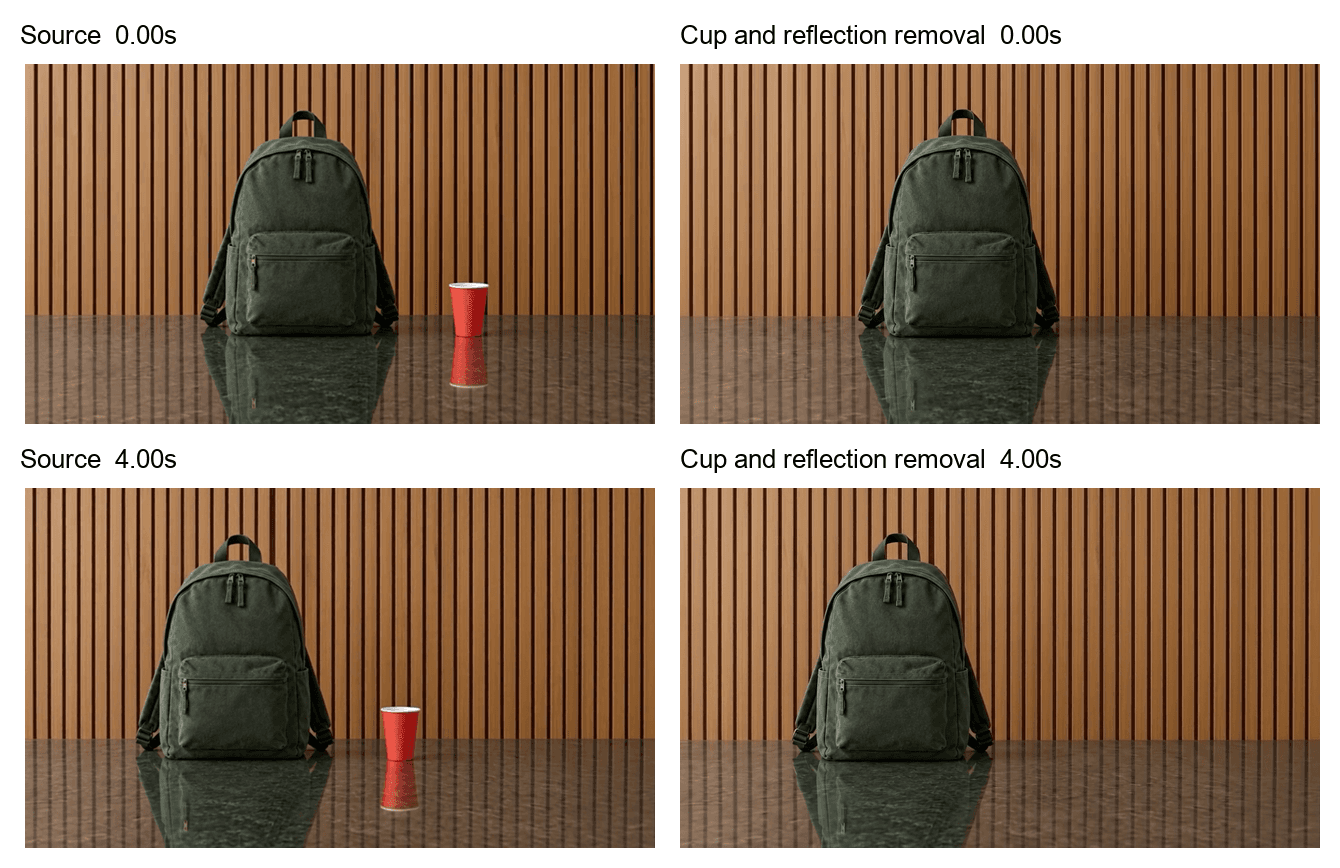
Figure 12. The cup and red reflection are absent in these comparisons, while the backpack’s reflection remains. Check the stone texture and wood-slat lines around the filled area.
Moving-camera source with the cup and its red reflection.
The cup and its red reflection are removed in these comparisons; the backpack’s reflection remains.
Troubleshoot the specific failure
Visible problem | Next action | When to use another method |
Object remains in later frames | Name its movement and all affected positions; verify Input Video | Tracking remains inconsistent |
Shadow or reflection remains | Include that associated effect explicitly | Precise lighting reconstruction is required |
Hand or product changes | Narrow the brief and compare protected details | Performance or identity must be preserved exactly |
Background swims with camera motion | Review landmarks across the moving interval | A tracked clean plate or controlled fill is needed |
Output is too short | Check selected duration and actual export before conforming | Required action cannot fit the available output route |
If a generative edit keeps changing required hand motion or product detail, switch to a method with more regional control. Adobe’s Content-Aware Fill documentation describes a mask-based alternative. The video inpainting guide explains how regional filling differs from a prompt-based edit.
Frequently asked questions
Can the editor remove an object hidden behind a hand
A crossing hand makes the reveal and contact harder. In our example the cup disappears in those comparisons, but the edited hand settles earlier. Check the performance before deciding whether the removal is useful.
Do I need a reference image for this workflow
For this route, connect your moving source as Input Video. We left additional reference images empty; the stills shown earlier were used to make the sources.
Will the rest of the shot remain identical
A generative edit can change nearby detail. Compare the product, performance and lighting with the original, then use the video quality control checklist on the final export.
Ready to try it on the canvas?
Open Astorie and fan your prompt across every frontier model in one workflow.