

How to Change a Video Background with AI
To change a video background with AI, connect the original clip and describe the setting you want, along with the person, action and framing to retain. We used Kling O3 Video Edit in Astorie to replace a plain room with a bright conservatory. The broad action remained recognizable, while the glass and reflections changed.
This route lets you try a new location through an edit prompt. If the foreground performance or product must stay exact, use the original footage in a controlled composite instead. Hair, moving fingers and transparent objects are the details most likely to influence that choice.
Change the setting from the existing clip and a clear brief
Write down the new environment and the foreground details you need to keep. In our example, the room can change; the woman, navy blouse, hand movement, glass and counter should remain recognizable. Keep that list beside the result when you review it.
Requirement | Tracked matte and compositing | Source-video generative edit |
|---|---|---|
Keep approved face, wardrobe and product detail | Retain the original foreground footage behind a refined mask | Ask for preservation, then verify the output |
Replace the environment | Put a separate background below the isolated foreground | Describe the replacement environment in the edit prompt |
Hair, motion blur and transparent objects | Refine edges and use separate masks where needed | Inspect each risky moment for regenerated details |
New reflections and contact with the set | Build and adjust them deliberately | May change with the generated environment |
Deliverable | A composite; transparency depends on the actual export format | A finished image sequence or video, not automatically an alpha foreground |
Best fit | Strict product or performance preservation | Flexible location changes with room for visual variation |
Adobe’s Object Mask background-replacement guidance explains the compositing option. The source-video steps below show how we tried the new setting through an edit prompt.
Prepare the original clip
Keep the original export and choose the action range you need. Note its frame rate, duration and dimensions so you can compare the edited file with the source and put it back into the timeline correctly.
Our source shows a woman in a navy blouse behind a gray counter. Her right hand crosses her cheek to tuck her hair, while her left hand holds a clear glass on screen right. The clip is about five seconds long at 1280 × 720 and 24 fps. Those overlaps make the face, hair and glass useful places to compare after the room changes.
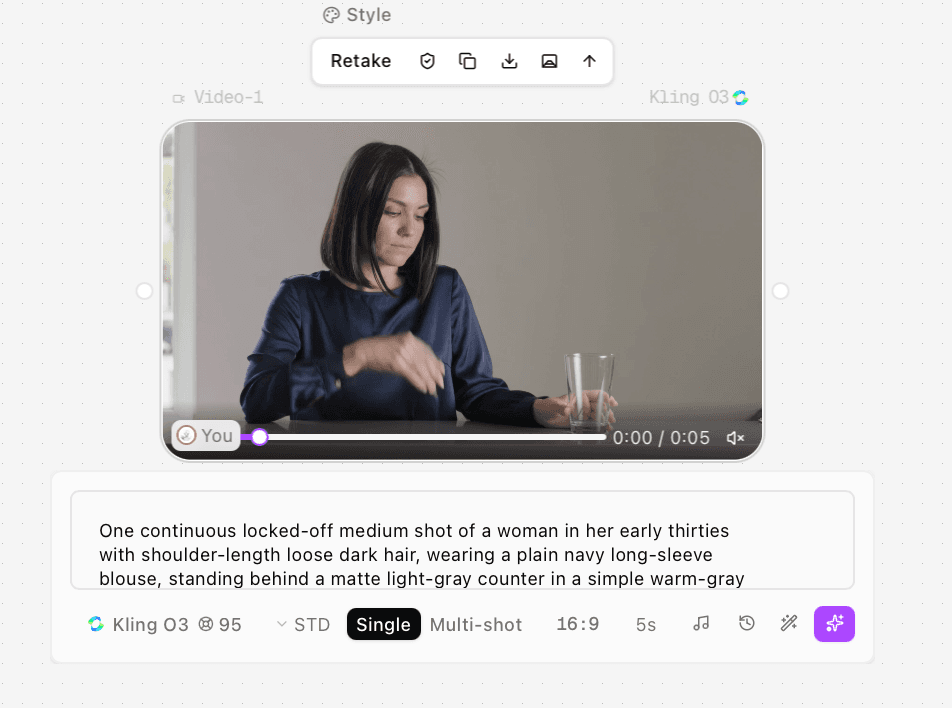
Figure 1. The source was generated with Kling O3 STD, Single, 16:9 and 5s. Her hand crosses the face while the other hand holds a clear glass.
Original woman-and-glass source. Compare action timing and protected details with the environment edits.
Before editing, mark the face and clothing as protected, along with the counter, glass silhouette, hand path, action timing and locked-off framing. Let the new room change the environmental reflection in the glass, but do not let that permission expand into a different glass or a new grip.
When the foreground must remain exact
Keep the original foreground in a controlled composite when its exact details must survive. A tracked mask separates it from the old background; refine the edges before placing the new environment behind it.
Inspect hair against the new background and step through the hand crossing the cheek. These overlaps need attention whether you refine a matte or evaluate a generative edit.
Transparent glass is a separate acceptance problem in either route. Check its rim, fingers, shape, transmitted background and reflections. A convincing room does not compensate for replacing the approved glass or changing the grip.
Decide whether you need a finished video or an isolated foreground with transparency. Our AI edit produces a finished video. For an alpha foreground, choose an export workflow that supports transparency.
Use the original video and an environment prompt in Astorie
In the steps below, the original clip is the moving footage to modify, and the prompt describes the new room. Keep those roles separate from a first-frame image or appearance reference. The existing-video guide explains the input-video workflow in more detail.
1 Add the source and choose the exact edit variant
Open an Astorie canvas and add or upload the original video. Choose Video Edit from its video actions, select Kling O3 Video Edit and connect the source as Input Video. We left Image Reference empty for this edit.
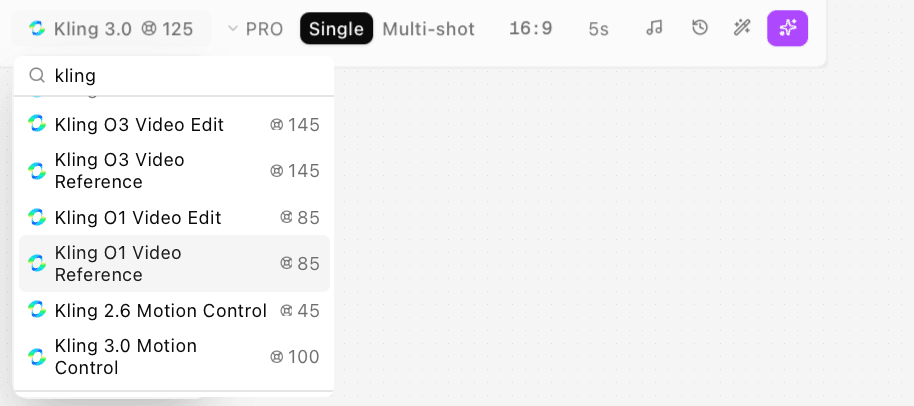
Figure 2. Choose Kling O3 Video Edit rather than Video Reference when you want to modify the connected footage.
2 Choose the edit settings
We used PRO for this edit. The downloaded result is 1920 × 1080 at 24 fps and keeps the source’s approximate five-second duration. Check your current node settings and quote before running, then inspect the downloaded file before conforming it to the edit.
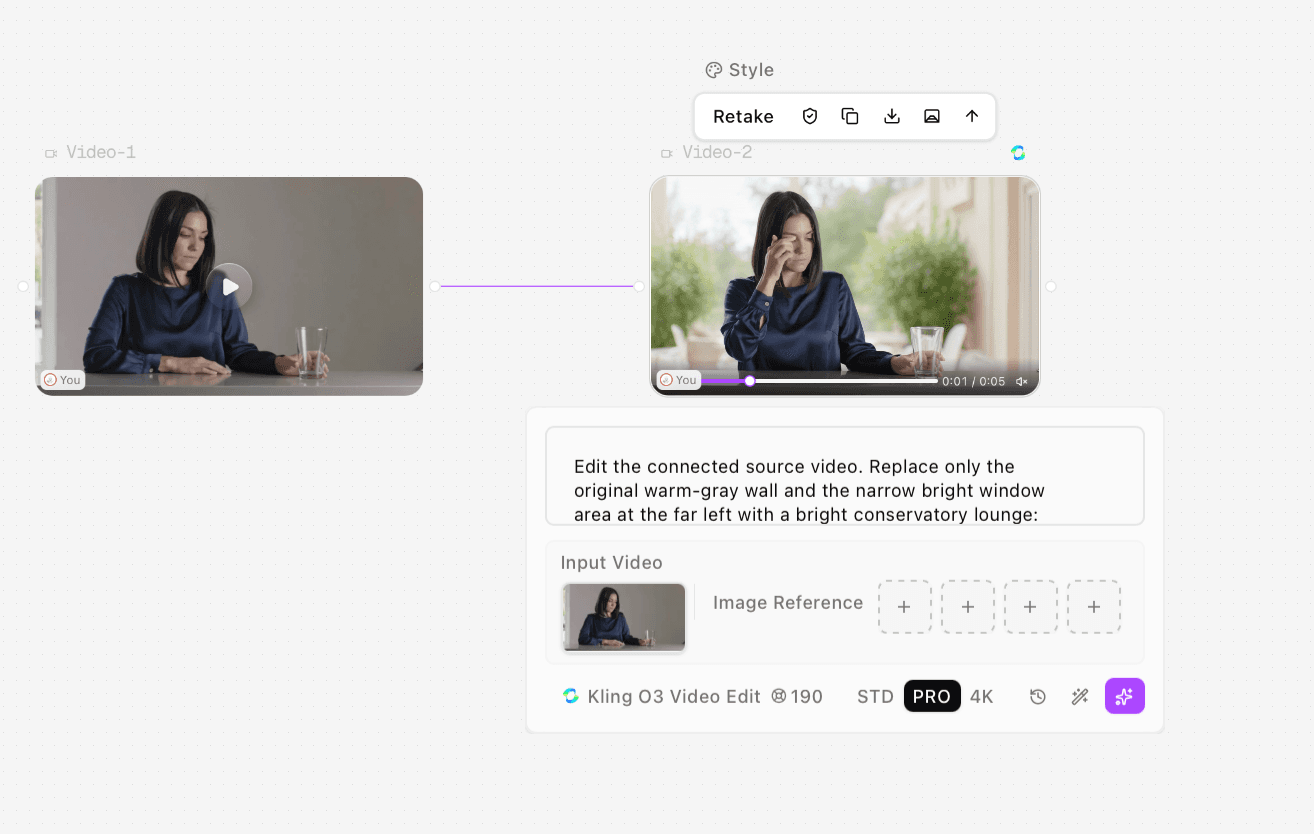
Figure 3. The completed Kling O3 Video Edit PRO setup uses the original clip as Input Video, with the image-reference slots empty.
3 Specify the change and the protected details
We used this edit prompt:
Edit the connected source video. Replace only the original warm-gray wall and the narrow bright window area at the far left with a bright conservatory lounge: pale stone walls, large softly defocused green plants, and soft diffuse daylight coming from camera left. The new background remains stationary throughout the shot, with no people, signs, or text.
Preserve the original woman as the same person, including her facial features, skin tone, hairstyle, fine hair edges, navy blouse, and body proportions. Preserve her original right-hand movement across the side of her face, the hair-tucking action, and the return of her hand to the counter, with the same timing and path. Preserve the original left hand holding the clear glass. Keep the counter, glass shape and position, framing, camera angle, shot duration, and locked-off camera unchanged.
Keep the fingers, cheek, and hair correctly separated during their overlaps. Let the new background appear naturally through the transparent parts of the glass while keeping its rim, shape, and visible fingers intact. Adapt only the subtle environmental reflections in the glass and on the counter to the new setting. Preserve the existing soft illumination on the woman. No new gestures, extra fingers, changes to the face or clothing, camera movement, zoom, cuts, or added objects. No audio.
4 Generate and download the result
Check the input thumbnail and quote, then generate. Download the completed MP4 and keep the source beside it. Give each version a distinct filename so the later review cannot mix them up.
5 Compare matching times and review the export
Check the opening, the hand crossing the face, the hair tuck and the return to the counter. Compare the same source times first; if the action is retimed, record that change rather than sliding the clips until they appear to agree. Then watch the whole usable range at normal speed and step through risky frames. Listen to the exported audio if the job requires it.
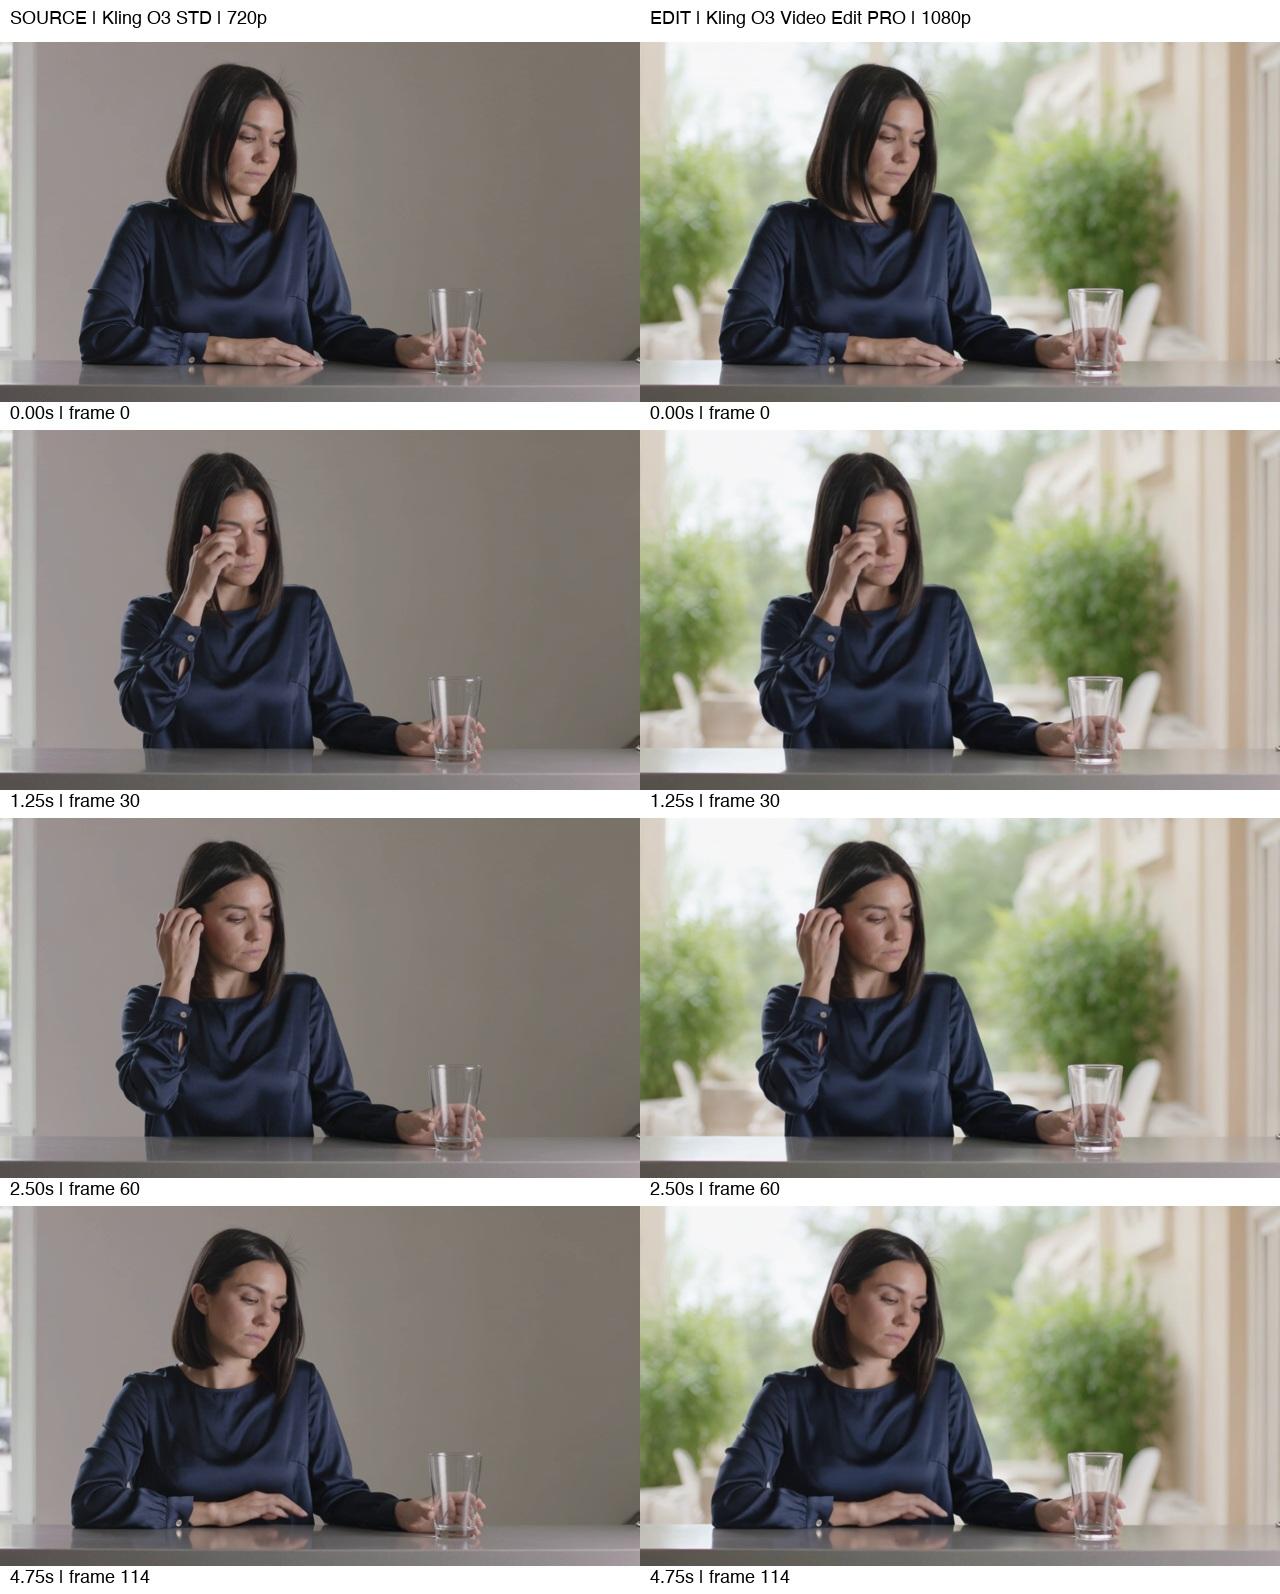
Figure 4. The conservatory replaces the plain room while the broad hand action and framing remain recognizable. Compare the glass rim and reflections closely.
O3 Video Edit PRO replaces the room with a conservatory. Compare the hair, hand overlaps and glass with the source.
The edited room has pale stone walls and soft greenery. At matching times, the woman’s broad action and framing remain recognizable, but the glass rim and reflections differ. If the glass is a featured product, those changes may rule the version out even when the new room works.
Recognize a recreation that looks like an edit
An earlier candidate from the same source shows a different result. Its screenshot identifies Kling 3.0 PRO, Single, rather than the later completed O3 Video Edit setup. The background changes, but the woman's facial appearance and neckline also change; the glass becomes shorter and moves toward the center, and the action no longer follows the source timing.
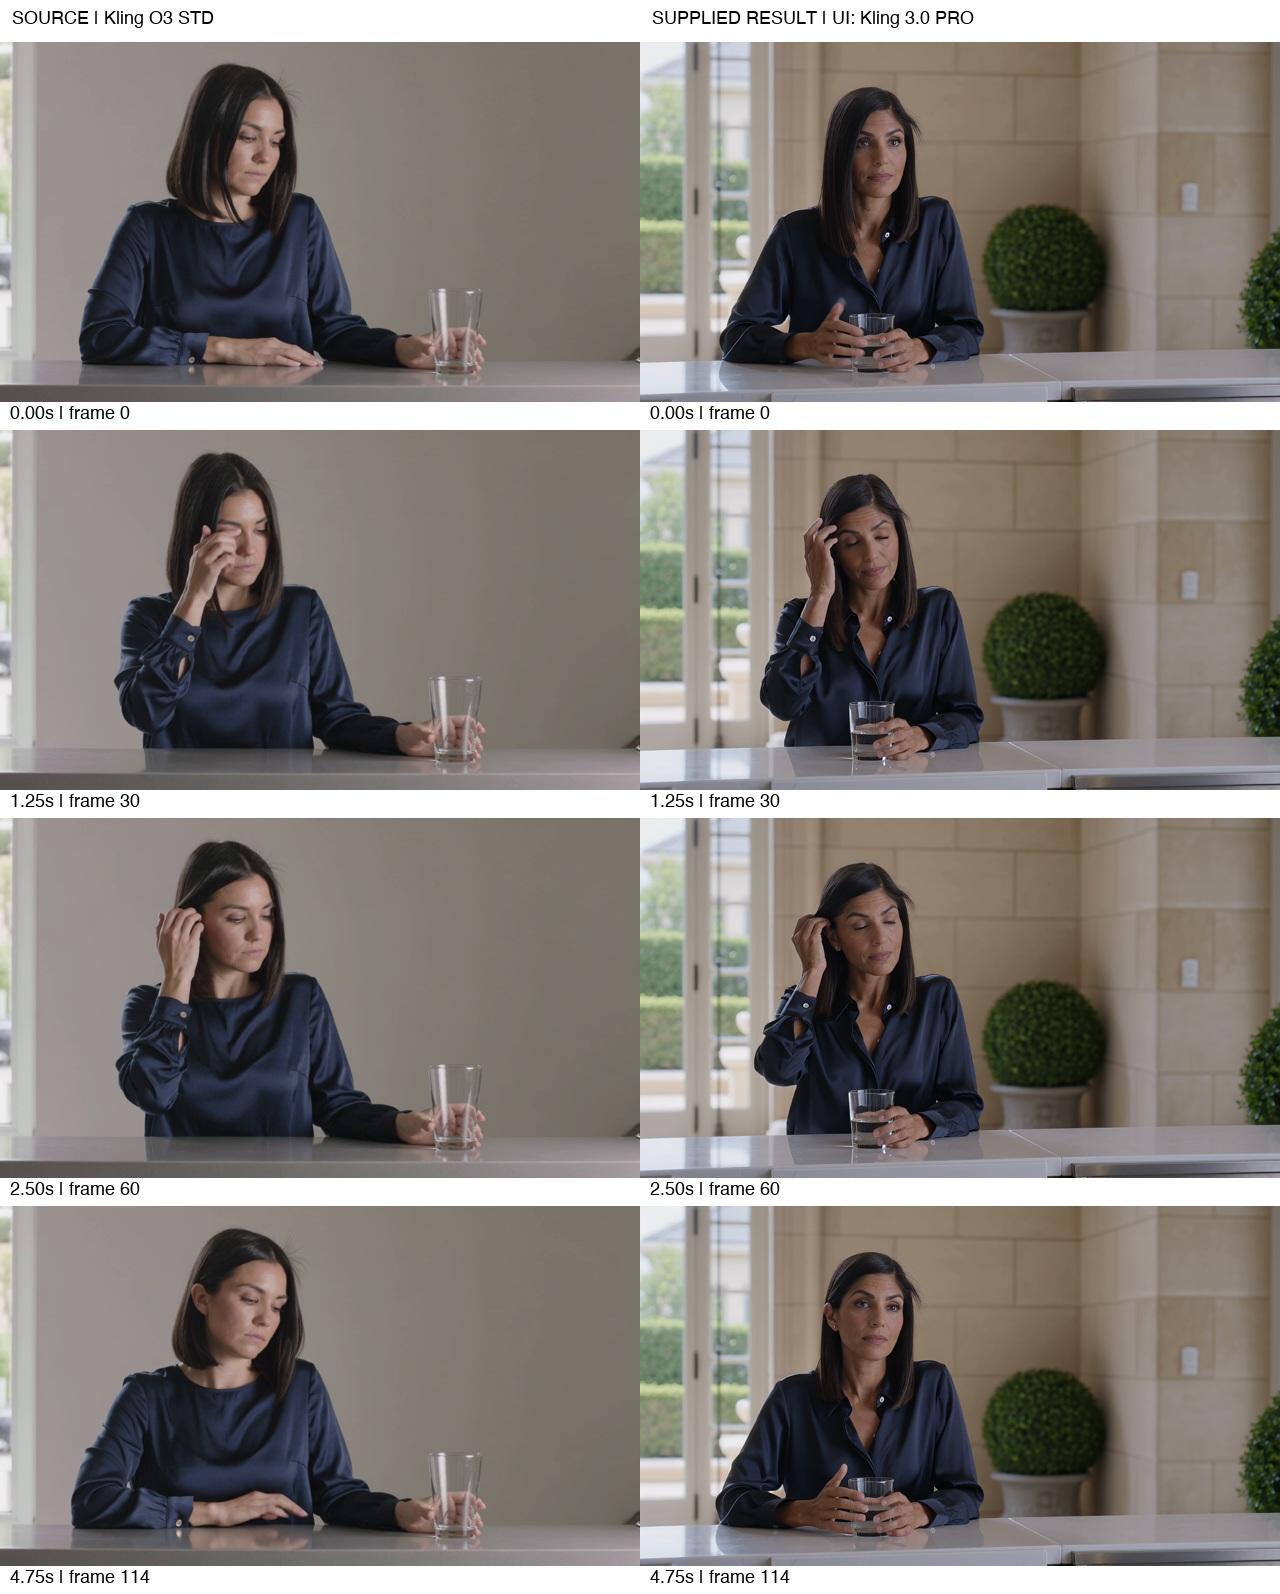
Figure 5. The earlier Kling 3.0 PRO version changes the woman’s appearance, the glass and the timing as well as the room.
Earlier background candidate with subject and glass changes; visible setup differs from the O3 Video Edit result.
Reject that version if the original woman, glass and gesture need to survive. Its visible setup differs from the O3 Video Edit run, so keep the two routes distinct when choosing which settings to try.
Check the details that backgrounds tend to expose
Area | What to inspect | What to do if it fails |
|---|---|---|
Hair and motion blur | Halos, missing strands and changing outline | Refine a matte or use a less exposed segment |
Hand and face overlap | Joined fingers, disappearing hair or altered cheek | Inspect adjacent frames; repair locally or replace the candidate |
Glass and reflections | Old wall inside glass, changing rim or grip | Separate transparency work from the subject mask |
Counter contact | Floating objects, changed shadows and reflections | Rebuild contact or reject the lighting change |
Performance and camera | Retimed gestures, new zoom or changed framing | Return to the source-video input; use compositing for strict retention |
For partial repairs, understand video inpainting and its limits. Before handoff, use a video quality control checklist on the exported file, not just the canvas preview.
Frequently asked questions
Can I replace the background without a green screen
Yes. A tracked object mask or rotoscoping workflow can isolate a subject from ordinary footage, and a source-video edit can generate a different environment. Hair, transparency and motion blur still need inspection.
Does “preserve the subject” mean every original pixel stays the same
No. A generative edit can redraw parts of the subject. For strict retention, keep the original foreground footage in a controlled composite and inspect the matte and any required repairs.
Can this Astorie edit export a transparent person
This example produces a finished video. If you need a transparent foreground for compositing elsewhere, choose an alpha-capable workflow and check the exported file’s transparency.
Ready to try it on the canvas?
Open Astorie and fan your prompt across every frontier model in one workflow.